Vegan cooking isn’t about simply replacing meat, dairy, or eggs with plant-based alternatives.
The real secret is learning a few simple cooking techniques that bring out great flavor, create satisfying textures, and help everyday ingredients shine.
Many people think vegan meals are difficult to make or that they won’t be as rich and delicious as traditional dishes.
In reality, a handful of practical skills can completely change the way you cook.
Once you know how to roast vegetables, build flavor with herbs and spices, cook grains properly, and prepare plant-based proteins, creating tasty meals becomes much easier.
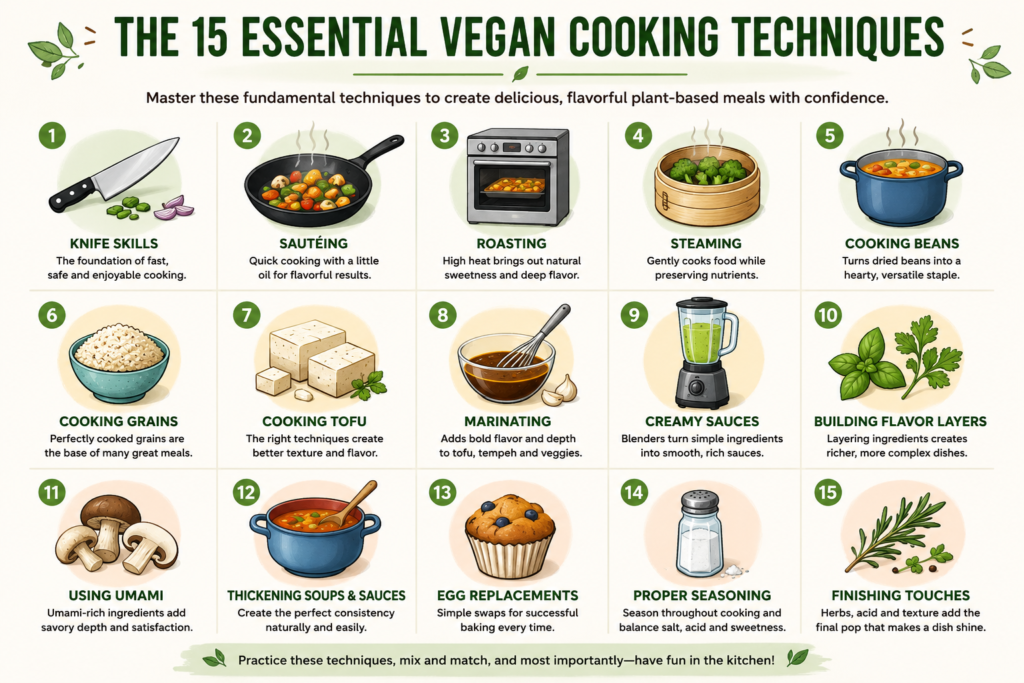
In this guide, you’ll learn the essential vegan cooking techniques every home cook should know.
| Technique | Best For | Difficulty |
|---|---|---|
| Knife Skills | Faster prep | Beginner |
| Sautéing | Quick weeknight meals | Beginner |
| Roasting | Maximum flavor | Beginner |
| Steaming | Tender vegetables | Beginner |
| Blanching | Salads & meal prep | Beginner |
| Cooking Beans | Batch cooking | Beginner |
| Cooking Grains | Meal bases | Beginner |
| Pressing Tofu | Better texture | Beginner |
| Marinating | Flavor | Beginner |
| Creamy Sauces | Dairy-free recipes | Intermediate |
| Flavor Layering | Richer meals | Intermediate |
| Umami | Savory flavor | Beginner |
| Thickening | Soups & sauces | Beginner |
| Egg Replacements | Baking | Intermediate |
| Proper Seasoning | Every recipe | Beginner |
Why Cooking Techniques Matter More Than Recipes
Understanding How Ingredients Behave
Every ingredient changes as it cooks, and learning those changes is one of the biggest steps toward becoming a better home cook.
Vegetables become sweeter when roasted because their natural sugars caramelize, creating deeper flavor and crispy edges.
Mushrooms release moisture before they brown, so giving them enough space in the pan helps them develop a rich, savory taste instead of steaming.
Tofu becomes firmer and crispier when pressed to remove excess water before cooking.
Beans continue to soak up flavor as they simmer, making herbs, spices, and seasonings even more effective over time.
Once you notice how ingredients respond during cooking, you’ll spend less time guessing and more time enjoying the process.
Building Confidence to Cook Without Following Recipes Exactly
Recipes are excellent teachers, especially when you’re starting out.
As you practice basic techniques, you’ll begin to recognize what a dish needs without checking every step.
You might swap broccoli for cauliflower, use black beans instead of chickpeas, or replace spinach with kale because you know each ingredient cooks in a similar way.
This flexibility makes cooking easier when your fridge looks different from the recipe or when you simply want to use what you already have.
The more techniques you learn, the more comfortable you’ll feel making small changes that suit your taste.
Creating Better Flavor, Texture, and Consistency
Great vegan cooking comes from building layers of flavor rather than depending on one ingredient to do all the work.
Simple habits like cooking onions until they’re soft, toasting spices for a few seconds, or adding a squeeze of lemon at the end can make a noticeable difference.
Texture matters just as much as flavor.
Roasting vegetables until their edges are golden, cooking grains until they’re tender but not mushy, and giving tofu a crisp outside all help create meals that are satisfying to eat.
Paying attention to these small details leads to more consistent results every time you cook.
Reducing Kitchen Mistakes and Food Waste
Learning techniques also helps you avoid many common cooking mistakes.
You’ll be less likely to overcook vegetables, burn garlic, or end up with soggy roasted food because you’ll understand what to look for as you cook.
Instead of throwing away ingredients that don’t match a recipe, you can confidently use what you have and adjust your cooking along the way.
Leftover cooked grains can become fried rice, roasted vegetables can be added to soups or wraps, and extra herbs can brighten sauces or dressings before they spoil.
Essential Equipment for Vegan Cooking
Must-Have Kitchen Tools
- Sharp chef’s knife: Makes chopping vegetables, herbs, and plant-based proteins faster, safer, and more precise.
- Cutting board: Provides a sturdy surface for preparing ingredients while protecting your countertops.
- Blender: Perfect for smoothies, creamy soups, sauces, dressings, and dairy-free milk alternatives.
- Food processor: Quickly chops, grates, blends, and mixes ingredients for dips, veggie burgers, and doughs.
- High-speed whisk: Helps combine sauces, batters, and dressings until smooth and lump-free.
- Nonstick skillet: Ideal for cooking tofu, pancakes, vegetables, and other foods that can easily stick.
- Cast iron pan: Retains heat well, making it great for searing, roasting, and creating flavorful browning.
- Saucepan: Useful for cooking grains, beans, soups, sauces, and pasta.
- Baking sheets: Perfect for roasting vegetables, baking tofu, and preparing sheet pan meals.
- Measuring cups and spoons: Ensure consistent results, especially when baking or making sauces.
- Mixing bowls: Handy for tossing vegetables with seasonings, mixing batters, and preparing salads.
Helpful (But Optional) Tools
- Immersion blender: Blends soups and sauces directly in the pot with minimal cleanup.
- Air fryer: Creates crispy vegetables and tofu using less oil and shorter cooking times.
- Spiralizer: Turns vegetables like zucchini and carrots into fun, noodle-like strands.
- Mandoline slicer: Produces thin, even slices for salads, gratins, and roasted vegetables.
- Citrus juicer: Makes it easy to extract fresh lemon, lime, or orange juice for bright, flavorful dishes.
- Digital kitchen scale: Provides accurate measurements for baking and portioning ingredients.
Technique Selection Guide
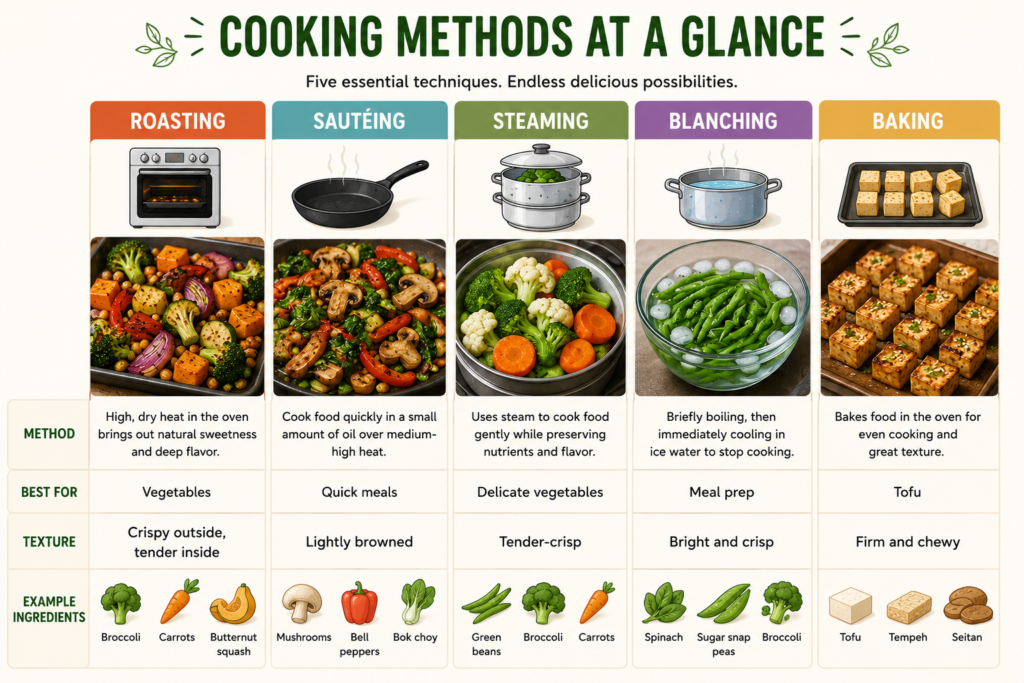
Not sure which cooking technique to use? Use this quick reference to choose the best method based on the result you’re trying to achieve.
| If you want to… | Use this technique |
|---|---|
| Crispy vegetables | Roasting |
| Fast weeknight meals | Sautéing |
| Bright green vegetables | Steaming |
| Crisp-tender vegetables | Blanching |
| Crispy tofu | Pressing + Baking |
| Flavor-packed tofu or tempeh | Marinating |
| Creamy dairy-free sauces | Blend cashews or silken tofu |
| Rich, hearty soups | Thicken with pureed beans or blended vegetables |
| Fluffy grains | Cook grains properly and let them rest before fluffing |
| Better baked goods | Use the right egg replacement |
| Deep savory flavor | Layer aromatics and add umami-rich ingredients |
| Well-balanced dishes | Finish with salt, acid, and fresh herbs |
1. Knife Skills
Good knife skills are one of the most valuable cooking techniques you can learn.
Cutting ingredients into similar-sized pieces helps them cook evenly, improves the look of your meals, and makes preparing recipes faster and safer.
Why Proper Cutting Matters
- Even cooking: Uniform pieces cook at the same rate, so you won’t end up with some pieces overcooked while others are still firm.
- Better presentation: Neatly cut vegetables make your finished dishes look more appealing and professional.
- Improved safety: A sharp knife and proper cutting technique give you better control, reducing the chance of slips and accidents.
Basic Cuts to Learn
- Dice: Small, even cubes that work well for soups, stews, stir-fries, and sauces.
- Mince: Very finely chopped ingredients, usually garlic, ginger, or herbs, for even flavor throughout a dish.
- Slice: Thin, flat pieces that are perfect for onions, mushrooms, cucumbers, and peppers.
- Julienne: Thin matchstick-shaped strips commonly used for salads, stir-fries, and vegetable toppings.
- Chiffonade: Thin ribbons made by rolling leafy greens or herbs before slicing them.
- Rough chop: Larger, uneven pieces that are ideal for roasting, stocks, soups, or blended recipes where perfect uniformity isn’t needed.
Tips for Faster Prep
- Keep your chef’s knife sharp, as a sharp blade cuts more easily and safely than a dull one.
- Trim and wash all your vegetables before you begin chopping to keep your workflow smooth.
- Group similar ingredients together so you can prepare everything in one session.
- Curl your fingertips under while holding food to help protect your hands as you cut.
- Take your time and focus on consistent cuts—speed naturally comes with practice.
2. Sautéing Vegetables Correctly
Sautéing is one of the quickest ways to cook vegetables while keeping them flavorful and full of texture.
The goal is to cook them over medium-high heat so they become tender with a little browning instead of soft and watery.
Choosing the Right Pan
A wide skillet gives vegetables enough room to cook evenly and develop color.
A nonstick skillet is great for everyday cooking and works especially well if you’re using very little oil.
A cast iron or stainless steel pan creates excellent browning, adding extra depth of flavor to vegetables like mushrooms and onions.
Oil vs. Water Sautéing
A small amount of oil helps vegetables brown, caramelize, and develop a richer flavor.
Water sautéing is a good option when you want to cook without oil.
To water sauté, add a few tablespoons of water or vegetable broth to a hot pan, then add more as needed to keep the vegetables from sticking.
No matter which method you choose, avoid adding too much liquid at once, or the vegetables will steam instead of sauté.
Preventing Mushy Vegetables
Preheat the pan before adding your vegetables so they start cooking immediately.
Keep the heat at medium-high to encourage browning instead of slow steaming.
Stir occasionally rather than constantly, giving the vegetables time to develop golden edges.
Cook only until the vegetables are tender but still have a slight bite, unless your recipe calls for them to be softer.
Cooking in Batches
Avoid filling the pan to the top.
Overcrowding traps steam, making vegetables soft instead of nicely browned.
If you’re cooking a large amount, divide the vegetables into two or more batches.
The extra few minutes are worth it because each batch will cook more evenly and develop better flavor.
Best Vegetables for Sautéing
- Mushrooms: Cook until they release their moisture and become deeply browned.
- Bell peppers: Turn sweet and slightly caramelized while keeping a little crunch.
- Onions: Become soft, sweet, and flavorful as they cook.
- Zucchini: Cooks quickly and develops light golden edges without becoming mushy when not overcooked.
- Broccoli: Stays bright and tender with slightly crisp florets when sautéed over medium-high heat.
- Spinach: Wilts in just a minute or two, making it an easy addition to pasta, grain bowls, soups, and stir-fries.
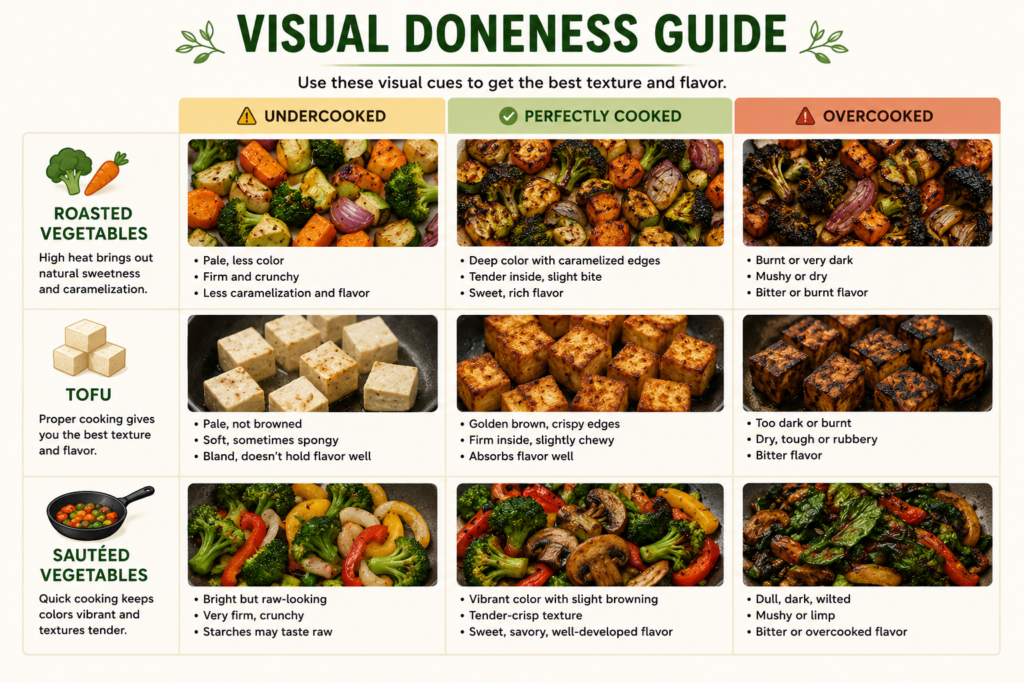
3. Roasting for Maximum Flavor
Roasting is one of the easiest ways to make vegetables taste richer and more satisfying.
The dry heat creates golden, caramelized edges while keeping the inside tender, bringing out natural sweetness and deeper flavor with very little effort.
| Technique | Temperature |
|---|---|
| Roasting vegetables | 400–425°F (200–220°C) |
| Baking tofu | 400°F (200°C) |
| Reheating roasted vegetables | 375°F (190°C) |
Why Roasting Changes Everything
Roasting uses high heat to brown the outside of vegetables, creating a delicious combination of crisp edges and soft centers.
This browning, known as caramelization, adds depth of flavor that steaming or boiling can’t achieve.
With just a few simple seasonings, roasted vegetables can become the star of any meal.
Choosing the Right Temperature
For most vegetables, a temperature of 400–425°F (200–220°C) works well.
This range is hot enough to encourage browning without burning the outside before the inside is cooked.
If you’re roasting dense vegetables like sweet potatoes or pumpkin, they may need a little more time than softer vegetables.
Don’t Overcrowd the Pan
Spread the vegetables out in a single layer with a little space between each piece.
When vegetables are packed too closely together, they release steam and become soft instead of developing crispy, golden edges.
If you’re roasting a large batch, use two baking sheets instead of squeezing everything onto one.
Tossing with Oil and Seasoning
Lightly coat the vegetables with oil so they brown evenly and the seasonings stick well.
Season with salt and pepper before roasting, then add herbs, spices, or a squeeze of fresh lemon juice after cooking for extra flavor.
Turn the vegetables halfway through cooking to help them brown evenly on all sides.
Best Vegetables to Roast
- Sweet potatoes: Become soft inside with lightly caramelized, crispy edges.
- Cauliflower: Develops a nutty flavor and beautifully golden florets.
- Brussels sprouts: Turn crispy on the outside while staying tender in the center.
- Carrots: Roast into sweet, lightly browned bites with plenty of natural flavor.
- Pumpkin: Becomes creamy and slightly sweet, making it perfect for grain bowls, soups, or side dishes.
- Chickpeas: Roast into crispy, crunchy bites that are great for salads, bowls, or a simple snack.
4. Steaming Without Losing Flavor
Steaming is a simple cooking method that keeps vegetables tender while preserving their natural color and texture.
When done correctly, steamed vegetables taste fresh and make an excellent base for countless vegan meals.
Benefits of Steaming
Steaming cooks vegetables gently, helping them stay bright, crisp-tender, and evenly cooked.
It doesn’t require oil, making cleanup quick and easy.
Steamed vegetables also pair well with almost any sauce, dressing, or seasoning, so they’re easy to customize for different meals.
How Long to Steam Common Vegetables
The exact time depends on the size of your vegetable pieces, but these guidelines work well for most home cooks:
| Vegetable | Approximate Steaming Time |
|---|---|
| Broccoli florets | 4–5 minutes |
| Cauliflower florets | 5–7 minutes |
| Carrot slices | 6–8 minutes |
| Green beans | 4–6 minutes |
| Zucchini slices | 3–4 minutes |
| Spinach | 1–2 minutes |
| Asparagus | 3–5 minutes |
Check the vegetables with a fork near the end of the cooking time.
They should be tender but still have a slight bite instead of feeling soft or mushy.
Adding Flavor After Steaming
Steamed vegetables are like a blank canvas, so season them while they’re still warm.
A drizzle of olive oil or melted vegan butter helps seasonings coat the vegetables evenly.
Finish with salt, freshly ground black pepper, fresh herbs, lemon juice, garlic, nutritional yeast, or your favorite spice blend to add plenty of flavor without covering up the vegetables’ natural taste.
If you’re serving steamed vegetables as a side dish, try tossing them with toasted nuts, seeds, or a simple vinaigrette for extra texture and a fresh finishing touch.
5. Blanching Vegetables
Blanching is a quick cooking method that involves briefly boiling vegetables and then immediately cooling them in ice water.
It only takes a few minutes and helps vegetables keep their bright color, crisp texture, and fresh flavor.
What Blanching Does
Blanching softens vegetables just enough without fully cooking them.
It helps vegetables stay vibrant and crisp, making them perfect for salads, grain bowls, stir-fries, or freezing for later use.
This technique is also a great way to prepare vegetables ahead of time, since they can be quickly reheated or added straight to other dishes.
Ice Bath Technique
Bring a large pot of water to a rolling boil and prepare a bowl filled with ice and cold water.
Add the vegetables to the boiling water and cook them just until they become bright in color and slightly tender.
Use a slotted spoon or strainer to transfer the vegetables immediately into the ice bath.
Let them cool completely before draining and patting them dry.
Stopping the cooking process right away prevents the vegetables from becoming overcooked and helps them keep their crisp texture.
Best Vegetables to Blanch
- Broccoli: Keeps its bright green color and crisp-tender bite.
- Green beans: Become tender while staying fresh and slightly crunchy.
- Asparagus: Cooks evenly and keeps its delicate texture.
- Snow peas: Stay crisp and vibrant for salads and stir-fries.
- Spinach: Wilts quickly, making it easy to squeeze out excess moisture for dips, fillings, and sauces.
- Carrots: Soften slightly while holding their shape and natural sweetness.
6. Cooking Beans from Scratch
Cooking dried beans from scratch takes a little planning, but the process is simple and well worth it.
You get beans with a better texture, richer flavor, and plenty of flexibility for soups, salads, stews, and grain bowls.
Why Homemade Beans Taste Better
Freshly cooked beans are often creamier and more flavorful than canned beans.
You can cook them until they’re exactly as tender as you like, whether you’re making a hearty soup or a fresh bean salad.
Cooking your own beans also lets you choose the herbs and seasonings that best match your recipe.
Soaking vs. No-Soak Method
Soaking beans overnight helps them cook more evenly and can shorten the cooking time.
To soak, cover the dried beans with plenty of water and let them sit for 8–12 hours before draining and rinsing.
If you forget to soak them, don’t worry.
You can cook most dried beans without soaking, but they will usually need extra time on the stove.
Cooking Times
Cooking times vary depending on the type of bean and its age.
Most beans become tender in 1 to 2 hours when simmered gently.
Lentils cook much faster and usually take 20 to 30 minutes.
Check the beans occasionally near the end of cooking and add more water if needed to keep them covered.
The beans are ready when they’re tender all the way through without falling apart.
Seasoning Beans Properly
Cook beans with aromatics like onion, garlic, bay leaves, or herbs to build flavor as they simmer.
Wait until the beans are nearly tender before adding salt, then taste and adjust the seasoning before serving.
For even more flavor, stir cooked beans into sauces, soups, or stews so they can absorb the seasonings from the rest of the dish.
Storage Tips
Let cooked beans cool before transferring them to airtight containers.
Store them in the refrigerator for up to 4 days.
For longer storage, freeze them in meal-sized portions with a little of their cooking liquid to help keep them moist.
Label each container with the bean type and date so they’re easy to identify when you’re ready to cook.
7. Cooking Perfect Grains
Grains are the foundation of many vegan meals, adding texture and helping turn simple vegetables and proteins into satisfying dishes.
Once you learn how to cook a few basic grains well, you’ll have endless options for bowls, salads, soups, and side dishes.
Rice
Rinse rice under cold water before cooking to remove excess starch and help the grains stay separate.
Cook according to the variety you’re using, then let it rest for about 10 minutes before fluffing it gently with a fork.
Quinoa
Rinse quinoa well before cooking to wash away its natural coating, which can taste slightly bitter.
Cook it until the liquid is absorbed, then let it stand for 5 minutes before fluffing to create a light, fluffy texture.
Farro
Farro has a pleasantly chewy texture and a mild, nutty flavor.
Simmer it until tender, then drain any excess liquid if needed before serving it in salads, grain bowls, or soups.
Barley
Barley becomes tender and slightly creamy as it cooks.
It’s an excellent choice for hearty soups, stews, and warm side dishes where you want a satisfying bite.
Couscous
Couscous cooks in just a few minutes, making it one of the quickest grains to prepare.
Pour hot broth or water over it, cover the bowl, and let it sit until the liquid is absorbed before fluffing with a fork.
Bulgur
Bulgur has a light, slightly nutty flavor and cooks faster than many whole grains.
Simply soak or simmer it according to the package directions, then fluff it before using it in salads, grain bowls, or pilafs.
Tips for Fluffy Results
- Rinse grains like rice and quinoa before cooking to improve their texture.
- Measure the liquid carefully so the grains don’t become too wet or too dry.
- Simmer gently instead of boiling rapidly to encourage even cooking.
- Let cooked grains rest for 5–10 minutes before fluffing to allow the moisture to settle.
- Fluff with a fork rather than stirring with a spoon to keep the grains light and separate.
- Store leftover cooked grains in the refrigerator for quick meals throughout the week.
8. Pressing and Cooking Tofu
Tofu is one of the most versatile ingredients in vegan cooking.
It easily takes on the flavors of marinades and seasonings, making it a great choice for everything from stir-fries to sandwiches.
Knowing which type to use and how to cook it will help you get the best results every time.
Why Press Tofu?
Pressing removes excess moisture from firm varieties of tofu.
Less water means the tofu can absorb marinades more effectively and develop a crisp, golden exterior when cooked.
Wrap the tofu in a clean kitchen towel or paper towels, place it on a plate, and set something heavy, like a cast iron pan or a few cookbooks, on top for 20–30 minutes.
If you’re using super firm tofu, pressing is often unnecessary because it already contains very little moisture.
Different Types of Tofu
- Silken: Very smooth and delicate, making it ideal for creamy sauces, desserts, smoothies, and soups.
- Soft: Slightly firmer than silken tofu and great for soups, gentle curries, and light scrambles.
- Firm: Holds its shape well and works nicely in stir-fries, baked dishes, and simple pan-fried recipes.
- Extra firm: Dense and sturdy, making it one of the best choices for frying, grilling, roasting, and marinating.
- Super firm: The densest variety, perfect when you want a chewy texture with little or no pressing required.
Best Cooking Methods
Pan-Frying
Cook tofu in a lightly oiled skillet over medium-high heat until each side is golden and crisp.
Baking
Bake seasoned or marinated tofu at 400°F (200°C) until the edges are browned and the outside is slightly chewy.
Air Frying
Air fry tofu for a crispy exterior using little oil, shaking the basket halfway through cooking for even browning.
Grilling
Use firm or extra firm tofu on a well-oiled grill or grill pan to create flavorful char marks and a smoky finish.
Crumbling
Break firm or extra firm tofu into small pieces with your hands or a fork for tacos, pasta sauces, fried rice, or tofu scrambles where a ground texture works best.
9. Marinating Plant-Based Proteins
A good marinade can turn simple plant-based proteins into flavorful, satisfying meals.
Since ingredients like tofu, tempeh, and soy curls have a mild taste on their own, they soak up seasonings well and become much more delicious with a little time.
Why Marinades Matter
Marinades add flavor throughout the surface of the protein instead of just coating it at the end.
They also help create a richer taste and encourage better browning during cooking.
Even a short marinating time can make a noticeable difference, especially when grilling, baking, or pan-frying.
Components of a Good Marinade
A balanced marinade combines several simple ingredients that work together to build flavor.
- Acid: Lemon juice, lime juice, or vinegar adds brightness and balances richer flavors.
- Fat: Olive oil, sesame oil, or another cooking oil helps carry flavors and promotes even browning.
- Salt: Soy sauce, tamari, or a pinch of salt seasons the protein and enhances the overall taste.
- Herbs: Fresh or dried herbs add freshness and complement a wide range of dishes.
- Spices: Paprika, cumin, garlic powder, black pepper, curry powder, and other spices add depth and character.
- Sweetness: Maple syrup, agave, or brown sugar balances savory flavors and helps create caramelized edges during cooking.
- Umami: Miso, nutritional yeast, tomato paste, or mushroom powder adds a rich, savory flavor that makes plant-based proteins more satisfying.
Marinating Times
Most plant-based proteins benefit from at least 30 minutes in a marinade.
For even deeper flavor, marinate tofu or tempeh for 2 to 8 hours in the refrigerator.
If you’re short on time, don’t skip the marinade altogether—even 15 to 20 minutes can add plenty of flavor.
Always discard any leftover marinade that has been in contact with uncooked ingredients, or boil it thoroughly before using it as a sauce.
10. Making Creamy Sauces Without Dairy
Rich, creamy sauces don’t need butter, cream, or cheese.
A few simple plant-based ingredients can create smooth, satisfying sauces that work beautifully with pasta, vegetables, grain bowls, and casseroles.
Ingredients That Create Creaminess
Each ingredient brings its own texture and flavor, so you can choose the one that best suits your recipe.
- Cashews: Blend into a rich, silky sauce with a mild flavor that pairs well with pasta, soups, and dips.
- Oats: Create a light, creamy texture and are a budget-friendly option for everyday sauces.
- Coconut milk: Adds a smooth, velvety consistency and works especially well in curries, soups, and creamy stews.
- Silken tofu: Blends into an ultra-smooth sauce that’s perfect for pasta sauces, dressings, and desserts.
- White beans: Add body and creaminess while keeping the flavor mild enough for soups and savory sauces.
- Potatoes: Cooked potatoes blend into thick, creamy sauces with a naturally smooth finish.
Blender Tips
Use a high-speed blender whenever possible for the smoothest texture.
Blend warm ingredients instead of cold ones, as they combine more easily into a creamy sauce.
Add the liquid gradually until you reach the consistency you want.
Stop occasionally to scrape down the sides of the blender so everything mixes evenly.
If the sauce becomes too thick, simply blend in a little more broth, plant-based milk, or water until it’s smooth.
Preventing Grainy Sauces
Soak raw cashews in hot water for about 20 to 30 minutes before blending to help them become extra smooth.
Blend the sauce long enough for all the ingredients to fully break down.
Use enough liquid to keep the mixture moving freely through the blender.
If needed, strain the finished sauce through a fine-mesh sieve for an even silkier texture, especially when making sauces for special meals.
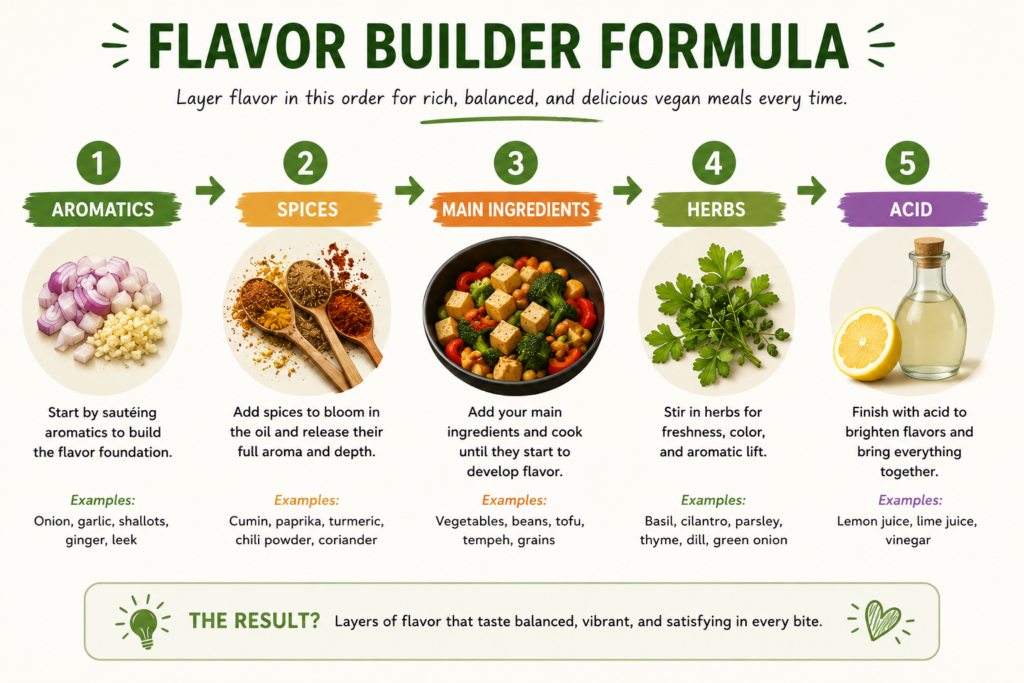
11. Building Flavor Layers
The best vegan meals aren’t made by adding lots of ingredients at once.
They’re built one step at a time, with each ingredient adding something new to the final dish.
Learning how to layer flavors will make your cooking taste richer, more balanced, and far more satisfying.
Start with Aromatics
Aromatics are ingredients that release wonderful flavors and aromas as they cook.
They create a flavorful base that gives the rest of the dish a strong foundation.
- Onion: Adds natural sweetness and depth as it softens and lightly browns.
- Garlic: Brings a rich, savory flavor and is best added after onions so it doesn’t burn.
- Ginger: Adds fresh warmth and a gentle kick that pairs especially well with Asian-inspired dishes, curries, and soups.
- Celery: Contributes a subtle savory flavor that works well in soups, stews, and sauces.
- Carrots: Add a touch of natural sweetness that balances savory ingredients beautifully.
Cook these ingredients over medium heat until they become soft and fragrant before adding the remaining ingredients.
Blooming Spices
Blooming spices means cooking them briefly in a little oil for about 30 to 60 seconds before adding liquids.
This simple step helps release their natural oils, making their flavors and aromas much more noticeable.
Keep the spices moving in the pan and add the next ingredients as soon as they become fragrant to prevent burning.
Adding Herbs at the Right Time
Hard herbs like rosemary, thyme, and sage hold up well during longer cooking times, so add them early to slowly release their flavor.
Tender herbs like parsley, cilantro, basil, and dill are best added near the end of cooking to keep their fresh taste and vibrant color.
A small handful of fresh herbs just before serving can make even a simple dish taste brighter and more complete.
Using Acidity for Balance
A splash of acid at the end of cooking can completely transform a dish.
Fresh lemon juice, lime juice, or a small splash of vinegar helps brighten flavors and balance rich or savory ingredients.
Start with a small amount, stir well, and taste before adding more.
Often, the final touch your meal needs isn’t more salt or spices—it’s just a little acidity to bring all the flavors together.
12. Creating Umami Flavor
Umami is the rich, savory taste that makes food feel satisfying and full of flavor.
While it’s often associated with meat and cheese, many plant-based ingredients naturally provide the same deep, savory quality.
What Is Umami?
Umami is considered one of the five basic tastes, alongside sweet, salty, sour, and bitter.
It adds depth and richness to a dish, making flavors taste more rounded and complete.
Using a few umami-rich ingredients can turn a simple soup, pasta, or stir-fry into something that tastes like it has been simmering for hours.
Vegan Umami Ingredients
- Mushrooms: Fresh or dried mushrooms add a deep, earthy flavor that works well in soups, sauces, pasta, and stir-fries.
- Nutritional yeast: Adds a savory, slightly cheesy flavor that’s perfect for pasta, popcorn, roasted vegetables, and creamy sauces.
- Miso: This fermented soybean paste brings a rich, salty depth to soups, dressings, marinades, and sauces.
- Soy sauce: A pantry staple that adds instant savory flavor to vegetables, grains, tofu, and noodles.
- Tamari: Similar to soy sauce but with a smoother, richer taste, making it a great choice for marinades and dipping sauces.
- Tomato paste: A small spoonful adds concentrated tomato flavor and extra richness to soups, stews, and pasta sauces.
- Sun-dried tomatoes: Deliver an intense sweet-and-savory flavor that brightens pasta dishes, salads, sandwiches, and spreads.
- Seaweed: Nori, kombu, and wakame contribute a naturally savory taste that works especially well in broths, rice dishes, and soups.
Try combining two or three of these ingredients in the same dish for even greater depth of flavor.
For example, mushrooms, soy sauce, and tomato paste make a simple vegetable stew taste remarkably rich without overpowering the other ingredients.
13. Thickening Soups, Stews, and Sauces
A good thickener can turn a thin soup or sauce into something rich, smooth, and satisfying.
The best part is that you don’t need dairy or heavy cream to create a silky texture.
A few simple pantry ingredients will do the job beautifully.
Natural Vegan Thickeners
- Cornstarch slurry: Mix equal parts cornstarch and cold water, then stir it into simmering soups or sauces until they thicken.
- Arrowroot: Creates a smooth, glossy finish and works well in sauces and gravies. Mix it with cold water before adding it to hot liquids.
- Flour roux: Cook flour with a little oil or vegan butter before slowly whisking in liquid to create a rich, creamy base for sauces and soups.
- Blended vegetables: Cooked cauliflower, potatoes, carrots, or squash can be blended into soups and sauces to add natural thickness and extra flavor.
- Pureed beans: White beans, chickpeas, or cannellini beans blend into a creamy texture that thickens soups, stews, and sauces without changing the flavor too much.
- Potato starch: A powerful thickener that works quickly. Mix it with cold water before adding it near the end of cooking to keep the texture smooth.
Start with a small amount of thickener and add more only if needed.
Allow the soup, stew, or sauce to simmer for a minute or two after adding the thickener so it has time to fully develop.
If your dish becomes thicker than you’d like, simply stir in a little vegetable broth, plant-based milk, or water until you reach the perfect consistency.
14. Baking Without Eggs
Eggs play different roles in baking, such as binding ingredients together, adding moisture, or helping baked goods rise.
The good news is that there isn’t just one vegan replacement.
Choosing the right substitute depends on what you’re baking.
Common Egg Replacements
- Flax egg: Made by mixing 1 tablespoon of ground flaxseed with 3 tablespoons of water and letting it sit for 5–10 minutes. Great for cookies, muffins, pancakes, and quick breads.
- Chia egg: Made with 1 tablespoon of chia seeds and 3 tablespoons of water. It works similarly to a flax egg and is ideal for hearty baked goods.
- Applesauce: Adds moisture and a touch of natural sweetness, making it a good choice for cakes, muffins, and brownies.
- Mashed banana: Helps bind ingredients while adding moisture. It’s perfect for banana bread, muffins, and other recipes where a mild banana flavor fits well.
- Aquafaba: The liquid from a can of chickpeas can be whipped or used as a binder in recipes like meringues, macarons, mousses, and some cakes.
- Commercial egg replacers: Convenient powdered products designed for baking and a reliable choice when you want consistent results.
Which Substitute Works Best for Different Recipes
| Recipe | Best Egg Replacement |
|---|---|
| Cookies | Flax egg or chia egg |
| Muffins | Flax egg, applesauce, or mashed banana |
| Quick breads | Flax egg, chia egg, or mashed banana |
| Brownies | Applesauce or flax egg |
| Cakes | Applesauce or commercial egg replacer |
| Pancakes | Flax egg or chia egg |
| Waffles | Flax egg or commercial egg replacer |
| Meringues | Aquafaba |
| Mousses | Aquafaba |
If you’re trying a recipe for the first time, follow the recommended egg replacement before experimenting with other options.
Once you’re comfortable with these substitutes, you’ll find that baking without eggs is straightforward and delivers delicious results.
15. Proper Seasoning Throughout Cooking
Seasoning is one of the simplest ways to improve your cooking. Instead of adding everything at the very end, build flavor little by little as you cook.
This creates dishes that taste balanced, well-rounded, and full of flavor from the first bite to the last.
Season Early
Add a small amount of seasoning during the first stages of cooking, especially when sautéing onions, garlic, or other aromatics.
Seasoning in layers gives ingredients time to absorb flavor as they cook.
Start with a light hand, since it’s much easier to add more seasoning later than to remove too much.
Taste Frequently
Get into the habit of tasting your food throughout the cooking process.
A quick taste lets you know whether a dish needs a little more seasoning, a brighter flavor, or a few extra minutes to develop.
Small adjustments along the way often make a much bigger difference than one large adjustment at the end.
Adjust Salt, Acid, and Sweetness
These three elements work together to create a balanced dish.
If the flavors seem flat, a small pinch of salt may be all that’s needed to bring everything together.
If the dish tastes rich or heavy, a squeeze of fresh lemon juice or a splash of vinegar can brighten the flavors.
If a tomato-based sauce, curry, or dressing tastes a little too sharp, a tiny drizzle of maple syrup or a pinch of sugar can soften the acidity without making the dish noticeably sweet.
Make one adjustment at a time, stir well, and taste again before adding anything else.
Don’t chase perfection—cook with curiosity. Every time you roast vegetables, cook tofu, or season a soup, pay attention to how the ingredients look, smell, and taste as they change. Those small observations will teach you far more than simply following a recipe. Start with one technique, practice it a few times, and before long you’ll find yourself cooking with confidence, making smart adjustments, and creating delicious vegan meals that suit your own taste.
Common Beginner Mistakes
Everyone makes mistakes when learning to cook, and vegan cooking is no different.
The good news is that most of these are easy to fix.
Knowing what to watch for will help you build confidence and enjoy better results from the start.
- Under-seasoning food: Add seasoning in small amounts throughout cooking instead of waiting until the end, and always taste before serving.
- Overcooking vegetables: Cook vegetables until they’re just tender to keep their flavor, color, and texture at their best.
- Not pressing tofu: Press firm and extra firm tofu before cooking so it absorbs marinades better and develops a crisp exterior.
- Skipping acid at the end: Finish dishes with a squeeze of lemon juice, lime juice, or a splash of vinegar to brighten and balance the flavors.
- Crowding pans: Leave space between ingredients so they brown instead of steaming.
- Using dull knives: Keep your knife sharp to make prep easier, faster, and safer.
- Not tasting while cooking: Taste your food as it cooks so you can make small adjustments before it’s finished.
- Expecting exact meat-like textures: Appreciate plant-based ingredients for their own unique textures and flavors rather than expecting them to behave exactly like meat.
| Problem | Cause | Quick Fix |
|---|---|---|
| Mushy vegetables | Overcooked | Reduce cooking time |
| Tofu isn’t crispy | Not pressed | Press longer before cooking |
| Bland soup | Under-seasoned | Add salt, herbs, and a splash of acid |
| Burnt garlic | Heat too high | Add garlic later |
| Grainy sauce | Not blended enough | Blend longer or add more liquid |
| Soggy roasted vegetables | Crowded pan | Spread vegetables into a single layer |
Time-Saving Vegan Cooking Tips
Cooking delicious vegan meals doesn’t have to take hours.
A little planning can make busy weekdays much easier and help you spend less time in the kitchen without sacrificing flavor.
- Batch cook grains: Prepare a large batch of rice, quinoa, or barley at the beginning of the week and store it in the refrigerator for quick lunches and dinners.
- Roast multiple vegetables together: Fill a couple of baking sheets with different vegetables and roast them at the same time for easy meal prep and versatile side dishes.
- Prepare sauces in advance: Make your favorite dressings, marinades, and creamy sauces ahead of time so they’re ready whenever you need them.
- Freeze beans in portions: Cook a large batch of beans and freeze them in meal-sized containers for quick use in soups, stews, salads, and grain bowls.
- Chop vegetables ahead of time: Wash and chop sturdy vegetables like carrots, broccoli, peppers, and onions, so they’re ready to cook when you are.
- Keep a stocked pantry: Always have essentials like canned beans, grains, pasta, vegetable broth, herbs, spices, nutritional yeast, and soy sauce on hand to make simple meals without an extra trip to the store.
Essential Pantry Staples for Practicing These Techniques
A well-stocked pantry makes vegan cooking much simpler.
Proteins
- Lentils: Quick to cook and perfect for soups, curries, salads, and veggie burgers.
- Chickpeas: Great for roasting, blending into dips, or adding to salads, stews, and grain bowls.
- Black beans: A versatile choice for tacos, chili, burritos, soups, and rice dishes.
- Tofu: A mild, protein-rich ingredient that works well baked, pan-fried, grilled, or crumbled.
- Tempeh: A firm, nutty plant-based protein that’s excellent for marinating, grilling, and stir-frying.
Grains
- Rice: A versatile base for stir-fries, curries, grain bowls, and side dishes.
- Quinoa: A light, fluffy grain that pairs well with roasted vegetables and salads.
- Oats: Useful for breakfast, baking, homemade veggie burgers, and creamy sauces.
- Pasta: A pantry staple that’s perfect for quick dinners with vegetables and homemade vegan sauces.
Flavor Builders
- Nutritional yeast: Adds a savory, cheesy flavor to sauces, popcorn, pasta, and roasted vegetables.
- Soy sauce: Brings rich, savory depth to marinades, stir-fries, soups, and grain dishes.
- Miso: Adds concentrated umami flavor to broths, dressings, sauces, and marinades.
- Vinegar: Brightens dishes and balances flavors in dressings, sauces, and cooked vegetables.
- Olive oil: Ideal for sautéing, roasting, and making simple vinaigrettes.
- Spices: Keep a variety such as paprika, cumin, turmeric, chili powder, garlic powder, oregano, and black pepper to create different flavor profiles.
- Herbs: Fresh or dried herbs like parsley, basil, cilantro, thyme, rosemary, and dill add freshness and aroma to almost any meal.
Pantry Staples Shopping Checklist
Use this checklist when stocking your pantry or planning your next grocery trip.
Keeping these basics on hand makes it much easier to cook flavorful vegan meals any day of the week.
Proteins
- Dried lentils
- Dried chickpeas
- Dried black beans
- Canned beans
- Firm or extra firm tofu
- Tempeh
Grains
- Rice
- Quinoa
- Rolled oats
- Whole wheat or regular pasta
- Couscous
- Bulgur
Canned Goods
- Canned chickpeas
- Canned black beans
- Canned white beans
- Diced tomatoes
- Tomato paste
- Vegetable broth
Oils
- Extra virgin olive oil
- Avocado oil
- Toasted sesame oil
Vinegars
- Apple cider vinegar
- Red wine vinegar
- Rice vinegar
- Balsamic vinegar
Herbs
- Basil
- Parsley
- Cilantro
- Thyme
- Rosemary
- Oregano
- Dill
Spices
- Garlic powder
- Onion powder
- Smoked paprika
- Ground cumin
- Turmeric
- Chili powder
- Black pepper
- Sea salt
Condiments
- Soy sauce or tamari
- Miso paste
- Nutritional yeast
- Dijon mustard
- Maple syrup
- Tahini or peanut butter
- Hot sauce
- Vegetable bouillon cubes or paste
Pro Tip: Start with the basics and build your pantry over time. A well-stocked pantry gives you the flexibility to create a wide variety of vegan meals without making a special trip to the store.
4-Week Beginner Practice Plan
You don’t need to master every technique at once.
Focus on one or two new skills each week, and you’ll build confidence naturally while creating delicious meals along the way.
Week 1: Build Your Foundation
- Practice basic knife skills.
- Roast a variety of vegetables.
- Sauté onions, peppers, and mushrooms.
Week 2: Master Everyday Staples
- Cook fluffy rice and quinoa.
- Cook a batch of beans from scratch or use canned beans in simple meals.
- Make a basic dairy-free creamy sauce using cashews, oats, or silken tofu.
Week 3: Get Comfortable with Plant-Based Proteins
- Press and cook tofu using pan-frying or baking.
- Marinate tofu or tempeh and compare how the flavor changes.
- Experiment with adding umami-rich ingredients like miso or nutritional yeast.
Week 4: Bring Everything Together
- Plan and cook a complete vegan meal using several techniques you’ve learned.
- Practice layering flavors with aromatics, spices, herbs, and a finishing splash of acid.
- Taste and adjust the seasoning throughout cooking to build confidence.
Remember: Progress comes from practice, not perfection. Every meal teaches you something new, and each technique you master makes the next recipe even easier.
Final Thoughts
Mastering a few basic vegan cooking techniques will take you much further than memorizing recipes.
Once you understand how to build flavor, cook ingredients properly, and season with confidence, creating delicious meals becomes much easier.
Don’t feel like you have to learn everything at once.
Pick one new technique, practice it a few times, and then move on to the next.
Every meal is a chance to build your skills and discover what you enjoy cooking most.
Now it’s time to put these techniques into action!
FAQs
Is vegan cooking difficult for beginners?
No. Start with simple recipes and learn a few basic techniques like sautéing, roasting, and seasoning. Your confidence will grow with practice.
Which cooking technique should I learn first?
Roasting vegetables is a great place to start. It’s simple, forgiving, and brings out rich, natural flavor with very little effort.
How do I make vegetables taste more flavorful?
Use techniques like roasting or sautéing, season in layers, and finish with fresh herbs or a squeeze of lemon juice for extra brightness.
What is the easiest plant-based protein to cook?
Tofu is one of the easiest options. Firm or extra firm tofu is versatile and can be baked, pan-fried, grilled, or air-fried.
Do I need special equipment for vegan cooking?
No. A sharp knife, cutting board, skillet, saucepan, blender, and baking sheet are enough for most everyday vegan recipes.
What’s the biggest mistake new vegan cooks make?
The most common mistake is under-seasoning food. Taste as you cook and adjust the seasoning gradually for the best flavor.
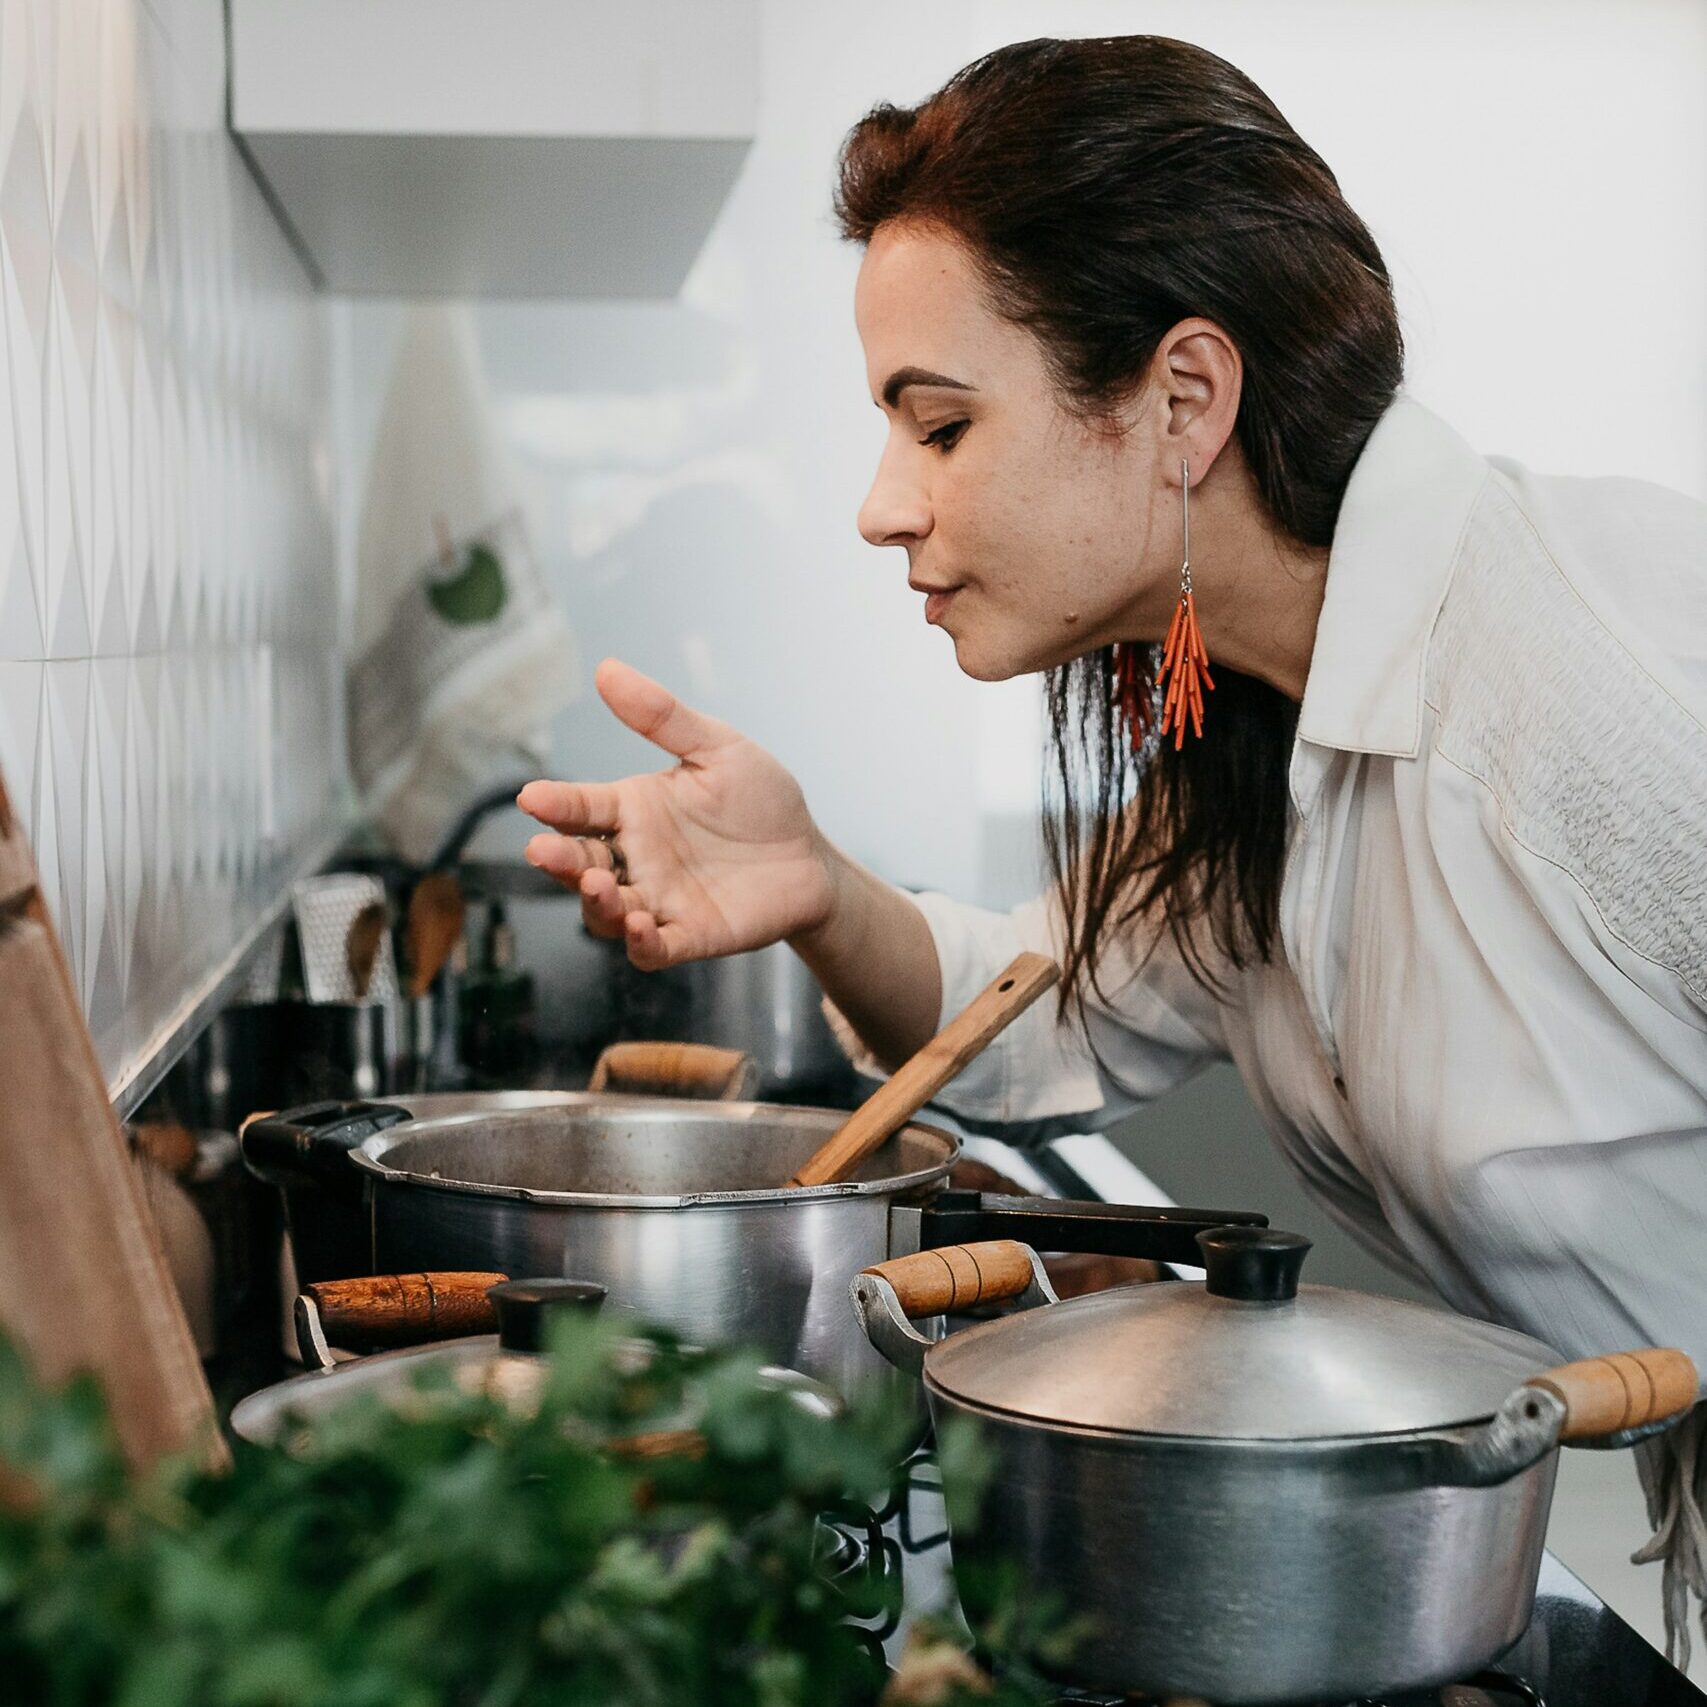
Hi, I’m Daisy Roots, the home cook and recipe developer behind this kitchen. I create simple, tested vegan recipes using everyday ingredients. Every dish is developed and cooked in my own kitchen, with clear steps to help you get reliable results every time. Thanks for stopping by — let’s cook something great!