A well-organized vegan pantry makes cooking feel easier from the moment you open the door.
When every ingredient has its place, you can spend less time searching and more time enjoying the process of making delicious meals.
Knowing exactly where your beans, grains, spices, and baking essentials are stored also helps you avoid buying items you already have.
It makes grocery shopping simpler, cuts down on food waste, and keeps your pantry from becoming cluttered with forgotten ingredients.
In this guide, you’ll learn practical, step-by-step tips for organizing your vegan pantry in a way that fits your kitchen and your cooking style.
Why Pantry Organization Matters for Vegan Cooking
Makes Meal Prep Faster
When every ingredient has a designated spot, you don’t have to stop what you’re doing to search through crowded shelves.
Instead of checking three different places for a bag of lentils or a jar of spices, you can grab what you need and keep cooking.
This small change saves time every time you step into the kitchen.
It also helps you stay focused on the recipe instead of getting distracted by clutter.
Weeknight meals become much easier when your everyday ingredients are easy to reach.
Keeping staples like rice, pasta, canned beans, cooking oils, and your favorite seasonings together means you can start cooking without hunting for each item.
If you prepare similar meals often, consider storing those ingredients near one another.
For example, keep pasta, tomato sauce, Italian herbs, and nutritional yeast on the same shelf so everything is ready when you need it.
Helps Prevent Food Waste
An organized pantry makes it much easier to see what you already have before opening a new package or buying more at the store.
Items hidden behind other containers are easy to forget, and they often sit unused until they’re no longer at their best.
A simple habit that works well is placing older products at the front and newer ones behind them.
This “first in, first out” approach helps you use ingredients in the order you bought them.
Taking a quick look through your pantry every few weeks also helps you notice foods that should be used soon.
You can then plan meals or baking projects around those ingredients instead of letting them go to waste.
Keeping an eye on expiration or best-by dates is easier when labels are visible and similar items are grouped together.
You won’t need to dig through every shelf just to check what should be used next.
Saves Pantry Space
A little organization can make even a small pantry feel much bigger.
Grouping similar foods together keeps shelves neat and prevents wasted space between random packages.
Using containers that stack neatly can also help you make better use of vertical space.
This leaves more room for the ingredients you use most often.
Small baskets or bins are another simple way to keep categories together.
You might have one for baking supplies, another for snacks, and another for grains.
Everything stays contained, and it’s much easier to pull out a basket than search through a crowded shelf.
If you like buying pantry staples in bulk, good organization becomes even more valuable.
Having dedicated storage space for larger bags of rice, oats, flour, or beans keeps them out of the way while making them easy to refill into smaller everyday containers.
Makes Grocery Shopping Easier
An organized pantry gives you a clear picture of what you already have before you leave for the store.
A quick glance at each section is often enough to spot items that are running low.
This makes writing a shopping list faster and more accurate.
Instead of guessing whether you need another bag of quinoa or another bottle of soy sauce, you’ll know right away.
Good organization also helps prevent duplicate purchases.
It’s frustrating to discover two unopened bags of the same ingredient hiding on different shelves.
Keeping similar items together means you’ll always know what’s in stock.
Over time, this simple habit helps you build a pantry that’s well stocked without becoming overcrowded.
You’ll spend less time organizing after each grocery trip and more time enjoying the recipes you want to make.
Start by Emptying Your Pantry
Before you start buying storage containers or moving things around, take everything out of your pantry.
Starting with an empty space gives you a clear view of what you have and makes it much easier to create an organization system that works.
It also helps you spot forgotten ingredients, duplicate items, and products that no longer belong in your pantry.
Remove Everything
Take every item off the shelves, even if you think it’s already in the right place.
Working with an empty pantry allows you to organize from scratch instead of simply shifting clutter from one spot to another.
Place everything on your kitchen counter, dining table, or another clean surface where you can easily sort through it.
As you remove each item, you’ll probably notice ingredients you forgot you had or products tucked away behind larger packages.
This is a great opportunity to see exactly what you’re working with before deciding where everything should go.
Wipe Down Shelves
With the pantry empty, give each shelf a quick but thorough cleaning.
Use a damp cloth or a mild kitchen cleaner to wipe away crumbs, dust, and sticky spots.
Pay extra attention to corners where small bits of food often collect.
If you use baskets or storage bins, wipe those down as well before putting them back.
Starting with clean shelves keeps your pantry looking fresh and makes it more enjoyable to maintain.
Check Expiration Dates
As you sort through your pantry, take a moment to check the dates on packaged foods.
Set aside anything that is expired or no longer in good condition according to its packaging.
If you find unopened items that you know you won’t use and they’re still suitable for donation, place them in a separate box for a local food pantry or community donation program if one is available in your area.
This simple step clears valuable shelf space and makes room for ingredients you’ll actually use.
It’s also a good reminder of which pantry staples you buy often and which ones tend to sit untouched.
Group Similar Items Together
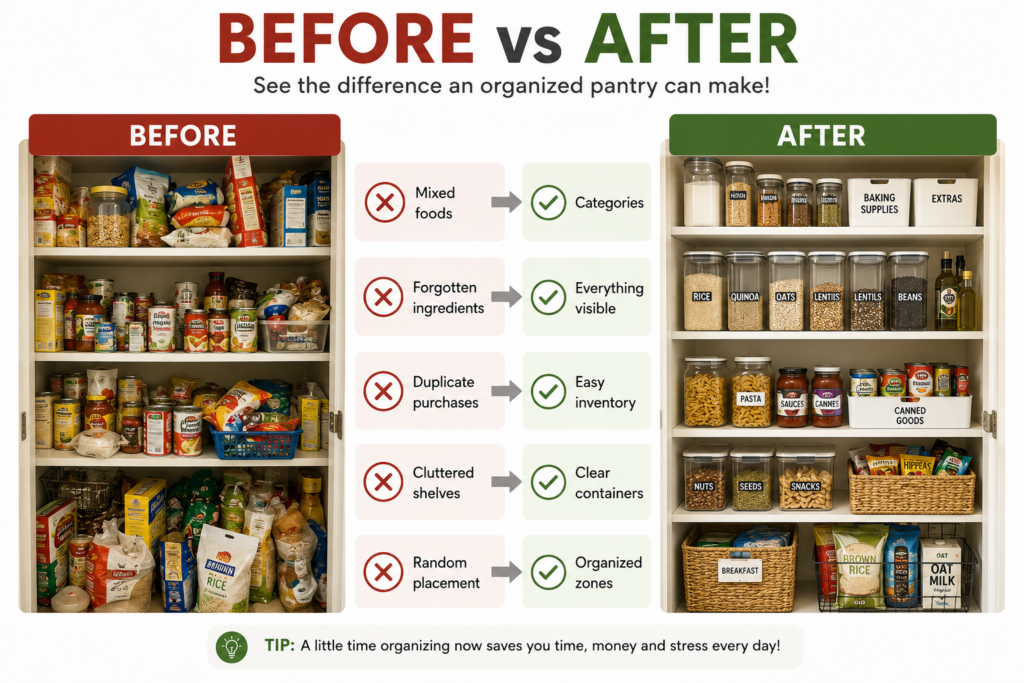
Once you’ve sorted through everything, begin creating simple categories.
Keeping similar foods together makes your pantry easier to use and helps you find ingredients in seconds.
Common categories include:
- Beans: Black beans, chickpeas, kidney beans, cannellini beans, and other dried or canned varieties.
- Lentils: Red, green, brown, black, and split lentils.
- Rice: White rice, brown rice, jasmine rice, basmati rice, wild rice, and rice blends.
- Pasta: Spaghetti, penne, fusilli, macaroni, noodles, and gluten-free pasta.
- Baking ingredients: Flour, sugar, cocoa powder, baking powder, baking soda, cornstarch, and vanilla extract.
- Snacks: Crackers, popcorn, dried fruit, trail mix, nuts, and granola bars.
- Breakfast foods: Oats, cereal, pancake mix, chia seeds, maple syrup, and nut butter.
- Canned goods: Tomatoes, coconut milk, vegetable broth, corn, peas, and canned vegetables.
- Spices: Herbs, spice blends, garlic powder, onion powder, paprika, cumin, cinnamon, and pepper.
Essential Vegan Pantry Categories
Creating simple pantry categories makes it much easier to find what you need while cooking.
Instead of searching through every shelf, you’ll know exactly where each ingredient belongs.
The categories below cover the pantry staples found in many vegan kitchens, but you can always adjust them to match your cooking style and favorite recipes.
Grains
Grains are the foundation of countless vegan meals.
They pair well with vegetables, legumes, sauces, and plant-based proteins, making them some of the most-used ingredients in the pantry.
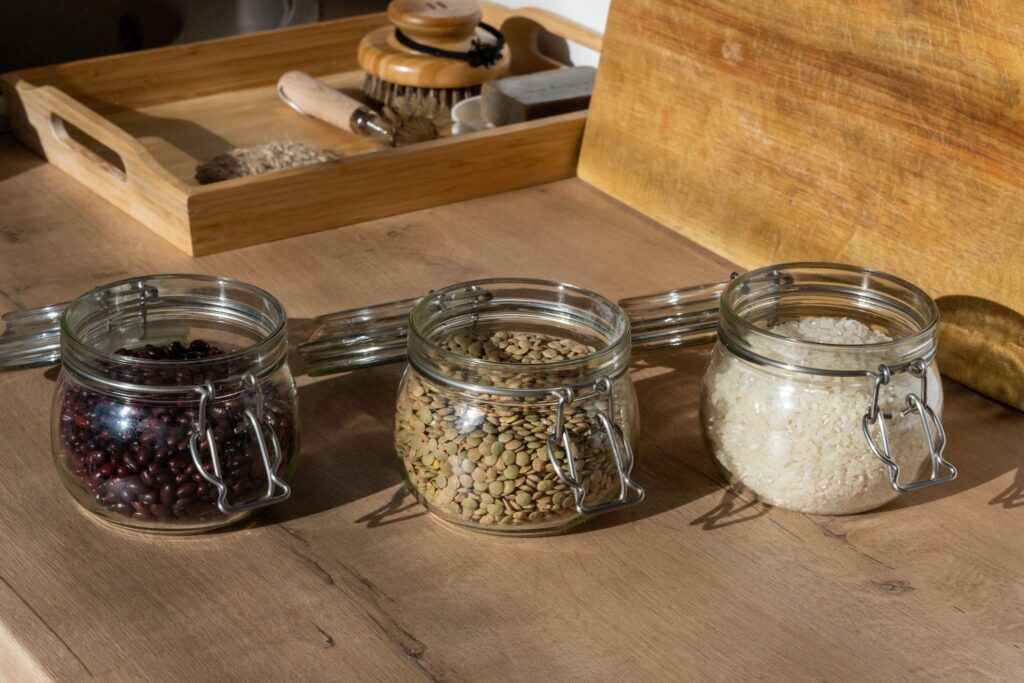
Store grains in airtight containers to keep them fresh and easy to see at a glance.
Common grains to keep on hand include:
- Rice
- Quinoa
- Oats
- Couscous
- Barley
If you enjoy trying new recipes, you can also create space for grains like bulgur, farro, or millet.
Legumes
Legumes are one of the most versatile pantry staples because they work well in soups, stews, curries, salads, wraps, and pasta dishes.
Keeping dried and canned varieties together makes meal planning much easier.
Store dried legumes in airtight containers, while canned varieties can stay in their original packaging until you’re ready to use them.
Popular options include:
- Chickpeas
- Black beans
- Kidney beans
- Lentils
- Split peas
If you buy several types, consider arranging them alphabetically or grouping dried and canned products separately for easier access.
Pasta and Noodles
A dedicated shelf for pasta and noodles makes preparing quick meals much more convenient.
Keep similar shapes together so you can easily grab the one you need for your recipe.
Tall containers work well for long pasta like spaghetti, while shorter containers or baskets are great for smaller shapes.
You may also want to group specialty noodles, such as rice noodles, soba noodles, or ramen, in their own section if you use them regularly.
Baking Ingredients
Keeping baking supplies together saves time whenever you’re making bread, muffins, cookies, or cakes.
Store dry ingredients in airtight containers whenever possible to help keep them fresh and make measuring easier.
A basic baking section often includes:
- Flour
- Sugar
- Baking powder
- Baking soda
- Cocoa powder
You can also keep ingredients like vanilla extract, chocolate chips, cinnamon, and cornstarch nearby so everything is ready when it’s time to bake.
Nuts and Seeds
Nuts and seeds add texture and flavor to everything from oatmeal and salads to baked goods and homemade snacks.
Because many varieties look similar, clear containers with labels make it easy to tell them apart.
Popular choices include almonds, walnuts, cashews, peanuts, sunflower seeds, pumpkin seeds, flaxseeds, chia seeds, and sesame seeds.
If you don’t use them often, consider storing extras according to the package directions to help maintain freshness.
Plant-Based Protein Products
Many vegan kitchens include convenient shelf-stable protein products that make everyday cooking faster.
Keeping these ingredients together helps you quickly build satisfying meals.
Common pantry items include:
- TVP (textured vegetable protein)
- Soy curls
- Shelf-stable tofu
- Seitan mix
If you regularly use other shelf-stable protein products, give them a dedicated space in this section as well.
Oils and Vinegars
Keeping cooking oils and vinegars together creates a convenient station for dressings, marinades, and everyday cooking.
Store bottles upright in a cool, dry place away from direct sunlight when possible.
Depending on your cooking style, this section may include olive oil, avocado oil, sesame oil, vegetable oil, balsamic vinegar, apple cider vinegar, rice vinegar, and red wine vinegar.
Using a small tray can help catch drips and keep shelves clean.
Herbs, Spices, and Seasonings
A well-organized spice collection makes it easier to add flavor while cooking.
Arrange jars in a way that makes sense to you, whether that’s alphabetically, by cuisine, or by how often you use them.
Frequently used seasonings are worth keeping within easy reach.
Common pantry staples include garlic powder, onion powder, paprika, cumin, oregano, basil, thyme, black pepper, cinnamon, chili powder, and Italian seasoning.
Sauces and Condiments
This category brings together the ingredients that add bold flavor to everyday meals.
Keeping bottles grouped together makes it easy to find what you need without searching multiple shelves.
Depending on your favorite recipes, you might store soy sauce, tamari, coconut aminos, hot sauce, mustard, ketchup, barbecue sauce, salsa, maple syrup, and nut butters in this section.
If space allows, place taller bottles toward the back so smaller jars stay visible.
Snacks
A dedicated snack section keeps quick bites organized and prevents them from getting mixed in with cooking ingredients.
Using a basket or bin works especially well because you can pull the entire container out instead of reaching around other items.
Popular pantry snacks include crackers, popcorn, granola bars, dried fruit, roasted chickpeas, nuts, trail mix, and pretzels.
Keeping snacks together also makes it easier to see when it’s time to restock your family’s favorites.
Choose the Right Storage Containers
The right storage containers can make your pantry easier to use every day.
They help keep ingredients organized, make shelves look less cluttered, and let you find what you need without digging through bags and boxes.
Start with the ingredients you use most often, then add more containers over time as your pantry grows.
Clear Containers
Clear containers make it easy to see what’s inside without opening every lid.
A quick glance tells you whether you’re running low on rice, oats, or flour, which makes meal planning and grocery shopping much simpler.
They also help you notice when it’s time to refill a container before you run out completely.
Using matching clear containers can create a cleaner, more organized look, but they don’t all have to be the same shape or brand.
Choose sizes that fit both your shelves and the amount of food you typically keep on hand.
Benefits of clear containers:
- Easy visibility of pantry staples
- Quick inventory checks before shopping
- Simple to identify ingredients while cooking
- Neater-looking pantry shelves
Airtight Containers
Airtight containers are one of the best upgrades you can make for storing dry pantry staples.
Their secure lids help keep out moisture and reduce exposure to air, which helps many dry goods stay in good condition for longer.
They’re especially useful for ingredients that come in paper or thin plastic packaging after opening.
Flour, sugar, oats, rice, beans, pasta, and cereal are all great candidates for airtight storage.
Choose containers with lids that are easy to open and close so you’ll actually enjoy using them every day.
Benefits of airtight containers:
- Help keep dry goods fresher
- Protect ingredients from moisture
- Reduce spills on pantry shelves
- Make stacking and organizing easier
Glass vs Plastic Containers
Both glass and plastic containers work well, so the best choice depends on your kitchen, budget, and personal preference.
Glass containers are durable, don’t absorb food odors, and stay clear over time.
They’re also heavier, which makes them less convenient if you frequently move large containers around.
Plastic containers are lightweight and often cost less, making them a practical option for larger pantry collections.
Many are designed to stack neatly, helping you make the most of your shelf space.
Whichever material you choose, look for sturdy containers with well-fitting lids and shapes that make good use of your pantry shelves.
| Feature | Glass Containers | Plastic Containers |
|---|---|---|
| Durability | Strong but can break if dropped | Durable and less likely to shatter |
| Weight | Heavier | Lightweight and easy to handle |
| Cost | Usually more expensive | Often more budget-friendly |
| Visibility | Stays clear over time | Usually clear, though some may become cloudy with age |
Mason Jars for Small Ingredients
Mason jars are a simple and attractive way to organize smaller pantry staples.
Their clear glass makes it easy to see what’s inside, and the wide openings make scooping ingredients quick and convenient.
They’re especially useful for ingredients that are often stored in small bags, which can be difficult to stack neatly.
Mason jars are ideal for storing:
- Seeds
- Nuts
- Dried herbs
- Spices
Adding a small label to each jar makes everything even easier to find.
Lining jars up on a shelf or placing them in a shallow basket can keep smaller ingredients organized while adding a clean, tidy look to your pantry.
Pantry Container Size Guide
Choosing the right container size helps prevent wasted space and keeps pantry shelves looking neat.
If you’re buying new storage containers, use this guide as a starting point.
You can always adjust the sizes based on how much of each ingredient you typically keep on hand.
| Ingredient | Suggested Container Size | Approximate Capacity | Why It Works |
|---|---|---|---|
| Rice | Large | 8–12 cups | Holds enough for frequent cooking while reducing refills. |
| Flour | Large | 8–12 cups | Fits most standard bags and leaves room for easy scooping. |
| Pasta | Tall | 8–10 cups | Perfect for long pasta like spaghetti and other dry pasta shapes. |
| Oats | Medium | 5–8 cups | Stores a typical package with room to scoop easily. |
| Lentils | Medium | 4–6 cups | Ideal for dried legumes without taking up too much shelf space. |
| Nuts | Small | 2–4 cups | Keeps small quantities organized and easy to grab for recipes or snacks. |
| Seeds | Small | 1–3 cups | Great for chia seeds, flaxseeds, pumpkin seeds, and similar ingredients. |
| Spices | Extra Small | 4–8 ounces | Fits neatly in a spice rack or drawer organizer while keeping labels visible. |
Tip: Before purchasing new containers, measure the height and depth of your pantry shelves. Containers that fit your space well are much easier to stack, organize, and access than ones that are simply the largest available.
Label Everything Clearly
Clear labels are one of the easiest ways to keep your pantry organized.
They take the guesswork out of cooking and help everyone in your household find the right ingredient without opening multiple containers.
Even if you have a great memory, labels make it much easier to keep your pantry neat over time.
Include Product Names
Start by labeling every container with the name of the ingredient inside.
This is especially helpful for foods that look alike, such as flour, powdered sugar, cornstarch, oats, quinoa, or different types of rice.
Clear names also make it easier for family members or guests to help in the kitchen without asking where everything is.
Use names that are easy to read at a glance.
For example, write “Brown Rice” instead of just “Rice” if you store more than one variety.
If you keep similar ingredients together, consistent labels make the entire pantry feel more organized.
Add Purchase Dates (Optional)
Adding the date you purchased an ingredient isn’t required, but it can be a useful habit if you buy pantry staples in bulk.
A small date on the label helps you remember which container should be used first when you refill your pantry.
This is especially handy for ingredients like flour, oats, beans, pasta, and grains that you keep stocked throughout the year.
There’s no need to include the full date if you don’t want to.
Even writing the month and year can make it easier to keep track of older items.
If your containers are refilled often, simply replace or update the label each time you add a fresh batch.
Add Expiration Dates (Optional)
If the original packaging includes a best-by or expiration date, consider writing it on the storage container before recycling the package.
This way, you’ll still have the information available without needing to keep the original bag or box.
Keeping dates visible also makes it easier to plan meals around ingredients that should be used sooner.
When you check your pantry every few weeks, you’ll quickly spot anything that deserves a place in your next recipe.
Remember that different pantry items have different storage recommendations, so follow the guidance printed on the original packaging whenever it’s available.
Use Waterproof Labels
Kitchen shelves can sometimes collect moisture, cooking splatters, or dusty fingerprints over time.
Waterproof labels are less likely to peel, smear, or fade, helping your pantry stay neat with very little effort.
If you prefer reusable containers, consider using removable labels or a chalk marker that can be wiped clean when it’s time to refill the container with something new.
Choose a label style that’s easy to read from the front of the shelf.
Large, simple lettering is often more useful than decorative designs because you’ll be able to find ingredients in seconds while cooking.
Organize by Frequency of Use
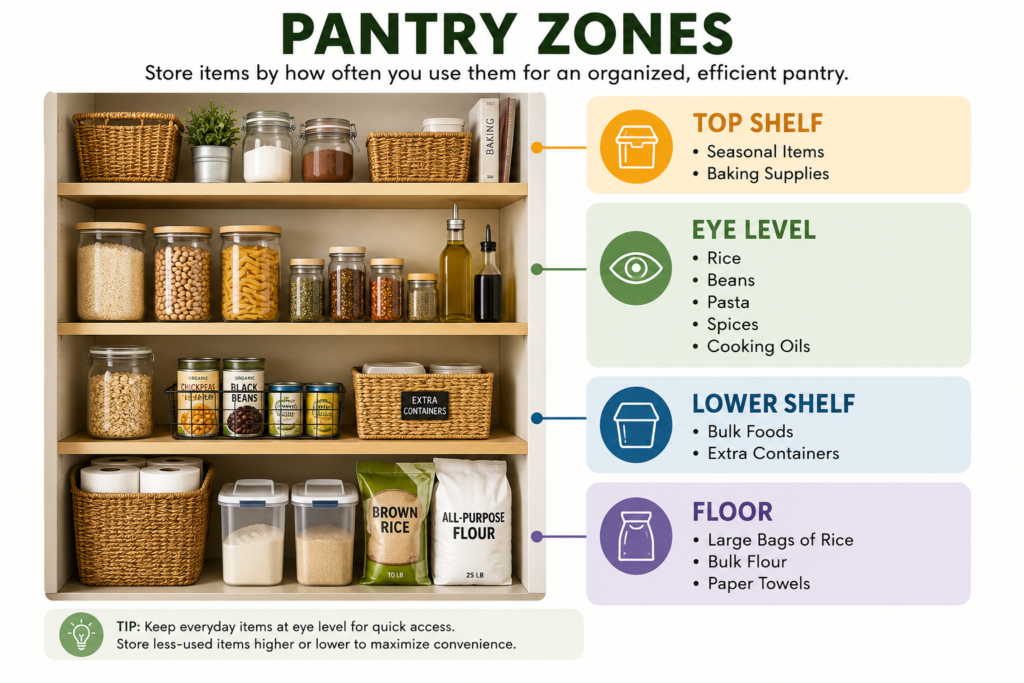
One of the easiest ways to make your pantry more practical is to arrange it based on how often you use each ingredient.
The foods you reach for every day should be the easiest to grab, while ingredients you use less often can be stored on higher or lower shelves.
This simple system saves time, reduces clutter, and makes cooking feel much more enjoyable.
As your cooking habits change, don’t be afraid to move items around.
Your pantry should work for you, not the other way around.
Everyday Ingredients
Place your most-used pantry staples at eye level or on the shelf that’s easiest to reach.
These are the ingredients you use regularly for breakfasts, lunches, dinners, and simple snacks.
Keeping them together means you can start cooking without searching through the pantry.
Common everyday ingredients include:
- Oats
- Rice
- Pasta
- Olive oil
- Salt
- Pepper
You may also want to keep other favorites nearby, such as canned beans, vegetable broth, garlic powder, onion powder, or nutritional yeast if they’re part of your everyday cooking.
Try not to overcrowd this section.
Leaving a little extra space makes it easier to grab ingredients and put them back when you’re finished.
Weekly Cooking Ingredients
Some ingredients aren’t used every day but still play an important role in your weekly meal rotation.
Store these on a nearby shelf so they’re easy to access without taking up your prime storage space.
This section might include:
- Quinoa
- Couscous
- Lentils
- Canned tomatoes
- Coconut milk
- Soy sauce
- Vinegars
- Dried herbs
- Specialty spices
Grouping these ingredients together helps you quickly gather everything you need for soups, curries, pasta dishes, stir-fries, and other favorite recipes.
Occasional Baking Supplies
Baking ingredients usually don’t need to be within arm’s reach unless you bake often.
A dedicated shelf or storage bin keeps everything together and prevents these items from getting mixed in with everyday pantry staples.
Consider storing items such as:
- Flour
- Sugar
- Baking powder
- Baking soda
- Cocoa powder
- Chocolate chips
- Vanilla extract
- Cornstarch
- Sprinkles and decorating supplies
Keeping all of your baking supplies in one place makes it much easier to prepare cookies, cakes, muffins, and homemade breads whenever the mood strikes.
Seasonal Ingredients
Some pantry items only come out during certain times of the year.
Instead of letting them take up valuable everyday space, store them on the highest shelf or in a clearly labeled storage bin until you need them.
Seasonal ingredients may include:
- Pumpkin pie spice
- Peppermint extract
- Holiday baking decorations
- Specialty cake mixes
- Canned pumpkin
- Cranberry sauce
- Food coloring for holiday treats
When the season arrives, simply move these ingredients to a more accessible shelf.
Once the holidays or special occasion have passed, return them to their storage area to keep your pantry organized year-round.
Make the Most of Small Pantry Spaces
A small pantry can be just as functional as a large one when every inch is used wisely.
Use Vertical Storage
Many pantry shelves have empty space above shorter containers that often goes unused.
Take advantage of this vertical space by storing taller containers at the back and shorter ones at the front.
You can also add extra storage with small stackable shelves or bins that let you use the full height of each shelf.
This works especially well for canned goods, jars, and small containers that would otherwise leave unused space above them.
Keeping items visible from top to bottom also makes it less likely that ingredients will get forgotten in the back of the pantry.
Add Shelf Risers
Shelf risers are simple platforms that create an extra level on your pantry shelf.
They make it easier to see items stored behind one another instead of hiding them in a single row.
They’re especially useful for canned goods, spices, small jars, and sauces.
Instead of moving several items to reach one can, you’ll be able to spot exactly what you need right away.
Choose risers that fit comfortably on your shelves without making the pantry feel crowded.
A little extra height often creates a big improvement in visibility.
Install Door Organizers
The inside of your pantry door is valuable storage space that’s often overlooked.
A door organizer can hold lightweight items that don’t need to take up shelf space.
This is a great place to store:
- Spice jars
- Small bottles of vinegar or cooking oil
- Seasoning packets
- Tea bags
- Snack bars
- Measuring spoons or small kitchen tools
Keeping these smaller items on the door frees up shelf space for larger pantry staples.
Just avoid overloading the organizer, as too much weight can make it harder to open and close the door smoothly.
Use Stackable Containers
Stackable containers help you make the most of both the width and height of your pantry shelves.
Their flat tops allow you to safely place one container on top of another without wasting space.
Using containers that are similar in shape also creates a cleaner layout and makes it easier to keep categories together.
For example, you might stack containers of rice, quinoa, and couscous on one shelf while storing different types of flour on another.
Before buying new containers, measure your shelves so you know they’ll fit comfortably with enough room to remove the lids.
Store Bulk Items Separately
Buying pantry staples in bulk can be convenient, but large bags often take up valuable shelf space.
Instead of storing oversized packages in your main pantry, keep only a smaller amount in an everyday container that’s easy to use.
Store the remaining bulk supply in another cool, dry storage area if you have one, such as a cabinet, utility shelf, or dedicated food storage bin.
When your everyday container starts running low, simply refill it from the larger package.
This approach keeps your pantry tidy while still giving you the convenience of buying larger quantities.
Even in a compact kitchen, a few thoughtful storage changes can make cooking feel smoother and more enjoyable every day.
| Shelf | Best Items | Why It Works |
|---|---|---|
| Top Shelf | Seasonal ingredients, baking supplies, extra pantry staples | Stores items you don’t need every day while keeping them organized and out of the way. |
| Eye Level | Everyday grains, beans, pasta, spices, cooking oils, favorite seasonings | Keeps your most-used ingredients within easy reach for faster meal prep. |
| Middle Shelf | Canned goods, sauces, vinegars, nut butters, breakfast foods | Makes frequently used pantry staples easy to see and grab without bending or stretching. |
| Lower Shelf | Bulk containers, snacks, extra pasta, large cereal boxes | Provides sturdy support for heavier containers while keeping snacks easy to access. |
| Floor | Large bags of rice, bulk flour, beverage boxes, overflow storage | Ideal for bulky or heavy items that would take up valuable shelf space elsewhere. |
Best Ways to Store Common Vegan Pantry Staples
Storing pantry staples the right way helps keep your shelves organized and makes cooking more enjoyable.
It also makes it easier to find ingredients quickly, refill containers when needed, and keep your pantry looking neat.
Most dry goods store well in airtight containers, while some ingredients are best left in their original packaging.
Use the table below as a quick reference when organizing your pantry.
| Pantry Item | Recommended Storage | Helpful Tip |
|---|---|---|
| Rice | Airtight container | Choose a container with a wide opening for easy scooping and keep it in a cool, dry place. |
| Flour | Airtight container | Label the container with the type of flour if you store more than one variety. |
| Oats | Airtight container | Keep a measuring cup inside or nearby for quick breakfasts and baking. |
| Lentils | Glass jar or airtight container | Group different varieties together and label each container clearly. |
| Beans | Original can or airtight container | Store canned beans in their original cans until opened, and transfer dried beans to airtight containers. |
| Pasta | Tall container | Tall containers are ideal for long pasta like spaghetti, while shorter containers work well for smaller shapes. |
| Nuts | Airtight container | Store different varieties in separate containers so they’re easy to identify while cooking or baking. |
| Seeds | Glass jar | Small glass jars keep seeds organized and make it easy to see when you’re running low. |
| Nutritional yeast | Original container with the lid tightly closed | Close the lid after each use and follow the storage instructions on the packaging. |
| Spices | Spice rack or drawer organizer | Arrange spices alphabetically or by how often you use them for faster cooking. |
You don’t need to buy every storage container at once.
Start with the pantry staples you use most often, then gradually organize the rest as your collection grows.
Pantry Check Guide for Common Staples
A quick pantry review every few weeks helps you spot ingredients that need attention before they become forgotten in the back of the shelf.
Instead of relying on a general timeline, check the original packaging for storage instructions and best-by dates, and look for the signs below during your regular pantry reset.
| Pantry Item | Check Regularly For | Organization Tip |
|---|---|---|
| Flour | Clumps, damaged packaging | Store in a labeled airtight container and keep it in a cool, dry place. |
| Rice | Moisture exposure or torn packaging | Keep containers tightly sealed and scoop with a clean, dry utensil. |
| Pasta | Opened or damaged packages | Transfer loose pasta to a tall container to keep different shapes organized. |
| Lentils | Broken packaging or moisture | Group different varieties together and label each container clearly. |
| Beans (Dried) | Moisture or damaged packaging | Store in airtight containers with other dried legumes for easy access. |
| Nuts | Freshness according to package guidance | Keep varieties in separate labeled containers to make meal prep easier. |
| Seeds | Freshness according to package guidance | Store in small labeled jars or containers so they’re easy to identify. |
| Spices | Loss of aroma or faded labels | Arrange alphabetically or by frequency of use and replace worn labels as needed. |
| Nutritional Yeast | Lid securely closed and package guidance | Return the container to its designated spot after each use to avoid duplicate purchases. |
Quick Tip: Whenever you finish a pantry item, add it to your shopping list right away. This simple habit helps keep your pantry stocked with the ingredients you actually use while preventing unnecessary duplicate purchases.
Pantry Organization Mistakes to Avoid
Keeping Expired Foods
It’s easy for older ingredients to get pushed to the back of a shelf and forgotten.
Taking a few minutes every month to check your pantry helps you spot products that should no longer be kept.
As you look through your shelves, remove anything that has expired or is no longer in good condition according to its packaging.
This also gives you a chance to move older ingredients to the front so they’re used before newer ones.
A quick pantry check before grocery shopping is a simple habit that keeps shelves tidy and helps you make better use of the ingredients you already have.
Buying More Than You Can Store
Buying pantry staples in larger amounts can be convenient, but only if you have enough space to store them properly.
When shelves become overcrowded, it’s much harder to see what you have.
Hidden ingredients are often forgotten, which can lead to unnecessary duplicate purchases.
Before buying more of a pantry staple, take a quick look at your current supply.
If you enjoy buying in bulk, keep only a refill container in your pantry and store the extra supply in another cool, dry location if you have the space.
This keeps your everyday shelves neat while still giving you the convenience of buying larger quantities.
Not Labeling Containers
Many dry ingredients look surprisingly similar once they’re transferred into storage containers.
Flour, powdered sugar, cornstarch, oats, and different types of rice can easily be mistaken for one another.
A simple label removes any guesswork and makes cooking much smoother.
Clear labels also help everyone in your household know where ingredients belong after they’re used.
The more consistent your labels are, the easier it becomes to maintain an organized pantry.
Mixing Different Products Together
It can be tempting to combine the last handful of one package with a newly opened bag to save space.
In most cases, it’s better to finish one package before adding another.
Keeping products separate makes it easier to keep track of what you’re using and avoids confusion about which ingredients came from which package.
It’s also helpful to keep different types of similar foods in their own containers.
For example, store white rice, brown rice, jasmine rice, and basmati rice separately instead of mixing them together.
The same idea works well for beans, lentils, pasta shapes, nuts, and seeds.
Overcrowding Shelves
Packing every shelf from front to back might seem like a good way to maximize space, but it often has the opposite effect.
When shelves are too full, it’s difficult to see what’s behind the front row.
Ingredients become harder to reach, and forgotten items are more likely to sit unused.
Leave a little open space on each shelf whenever possible.
That extra room makes it easier to grab ingredients, return them after cooking, and put away groceries without creating clutter.
Remember, an organized pantry doesn’t need to look perfect.
It simply needs to be easy to use every time you step into the kitchen.
Pantry Organization Timeline
If you’re organizing your pantry from start to finish, breaking the project into smaller steps makes it feel much more manageable.
Most pantries can be organized in about 1½ hours, although larger pantries may take a little longer.
Use this timeline as a simple guide and work at your own pace.
| Time | Task | What You’ll Do |
|---|---|---|
| 15 minutes | Empty the pantry | Remove all food, containers, baskets, and shelf organizers. |
| 20 minutes | Clean the shelves | Wipe away crumbs, dust, and spills before putting anything back. |
| 20 minutes | Sort ingredients | Check expiration dates and group similar pantry items together. |
| 20 minutes | Organize categories | Arrange ingredients by category and place everyday items at eye level. |
| 15 minutes | Label containers | Label storage containers and return everything to its designated place. |
Quick Tip: Don’t worry if you can’t finish everything in one session. Organizing just one shelf at a time is still progress, and it’s much easier to maintain than trying to create a perfect pantry all at once.
Simple Pantry Maintenance Routine
The easiest way to keep your pantry organized is to spend a few minutes maintaining it on a regular schedule.
Small tasks take much less time than a complete pantry makeover.
A quick check every week and a more thorough review every month will help your organization system stay neat without feeling like a chore.
5-Minute Weekly Pantry Reset
Keeping your pantry organized doesn’t have to take a lot of time.
Spend just five minutes once a week running through this quick checklist, and you’ll prevent clutter from building up in the first place.
- Return every ingredient to its designated shelf.
- Check which pantry staples are running low.
- Wipe away crumbs or small spills.
- Move older products to the front and newer ones behind (FIFO).
- Add anything you need to your shopping list.
Quick Tip: Pick the same day each week for your pantry reset, such as after unpacking groceries or before planning next week’s meals. Turning it into a routine makes it much easier to keep your pantry neat all year long.
Weekly
Set aside five to ten minutes each week to tidy up your pantry.
Start by putting any ingredients back where they belong after cooking or baking.
Returning items to their proper place keeps categories organized and makes it easier to find what you need the next time you cook.
Take a quick look at the ingredients you use most often.
If you’re running low on staples like rice, pasta, oats, canned beans, or olive oil, add them to your shopping list right away.
This simple habit helps you avoid last-minute trips to the store and makes meal planning much easier.
While you’re there, straighten containers, close any loose lids, and quickly scan the shelves to make sure everything is easy to see.
These small tasks only take a few minutes but make a big difference over time.
Monthly
Once a month, give your pantry a slightly deeper refresh.
Wipe down shelves to remove crumbs, dust, and any small spills before they become harder to clean.
You don’t have to empty the entire pantry every month.
Simply move containers one section at a time, clean the shelf, and place everything back neatly.
As you put items away, move older ingredients toward the front and place newer ones behind them.
This simple rotation helps you use ingredients in the order you bought them and keeps pantry staples from getting forgotten.
Take a moment to straighten baskets, storage bins, and spice jars so everything stays easy to find.
Every Few Months
Every few months, spend a little extra time reviewing the overall condition of your pantry.
Check the dates on packaged foods and remove anything that is no longer suitable to keep according to its packaging.
If you notice ingredients you rarely use, think about moving them to a higher shelf so your everyday staples stay within easy reach.
Your cooking habits may also change throughout the year.
As they do, adjust your pantry categories to match the way you cook now rather than the way you organized them months ago.
Don’t be afraid to rearrange shelves if a different layout would make cooking more convenient.
A pantry isn’t meant to stay exactly the same forever.
A few small adjustments from time to time will help your storage system continue working for you, making every meal a little easier to prepare.
Pantry Reset Checklist
Use this checklist whenever your pantry starts to feel cluttered or needs a fresh start.
Check off each step as you go and enjoy the progress along the way.
- Empty all pantry shelves and remove storage bins or baskets.
- Wipe down shelves, containers, and organizers.
- Remove expired or unwanted pantry items.
- Set aside unopened foods for donation, if appropriate.
- Group similar ingredients into categories.
- Transfer dry goods into airtight containers where needed.
- Label containers with ingredient names.
- Place older items in front and newer items behind (FIFO method).
- Arrange ingredients by how often you use them.
- Organize spices, sauces, and snacks into dedicated sections.
- Restock low pantry staples from your shopping list.
- Leave a little open shelf space for future groceries.
- Take one final look to make sure everything is easy to see and reach.
Quick Tip: Save this checklist for your next pantry refresh. Running through these simple steps every few months is much easier than reorganizing your entire pantry from scratch.
Vegan Pantry Essentials Checklist
Use this checklist as a simple guide when stocking or organizing your vegan pantry.
Start with the ingredients you use most often and build your pantry over time as you discover new recipes and favorite meals.
Grains
- Rice
- Oats
- Quinoa
- Pasta
Legumes
- Chickpeas
- Lentils
- Black beans
Baking
- Flour
- Sugar
- Baking powder
Flavor Builders
- Nutritional yeast
- Soy sauce
- Vinegar
- Olive oil
Herbs & Spices
- Garlic powder
- Onion powder
- Paprika
- Cumin
- Oregano
- Basil
Snacks
- Nuts
- Seeds
- Dried fruit
- Popcorn
As your cooking style grows, you can always add new pantry staples that fit your favorite recipes.
Expert Pantry Organization Tips
Keep Everyday Ingredients at Eye Level
Store the ingredients you reach for most often where they’re easiest to see and grab.
Everyday staples like rice, oats, pasta, olive oil, salt, and your favorite seasonings deserve the most convenient shelf space.
Less frequently used items, such as specialty baking ingredients or seasonal products, can be stored on higher or lower shelves.
Follow the First In, First Out (FIFO) Method
The first in, first out (FIFO) method is a simple way to use older ingredients before newer ones.
Each time you unpack groceries, place the newer products behind the ones already on the shelf.
This small habit helps you work through your pantry in the order items were purchased and makes it less likely that ingredients will be forgotten.
Leave a Little Extra Shelf Space
It can be tempting to fill every shelf completely, but a little empty space is actually helpful.
Open space makes it easier to put groceries away, remove containers, and return ingredients after cooking.
A less crowded shelf also allows you to see what you have at a glance, making your pantry feel more organized and easier to maintain.
Create Small Ingredient Baskets
Keep ingredients that are often used together in small baskets or storage bins.
For example, you could have one basket for baking supplies, another for taco night essentials, and another for pasta ingredients.
When it’s time to cook, simply pull out the entire basket instead of collecting individual items from different shelves.
This saves time and keeps related ingredients neatly grouped together.
Check Your Pantry Before Shopping
Before heading to the grocery store, take a quick look through your pantry.
A two-minute check is often enough to see which staples are running low and which ones you already have.
This simple routine helps you write a more accurate shopping list and reduces the chances of buying duplicate ingredients.
Over time, you’ll spend less money on unnecessary purchases and enjoy a pantry that’s always ready for your next recipe.
Expert Kitchen Tips
- Keep a shopping list nearby. Place a small notepad, magnetic grocery list, or dry-erase board near your pantry so you can write down staples as soon as they start running low.
- Create a “new grocery” zone. Reserve one shelf or basket for newly purchased groceries. Once you have time, move each item to its proper place instead of squeezing everything onto already full shelves.
- Use labels everyone can understand. If multiple people use your kitchen, choose simple, easy-to-read labels so everyone knows where ingredients belong after cooking.
- Avoid opening a new package too soon. Finish one bag or container before opening another of the same ingredient whenever possible. This keeps your pantry tidier and makes it easier to track what you have.
- Keep a few empty containers on hand. Having one or two spare airtight containers ready makes it easy to organize bulk purchases or transfer ingredients from damaged packaging without delaying the task.
- Adjust your pantry as your cooking habits change. Your organization system doesn’t have to stay the same forever. If you start cooking different recipes more often, move those ingredients to a more convenient shelf so your pantry continues to work for you.
Final Thoughts
A well-organized vegan pantry makes everyday cooking simpler, faster, and more enjoyable.
When every ingredient has a place, meal prep feels easier, grocery shopping becomes more efficient, and it’s much less likely that food will be forgotten in the back of a shelf.
Don’t feel like you have to organize your entire pantry in one afternoon. Start with one shelf, one category, or even one container, and build from there.
Remember, the best pantry isn’t the one that looks perfect.
It’s the one that’s easy to use, simple to maintain, and helps you spend more time enjoying homemade meals and less time searching for ingredients.
FAQs
How should dry beans be stored?
Store dry beans in airtight containers in a cool, dry pantry away from direct sunlight.
Is it better to keep food in its original packaging?
For many dry goods, transferring them to airtight containers can improve organization and make it easier to see what you have.
Shelf-stable canned goods and unopened packaged items can remain in their original packaging until opened.
What is the best way to organize spices?
Arrange spices alphabetically, by cuisine, or by how often you use them, depending on what works best for your cooking routine.
How often should I reorganize my pantry?
A quick tidy each week and a more thorough review every few months helps keep your pantry organized.
Are clear storage containers necessary?
No. While they make it easier to see inventory at a glance, opaque airtight containers can work just as well if they are clearly labeled.
Should I organize my pantry by category or meal type?
For most kitchens, organizing by category is the easiest system to maintain.
Keep similar items together, such as grains, legumes, baking ingredients, spices, and snacks, so they’re easy to find.
If you regularly cook the same meals, you can also use small baskets to group ingredients used together, like taco night or baking essentials.
What containers work best for small pantries?
Stackable, airtight containers are a great choice because they make the most of limited shelf space while keeping ingredients easy to see.
Clear containers are especially helpful since you can quickly check what you have without opening every lid.
Choose container sizes that fit your shelves rather than buying the largest ones available.
How do I keep pantry shelves from getting cluttered again?
The easiest way is to spend a few minutes each week putting ingredients back where they belong and checking for low-stock items.
Avoid overfilling shelves, and leave a little open space for new groceries.
Following the first in, first out (FIFO) method also helps keep your pantry organized by ensuring older items are used before newer ones.
Can I organize a pantry without buying storage containers?
Absolutely. You can create a well-organized pantry by grouping similar ingredients together, adding simple labels, and using baskets or bins you already own.
Transfer dry goods into airtight containers only when it makes sense for your storage space and cooking routine.
A consistent organization system is more important than matching containers.
How do I organize a pantry with deep shelves?
Store everyday ingredients near the front so they’re easy to reach.
Place less frequently used items toward the back, and use clear bins or pull-out baskets to keep products from getting lost.
Shelf risers can also improve visibility by creating different levels, making it easier to see what’s stored behind the front row.
Hi, I’m Daisy Roots, the home cook and recipe developer behind this kitchen. I create simple, tested vegan recipes using everyday ingredients. Every dish is developed and cooked in my own kitchen, with clear steps to help you get reliable results every time. Thanks for stopping by — let’s cook something great!