Cooking beans from scratch is easier than you might think, and the results are well worth the little extra time.
Dried beans cook up tender, creamy, and full of flavor, giving you a texture that’s hard to match with canned beans.
They’re also budget-friendly and create less packaging waste, making them a smart staple to keep on hand.
In this guide, you’ll learn how to prepare, soak (or skip soaking), cook, season, and store dried beans with confidence.
How to Cook Beans from Scratch at a Glance
- Difficulty: Easy
- Prep Time: 10 minutes (plus optional soaking)
- Cook Time: 1–3 hours (depending on the bean variety)
- Best Cooking Method: Gentle simmer on the stovetop
- Bean-to-Water Ratio: 1 cup dried beans to 3–4 cups water
- Typical Yield: 1 cup dried beans = about 2½–3 cups cooked
- Freezer Friendly: Yes
- Storage: 3–5 days in the refrigerator or up to 6 months in the freezer
- Best For: Meal prep, soups, salads, chili, burritos, grain bowls, and side dishes
Why Cook Dried Beans Instead of Using Canned?
Better Flavor and Texture
One of the biggest reasons to cook dried beans is the flavor.
Freshly cooked beans have a deeper, richer taste that isn’t hidden by the liquid found in most cans.
As the beans simmer, they slowly absorb the flavors of the water and any aromatics you add, such as onion, garlic, or bay leaves.
The texture is just as rewarding.
When cooked gently, dried beans become creamy and smooth on the inside while keeping their shape on the outside.
This makes them perfect for everything from hearty soups to fresh salads and homemade dips.
Cooking beans yourself also lets you decide exactly how tender they should be.
For salads, you can stop cooking while they’re still slightly firm so they hold their shape.
For soups, stews, mashed beans, or refried beans, you can let them cook a little longer until they’re soft and creamy.
That level of control is hard to achieve with canned beans, which are already fully cooked.
More Budget-Friendly
Dried beans are one of the most affordable pantry staples you can buy.
A single bag usually makes several servings once cooked, often costing much less than buying the same amount in cans.
If you cook for a family or enjoy meal prepping, those savings can add up quickly.
Cooking a large batch at once also means you’ll have beans ready for several meals throughout the week.
You can use them in tacos one night, soups another day, and grain bowls or salads later in the week without opening multiple cans.
Less Packaging Waste
Choosing dried beans also means bringing home less packaging.
Instead of throwing away several empty cans, you only need one bag of dried beans to make a generous batch.
If you’re trying to reduce kitchen waste, this is a simple change that fits easily into everyday cooking.
It’s a small habit that can make a noticeable difference over time, especially if beans are a regular part of your meals.
Full Control Over Ingredients
When you cook beans from scratch, you decide exactly what goes into the pot.
You can keep the flavor simple with just water and salt or build extra flavor by adding garlic, onions, herbs, or spices as they cook.
You also control when and how much salt to add, making it easy to season the beans to match the recipe you’re preparing.
Many canned beans contain added salt or other ingredients to help preserve them or improve texture.
Cooking dried beans lets you skip anything you don’t want and keep the ingredient list as simple as you like.
The result is a pot of beans that’s made to your taste and ready to fit into almost any meal.
Types of Beans You Can Cook from Scratch
Black Beans
Black beans have a mild, slightly earthy flavor and a smooth, creamy texture when cooked.
They hold their shape well, making them a great choice for tacos, burritos, rice bowls, soups, salads, and homemade dips.
Pinto Beans
Pinto beans become soft and creamy as they cook, with a rich, comforting flavor.
They’re best known for refried beans, but they also work beautifully in chili, burritos, soups, and casseroles.
Kidney Beans
Kidney beans are large, firm beans with a hearty texture that stands up well to long cooking.
Their shape makes them ideal for chili, bean salads, stews, and other recipes where you want the beans to stay intact.
Navy Beans
Navy beans are small, white beans that cook into a soft, creamy consistency.
They’re a classic choice for baked beans and are also excellent in soups, chowders, and creamy bean purees.
Cannellini Beans
Cannellini beans are larger white beans with a mild, slightly nutty flavor.
Their creamy texture pairs well with pasta dishes, vegetable soups, salads, and simple side dishes flavored with garlic and fresh herbs.
Great Northern Beans
Great Northern beans are medium-sized white beans with a delicate flavor.
They stay slightly firmer than navy beans after cooking, making them a versatile option for soups, casseroles, and slow-simmered dishes.
Chickpeas (Garbanzo Beans)
Chickpeas have a firm texture and a mild, nutty taste that works in countless recipes.
They’re perfect for homemade hummus, roasted snacks, curries, grain bowls, pasta salads, and hearty stews.
Lima Beans
Lima beans are buttery, creamy, and slightly sweet once fully cooked.
They’re delicious in soups, succotash, casseroles, and simple side dishes where their smooth texture can really shine.
Quick Bean Comparison
| Bean | Typical Cook Time* | Best Uses |
|---|---|---|
| Black Beans | 60–90 minutes | Tacos, soups, burritos, rice bowls |
| Pinto Beans | 60–90 minutes | Refried beans, chili, burritos |
| Kidney Beans | 90–120 minutes | Chili, stews, bean salads |
| Chickpeas (Garbanzo Beans) | 90–120 minutes | Hummus, curries, roasted snacks |
| Navy Beans | 60–90 minutes | Baked beans, soups, chowders |
How Much Do Beans Yield?
Dried beans expand significantly as they cook, making them an excellent pantry staple for meal planning and batch cooking.
Use this quick reference to estimate how much cooked beans you’ll have.
| Dried Beans | Approximate Cooked Yield |
|---|---|
| 1 cup | About 2½–3 cups |
| 2 cups | About 5–6 cups |
| 1 pound (about 2 cups) | About 6–7 cups |
Tip: These are approximate yields and can vary slightly depending on the type of bean and how long it’s cooked.
Equipment You’ll Need
- Large bowl: Ideal for sorting, rinsing, and soaking the beans before cooking.
- Colander: Makes it easy to rinse the beans thoroughly and drain them after soaking.
- Large heavy-bottomed pot: Helps the beans cook evenly and prevents them from sticking or scorching.
- Wooden spoon: Useful for gently stirring the beans without breaking them apart.
- Measuring cups: Helps you measure the right amount of beans and water for consistent results.
- Storage containers: Perfect for refrigerating or freezing leftover cooked beans for future meals.
Ingredients
- Dried beans: Choose your favorite variety, such as black beans, pinto beans, kidney beans, or chickpeas.
- Water: Fresh water is essential for soaking (if desired) and cooking the beans evenly.
- Salt: Enhances the natural flavor of the beans when added during cooking.
Optional Aromatics
- Onion: Adds a mild sweetness and savory flavor to the cooking liquid.
- Garlic: Brings a rich, aromatic depth that pairs well with most bean varieties.
- Bay leaves: Infuse the beans with a subtle earthy flavor as they simmer.
- Celery: Adds a light, savory note to the pot without overpowering the beans.
- Carrots: Contribute a gentle sweetness and extra flavor to the broth.
- Fresh herbs: Herbs like thyme, rosemary, or parsley add fresh, fragrant flavor while the beans cook.
Bean-to-Water Ratio Quick Reference
A good starting ratio is to use 3 to 4 cups of water for every 1 cup of dried beans.
This gives the beans enough room to absorb water and cook evenly.
| Dried Beans | Water for Cooking |
|---|---|
| 1 cup | 3–4 cups |
| 2 cups | 6–8 cups |
| 3 cups | 9–12 cups |
Tip: Check the water level occasionally while the beans simmer. If it drops below the beans, add more hot water to keep them fully covered and cooking evenly.
Before You Start: Quick Preparation Tips
Sort Through the Beans
Pour the dried beans into a large bowl or spread them out on a baking sheet where they’re easy to see.
Take a quick look through the beans and remove anything that doesn’t belong.
This only takes a minute or two, but it’s a good habit that helps prevent surprises later.
Remove Stones or Damaged Beans
Although dried beans are cleaned before they’re packaged, it’s still possible to find a small stone, a twig, or a broken bean mixed in.
Discard any beans that are cracked, badly shriveled, or unusually discolored.
Starting with good-quality beans gives you more consistent results once they’re cooked.
Rinse Thoroughly
Place the sorted beans in a colander and rinse them well under cool running water.
This washes away dust and any small bits left from processing or packaging.
Give the beans a gentle stir with your hand while rinsing so every bean gets cleaned.
Choose the Correct Pot Size
Pick a pot that’s large enough to give the beans plenty of room to expand as they cook.
A heavy-bottomed pot is a great choice because it distributes heat more evenly and helps prevent sticking.
As a general rule, use a pot that’s at least three to four times larger than the amount of dried beans you’re cooking.
This leaves enough space for both the beans and the cooking water without worrying about the pot becoming overcrowded.
Plan Enough Cooking Time
Beans cook at their own pace, so it’s best not to rush them.
Set aside enough time for soaking if you’re using that method, followed by gentle simmering until the beans are tender.
Instead of watching the clock, start checking for doneness near the end of the recommended cooking time.
Every batch is a little different, and a simple taste test is the easiest way to know when your beans are perfectly cooked.
Do You Need to Soak Beans?
The short answer is no, but soaking can make cooking easier and a little faster.
Many home cooks prefer to soak their beans overnight, while others skip the step when they’re short on time.
Both methods can produce delicious, tender beans, so the best choice depends on your schedule and the type of recipe you’re making.
Overnight Soaking
Overnight soaking is the traditional method and works well for nearly every type of dried bean.
To soak the beans, place them in a large bowl and cover them with plenty of cool water.
The beans will expand as they absorb water, so use at least three times as much water as beans.
Leave the bowl at room temperature for 8 to 12 hours, or overnight.
When you’re ready to cook, drain the soaking water and give the beans a quick rinse before transferring them to your cooking pot.
Soaking helps the beans absorb water before they reach the stove, which usually shortens the cooking time.
Many cooks also find that soaked beans cook more evenly because they start out with a more consistent level of moisture.
If you’re planning ahead, this is an easy method that requires very little effort.
Quick Soak Method
If you forgot to soak the beans overnight, the quick soak method is a great backup.
Place the rinsed beans in a large pot and cover them with plenty of fresh water.
Bring the water to a full boil and let the beans boil for 2 minutes.
Remove the pot from the heat and cover it with a lid.
Let the beans sit undisturbed for 1 hour.
Once the hour is up, drain the beans, rinse them, and continue cooking with fresh water.
This method won’t replace an overnight soak completely, but it can help reduce the cooking time compared to starting with completely dry beans.
Cooking Without Soaking
You can also cook dried beans without soaking them at all.
This method works especially well when you have extra time and don’t mind a longer simmer.
Simply rinse the beans, place them in a pot with fresh water, and cook them until they’re tender.
Depending on the type and age of the beans, cooking without soaking can add anywhere from 30 minutes to over an hour to the total cooking time.
The extra simmering is mostly hands-off, so it’s still a simple option for busy days at home.
Whichever method you choose, check the beans for tenderness instead of relying only on the clock.
Every batch cooks a little differently, and tasting a few beans is the easiest way to know when they’re ready.
Soaking Beans: Pros vs. Cons
| Method | Pros | Cons |
|---|---|---|
| Overnight Soaking | Shortens cooking time, helps beans cook more evenly, requires little hands-on work | Requires planning ahead and overnight waiting |
| Quick Soak Method | Great last-minute option, reduces cooking time compared to no soaking | Takes about an hour before cooking can begin |
| No Soaking | Most convenient, no advance preparation needed | Longer cooking time and beans may cook less evenly depending on their age |
First-Time Bean Cooking Checklist
Before turning on the stove, take a minute to make sure everything is ready.
A little preparation helps the cooking process go much more smoothly.
✓ Beans have been sorted and any stones or damaged beans removed.
✓ Beans have been rinsed thoroughly under cold water.
✓ You’ve decided whether to soak the beans (or skip soaking).
✓ A large pot with plenty of room for the beans to expand is ready.
✓ Fresh water has been measured for cooking.
✓ Any aromatics, such as onion, garlic, bay leaves, or herbs, are prepared.
✓ A timer is ready so you can check the beans as they cook.
Step-by-Step: How to Cook Beans from Scratch
Step 1: Sort and Rinse
Pour the dried beans into a large bowl or onto a clean baking sheet and quickly sort through them.
Remove any small stones, broken beans, or anything else that doesn’t belong.
Transfer the beans to a colander and rinse them well under cool running water.
This quick step helps ensure you’re starting with clean, good-quality beans.
Step 2: Soak (Optional)
If you’re soaking the beans, place them in a large bowl and cover them with plenty of cool water.
Leave them to soak overnight for 8 to 12 hours, or use the quick soak method if you’re short on time.
When the soaking time is finished, drain the beans and rinse them once more.
If you prefer not to soak them, simply move on to the next step.
Step 3: Add Fresh Water
Place the beans in a large heavy-bottomed pot.
Cover them with fresh water, making sure the water sits about 2 inches above the beans.
This gives the beans enough room to expand while they cook.
If the water level drops too much during cooking, simply add a little more hot water to keep the beans covered.
Step 4: Bring to a Boil
Place the pot over medium-high heat and bring the water to a boil.
Once the water reaches a full boil, let it boil for a minute or two.
This helps start the cooking process before lowering the heat.
Step 5: Reduce to a Gentle Simmer
Reduce the heat until the water is barely bubbling.
A gentle simmer cooks the beans evenly and helps keep their skins from splitting.
Partially cover the pot with a lid to reduce evaporation while still allowing a little steam to escape.
Now it’s simply a matter of letting the beans cook until they’re tender.
Step 6: Skim Foam if Needed
As the beans begin cooking, you may notice a light layer of foam collecting on the surface.
This is completely normal.
If you’d like, use a spoon to skim it off and discard it.
It won’t affect the finished beans, but removing it can make the cooking liquid look a little clearer.
Step 7: Add Aromatics
Once the beans are gently simmering, add any aromatics you’d like to use.
Onion, garlic, bay leaves, celery, carrots, and fresh herbs all add subtle flavor as the beans cook.
Leave the aromatics whole or in large pieces so they’re easy to remove before serving.
They’ll quietly flavor the beans without overpowering their natural taste.
Step 8: Stir Occasionally
Give the beans a gentle stir every 20 to 30 minutes.
This helps prevent any beans near the bottom of the pot from sticking.
Avoid stirring too often or too vigorously, as this can cause softer beans to break apart.
While you’re stirring, check the water level and add more hot water if needed.
Step 9: Check for Doneness
Start testing the beans near the lower end of the recommended cooking time.
Scoop out a few beans and let them cool for a minute before tasting them.
Perfectly cooked beans should be tender all the way through with a creamy center.
If they’re still firm or chalky inside, continue simmering and check again every 10 to 15 minutes.
Step 10: Season and Cool
Once the beans are fully cooked, stir in salt to taste if you haven’t already added it during cooking.
Let the beans sit in their cooking liquid for 10 to 15 minutes before serving.
This short rest allows them to absorb even more flavor.
If you’re storing the beans, let them cool completely before transferring them to airtight containers.
For the best texture, store the beans with a little of their cooking liquid to help keep them moist.
| Amount of Dried Beans | Recommended Salt |
|---|---|
| 1 cup | 1–1½ teaspoons |
| 2 cups | 2–3 teaspoons |
| 1 pound (about 2 cups) | 2–3 teaspoons |
Tip: Add salt during the last 20–30 minutes of cooking for the best flavor and texture. Once the beans are tender, taste them before serving and add a little more salt if needed.
Approximate Cooking Times for Popular Beans
Cooking times can vary depending on the type of bean, its age, and how gently it’s simmered.
Use the table below as a general guide, and always test a few beans for tenderness before removing them from the heat.
| Bean | Soaked | Unsoaked |
|---|---|---|
| Black Beans | 60–90 minutes | 90–120 minutes |
| Pinto Beans | 60–90 minutes | 90–120 minutes |
| Navy Beans | 60–90 minutes | 90–120 minutes |
| Cannellini Beans | 60–90 minutes | 90–120 minutes |
| Chickpeas | 90–120 minutes | 2–3 hours |
| Kidney Beans | 90–120 minutes | 2–3 hours |
Tip: These times are estimates, not exact rules.
Older dried beans often take longer to soften than freshly purchased beans.
Keep the beans at a gentle simmer and begin checking for doneness near the shortest cooking time listed.
If the beans aren’t tender yet, continue cooking and test them every 10 to 15 minutes until they reach your preferred texture.
How to Tell When Beans Are Perfectly Cooked
Tender but Not Falling Apart
A perfectly cooked bean should be tender all the way through without feeling mushy.
It should hold its shape when you scoop it out of the pot.
If the beans are splitting apart or falling apart with gentle stirring, they’ve likely cooked a little longer than needed.
Creamy Inside
Cut a bean in half or bite into one after it has cooled slightly.
The center should be smooth, creamy, and evenly cooked from edge to edge.
If the middle looks dry, chalky, or feels firm, continue simmering the beans and test them again in 10 to 15 minutes.
Skins Mostly Intact
The skins should stay mostly intact during cooking.
A few split skins are completely normal, especially with longer cooking times.
If many of the beans have burst open, the heat may have been too high, or they may have cooked longer than necessary.
Keeping the pot at a gentle simmer helps the beans stay whole while becoming perfectly tender inside.
Easy to Mash with a Fork
Place a cooked bean on a plate and gently press it with the back of a fork.
It should mash easily with very little pressure.
If it resists or feels firm in the center, give the beans a little more time on the stove.
Once the beans are tender, creamy, and easy to mash while still holding their shape, they’re ready to enjoy or use in your favorite recipes.
Common Mistakes to Avoid
Cooking at a Rolling Boil
After bringing the beans to a boil, lower the heat to a gentle simmer.
A hard, rolling boil can cause the beans to bounce around in the pot, which may split the skins and make some beans cook unevenly.
A slow, steady simmer is the best way to cook beans until they’re tender and creamy.
Using Too Little Water
Beans absorb a surprising amount of water as they cook.
If there isn’t enough water in the pot, the beans may become exposed and cook unevenly.
Start with plenty of fresh water so the beans stay covered throughout the cooking process.
Forgetting to Check Water Levels
As the beans simmer, some of the water naturally evaporates.
Take a quick look every so often to make sure the beans are still covered by water.
If the water level gets too low, add a little hot water rather than cold water to keep the cooking temperature steady.
Overcooking Beans
Beans continue to soften the longer they cook.
If they’re left on the stove too long, they can become mushy and begin to fall apart.
Start checking for doneness near the end of the recommended cooking time instead of waiting until the timer is finished.
Not Testing Several Beans
One bean doesn’t always tell the whole story.
Beans can cook at slightly different rates, especially in larger batches.
Taste two or three beans from different areas of the pot before deciding they’re finished.
If they’re all tender and creamy, your batch is ready.
Storing While Still Hot
Let the beans cool before transferring them to storage containers.
Placing very hot beans in the refrigerator can trap steam inside the container and create excess moisture.
Once the beans have cooled, store them with a little of their cooking liquid to help keep them tender and flavorful until you’re ready to use them.
Bean Cooking Troubleshooting Guide
Even experienced cooks occasionally run into problems when cooking dried beans.
Use this quick guide to identify common issues and get your beans back on track.
| Problem | Likely Cause | Solution |
|---|---|---|
| Beans are still firm | They need more cooking time or the beans are older | Continue simmering and test a few beans every 10–15 minutes until tender. |
| Beans split open | The water was boiling too vigorously | Reduce the heat and maintain a gentle simmer instead of a rolling boil. |
| Water evaporated too quickly | The pot simmered uncovered or the heat was too high | Add more hot water to keep the beans covered and lower the heat if needed. |
| Beans are mushy | They cooked longer than necessary | Begin checking for doneness earlier and remove the beans from the heat once they’re tender. |
| Beans cooked unevenly | Some beans were older or not fully submerged | Stir occasionally and ensure all beans remain covered with water throughout cooking. |
| Beans lack flavor | Not enough seasoning or aromatics were used | Season during the last 20–30 minutes of cooking and adjust the salt before serving. |
Tips for Better Flavor
- Add onions and garlic: Simmer whole or roughly chopped onions and garlic with the beans to build a rich, savory flavor.
- Use bay leaves: Add one or two bay leaves while the beans cook for a subtle earthy aroma.
- Fresh herbs: Toss in sprigs of thyme, rosemary, or parsley to gently infuse the beans with fresh flavor.
- Finish with olive oil: Stir in a drizzle of extra virgin olive oil just before serving for a richer, silkier finish.
- Add citrus after cooking: A squeeze of lemon or lime juice at the end brightens the flavor without slowing the cooking process.
- Adjust seasoning before serving: Taste the beans and add more salt, pepper, or your favorite seasonings until the flavor is just right.
Best Aromatics by Bean Type
The right herbs, spices, and aromatics can enhance the natural flavor of beans without overpowering them.
Use this table as a starting point, then adjust the seasonings to suit your favorite recipes.
| Bean Type | Great Flavor Pairings |
|---|---|
| Black Beans | Cumin, garlic, onion, lime |
| Pinto Beans | Onion, garlic, chili powder, smoked paprika |
| Kidney Beans | Bay leaf, garlic, oregano, thyme |
| Chickpeas | Garlic, rosemary, lemon, cumin |
| Cannellini Beans | Sage, thyme, garlic, rosemary |
| Great Northern Beans | Onion, bay leaf, parsley, thyme |
| Navy Beans | Bay leaf, onion, garlic, black pepper |
| Lima Beans | Butter, garlic, parsley, thyme |
Tip: Add sturdy aromatics like onion, garlic, bay leaves, and fresh herbs at the beginning of cooking, then finish with fresh ingredients like lemon juice, lime juice, or chopped herbs just before serving for the brightest flavor.
How to Store Cooked Beans
Refrigerating
Let the beans cool until they’re no longer hot before storing them.
Transfer the beans to clean, airtight storage containers.
Add a small amount of the cooking liquid to each container before sealing it.
The cooking liquid helps keep the beans moist and prevents them from drying out in the refrigerator.
Store the containers in the refrigerator and use the beans within 3 to 5 days for the best flavor and texture.
When you’re ready to enjoy them, gently reheat the beans on the stovetop or in the microwave with a splash of water or cooking liquid if they seem a little thick.
Freezing
Freezing is a great way to keep cooked beans on hand for quick meals.
Divide the cooled beans into meal-sized portions so you can thaw only what you need.
Add a little of the cooking liquid to each container or freezer-safe bag before sealing it.
This helps protect the beans from drying out and keeps them tender after thawing.
Leave a little space at the top of each container because the liquid expands as it freezes.
Label each container with the type of bean and the date it was frozen.
For the best quality, use frozen beans within 3 to 6 months.
To thaw, place the beans in the refrigerator overnight or gently warm them straight from frozen in a saucepan over low heat.
Easy Ways to Use Cooked Beans
- Grain bowls: Pair beans with cooked grains, roasted vegetables, and your favorite sauce for a satisfying meal.
- Salads: Toss beans into green salads or pasta salads for extra texture and flavor.
- Soups: Stir them into vegetable or broth-based soups to make them more hearty.
- Stews: Add beans to slow-simmered stews for a rich, comforting dish.
- Burritos: Fill burritos with beans, rice, vegetables, cheese, and your favorite toppings.
- Wraps: Use beans as a flavorful filling for quick and easy lunch wraps.
- Pasta dishes: Mix beans into pasta with vegetables and a simple sauce for a filling dinner.
- Homemade veggie burgers: Mash cooked beans with breadcrumbs, seasonings, and vegetables to create flavorful burger patties.
- Dips: Blend beans with garlic, herbs, olive oil, and lemon juice for a smooth homemade dip.
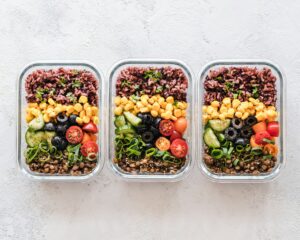
- Meal prep lunches: Portion cooked beans into containers with grains and vegetables for easy grab-and-go meals.
Best Recipes for Each Bean
Not sure which bean to cook? This quick reference can help you choose the right variety based on the meal you want to make.
| Bean Type | Best Used In |
|---|---|
| Black Beans | Tacos, burritos, rice bowls, black bean soup |
| Pinto Beans | Refried beans, chili, bean dips, burrito filling |
| Kidney Beans | Chili, hearty soups, stews, bean salads |
| Navy Beans | Baked beans, ham and bean soup, casseroles |
| Cannellini Beans | Pasta dishes, Tuscan soups, salads, white bean mash |
| Great Northern Beans | Chicken soups, casseroles, creamy bean soups |
| Chickpeas | Hummus, curries, roasted snacks, grain bowls |
| Lima Beans | Succotash, vegetable stews, creamy side dishes |
Tip: If you’re meal prepping, cook a large batch of one or two bean varieties and use them in several different recipes throughout the week to save time.
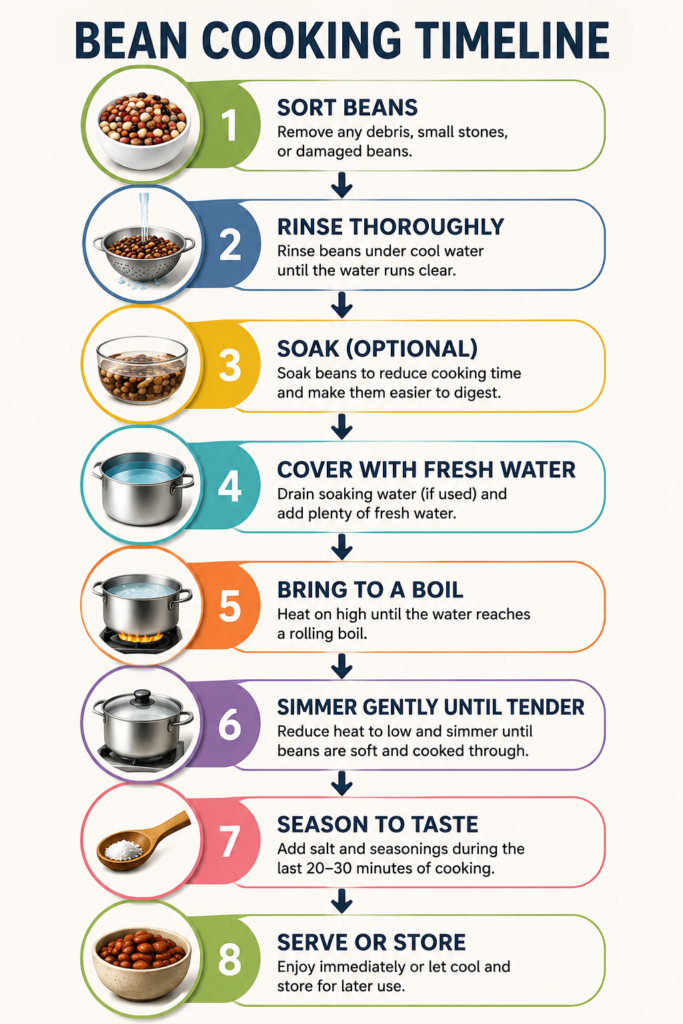
Quick Reference: Bean Cooking Cheat Sheet
Use this simple cheat sheet whenever you need a quick reminder of the basic bean-cooking process.
| Step | What to Do |
|---|---|
| 1 | Sort and rinse the dried beans. |
| 2 | Soak the beans if desired, then drain and rinse. |
| 3 | Cover the beans with fresh water in a large pot. |
| 4 | Bring the water to a boil. |
| 5 | Reduce the heat and simmer gently until tender. |
| 6 | Taste a few beans to check for doneness. |
| 7 | Season the cooked beans to taste. |
| 8 | Serve immediately or cool and store for later. |
Beginner’s Bean Cooking Checklist
Use this simple checklist before you start cooking to help ensure your beans turn out tender, flavorful, and ready for any recipe.
- Buy quality dried beans to give yourself the best chance of even cooking and great flavor.
- Sort and rinse thoroughly to remove any small stones, damaged beans, or debris.
- Soak overnight if preferred to help reduce cooking time and promote even cooking.
- Use plenty of fresh water so the beans have enough room to expand as they simmer.
- Simmer gently rather than boiling hard to keep the beans tender with skins that stay mostly intact.
- Taste for doneness instead of relying only on time because every batch of beans cooks a little differently.
- Cool the beans before storing to prevent excess moisture from building up in the container.
- Freeze extra portions for future meals so you always have cooked beans ready whenever you need them.
Final Thoughts
Cooking beans from scratch is a simple skill that rewards you with rich flavor, a creamy texture, and endless meal possibilities.
Once you learn the basic steps, don’t be afraid to try different bean varieties, herbs, and seasonings to find your favorite combinations.
Use your homemade beans in soups, salads, burritos, grain bowls, pasta dishes, and many other everyday meals.
Bookmark this guide so you can come back to it whenever you’re ready to cook another delicious batch of beans from scratch.
FAQs
Can you cook beans without soaking?
Yes. Dried beans can be cooked without soaking, but they will usually take 30 minutes to over an hour longer to become tender.
Why are my beans still hard after cooking?
Older beans often take longer to soften. Continue simmering gently and make sure the beans stay covered with water throughout the cooking process.
Should beans be covered while simmering?
It’s best to partially cover the pot with a lid. This helps reduce evaporation while allowing a little steam to escape.
Can I freeze cooked beans?
Yes. Let the beans cool completely, then freeze them in meal-sized portions with a little cooking liquid for the best texture.
How much do dried beans expand when cooked?
Most dried beans roughly double to triple in size after soaking and cooking, depending on the variety.
Can I reuse the cooking liquid?
Yes. The cooking liquid can be used to add flavor to soups, stews, sauces, or bean dishes if desired.
Hi, I’m Daisy Roots, the home cook and recipe developer behind this kitchen. I create simple, tested vegan recipes using everyday ingredients. Every dish is developed and cooked in my own kitchen, with clear steps to help you get reliable results every time. Thanks for stopping by — let’s cook something great!