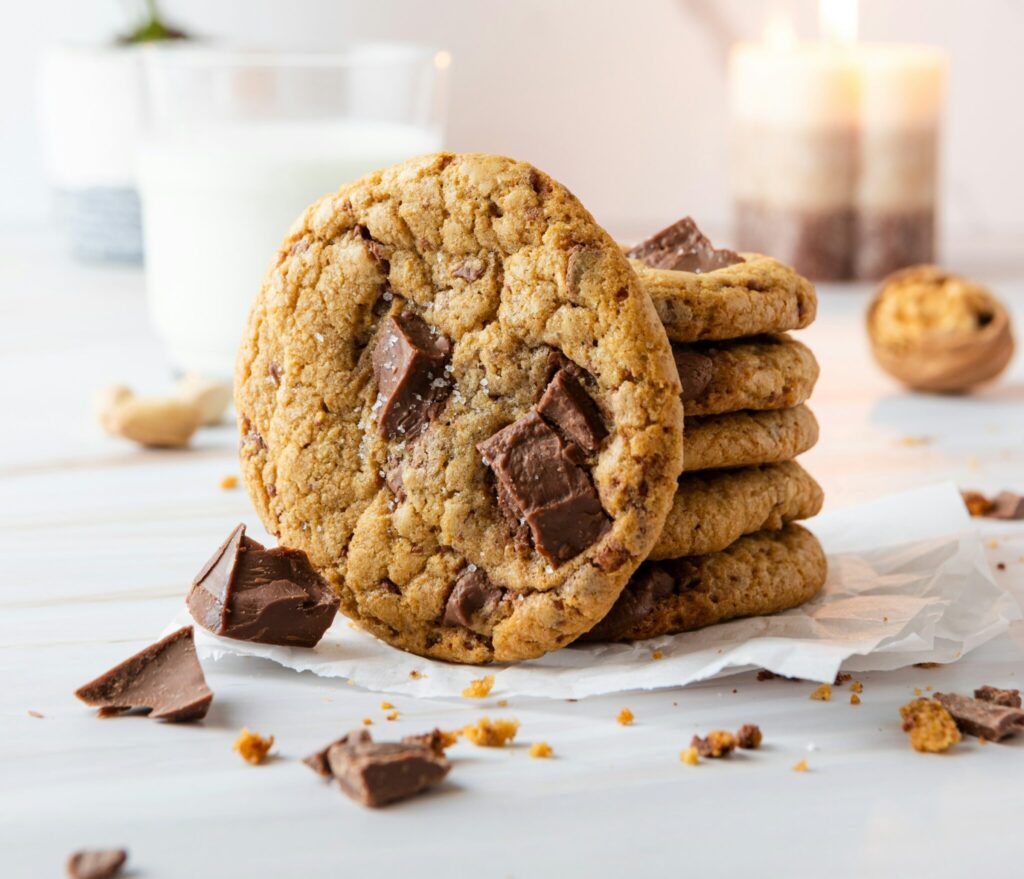
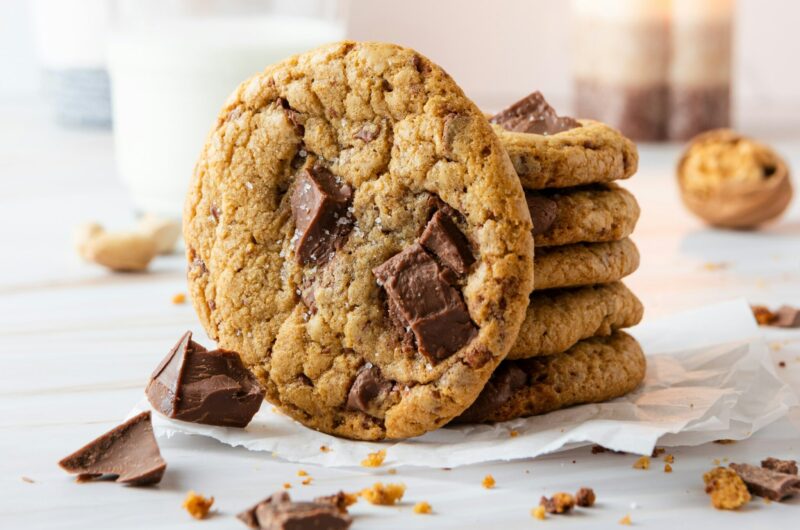
There’s nothing quite like a warm chocolate chip cookie fresh from the oven, and this vegan version delivers everything you love.
These cookies are soft in the center, perfectly chewy, and packed with rich chocolate in every bite.
The secret is a simple combination of ingredients that creates that classic bakery-style texture without any dairy or eggs.
Don’t worry if you’re new to baking because this recipe is easy to follow and comes together with basic pantry staples.
Once you try them, they may become your new go-to cookie recipe.
Recipe At a Glance
| Detail | Information |
|---|---|
| Prep Time | 15 minutes |
| Bake Time | 10–12 minutes |
| Total Time | 25–30 minutes |
| Yield | 24 cookies |
| Difficulty | Easy |
| Diet | Vegan |
| Freezer Friendly | Yes |
| Best Texture | Soft centers with slightly crisp edges |
| Perfect For | Dessert, snacks, parties, and holiday baking |
Why You’ll Love This Recipe
- Completely dairy-free and egg-free – Enjoy classic chocolate chip cookies made entirely with plant-based ingredients.
- Soft centers with slightly crisp edges – Every cookie has the perfect balance of chewy, tender, and lightly golden textures.
- Made with simple pantry ingredients – No specialty products needed; you likely have most of the ingredients on hand.
- Ready in under 30 minutes – From mixing the dough to enjoying warm cookies, this recipe comes together quickly.
- Easily customizable with different mix-ins – Add nuts, chocolate chunks, or dried fruit to make the cookies your own.
- Freezer-friendly and meal-prep friendly – Freeze baked cookies or extra dough for a homemade treat whenever you want one.
Baker’s Notes From My Kitchen
After making these cookies many times, I’ve found that brown sugar makes a noticeable difference in both flavor and texture.
It adds extra moisture to the dough, which helps create the soft, chewy centers that make these cookies so satisfying.
I’ve also tested this recipe with coconut oil instead of vegan butter. While the cookies were still delicious, they spread a little more and had a slightly different texture.
For the thickest, chewiest cookies, I always reach for a good-quality vegan butter.
One of my favorite baking tips is to remove the cookies from the oven when the centers still look slightly soft.
They may seem underdone at first, but they’ll continue setting as they cool on the baking sheet.
This simple step helps prevent dry cookies and creates that bakery-style texture everyone loves.
When they’re finished, you can expect soft centers, lightly crisp edges, and plenty of melted chocolate in every bite.
The cookies should be tender and chewy rather than cakey, with a rich flavor that keeps you reaching for another one.
What Makes Vegan Cookies Soft and Chewy?
The secret to soft and chewy vegan cookies comes down to creating and holding onto the right amount of moisture throughout the baking process.
Unlike traditional cookies that rely on eggs, vegan cookies get their texture from a careful balance of ingredients that keep the dough rich, tender, and flavorful without becoming dry or crumbly.
Moisture plays a huge role in vegan baking because it helps create a soft center that stays delicious even after the cookies have cooled.
Ingredients such as plant-based milk, vegan butter, and brown sugar work together to add moisture to the dough, allowing the cookies to bake up with a satisfying chew instead of a dry texture.
Brown sugar is one of the most important ingredients for chewy cookies because it contains molasses, which naturally holds moisture better than regular white sugar.
As the cookies bake, the brown sugar helps create a soft interior while also adding a deeper caramel-like flavor that makes every bite taste richer and more indulgent.
Plant-based butter is another key ingredient because it provides the fat needed for tender cookies and helps create that classic bakery-style texture people love.
When creamed with the sugars, vegan butter creates a smooth dough that bakes evenly and develops slightly crisp edges while keeping the centers soft and chewy.
Proper baking time is just as important as the ingredients themselves, and even a few extra minutes in the oven can change the final texture.
For the best results, remove the cookies when the edges are lightly golden, but the centers still look slightly soft, as they will continue to set while cooling on the baking sheet.
This simple step helps lock in moisture and gives you cookies with crisp edges, soft middles, and the perfect chewy bite every time.
Ingredients You’ll Need

For the Cookie Dough
- 2 ¼ cups (280g) all-purpose flour – Provides structure while keeping the cookies soft and tender.
- 1 teaspoon baking soda – Helps the cookies rise slightly and spread evenly.
- ½ teaspoon salt – Balances the sweetness and enhances the chocolate flavor.
- ¾ cup (170g) vegan butter, softened – Creates a rich texture and chewy bite.
- ¾ cup (150g) brown sugar, packed – Adds moisture and helps create soft, chewy cookies.
- ¼ cup (50g) granulated sugar – Helps the edges become lightly crisp while balancing the texture.
- 2 tablespoons plant-based milk – Adds moisture and helps bring the dough together.
- 2 teaspoons vanilla extract – Adds warm, classic cookie flavor.
- 1 ½ cups (260g) vegan chocolate chips – Delivers plenty of chocolate in every bite.
Optional Add-Ins
- ½ cup (60g) chopped walnuts – Adds a crunchy texture and nutty flavor.
- ½ cup (60g) chopped pecans – A buttery, slightly sweet addition to the cookies.
- ¼ cup (20g) shredded coconut – Adds subtle sweetness and texture.
- ½ cup (85g) dark chocolate chunks – Creates larger pockets of melted chocolate.
- 1 teaspoon flaky sea salt – Sprinkle on top before baking for a sweet-and-salty finish.
Ingredient Notes and Substitutions
Best Vegan Butter Options
Vegan butter is the best choice for achieving soft centers, chewy texture, and rich flavor in these cookies.
Stick-style vegan butter is often the most reliable option because it contains less water and behaves more like traditional butter during baking.
If your vegan butter is stored in the refrigerator, let it soften at room temperature before mixing so it creams smoothly with the sugars.
Avoid using whipped vegan spreads because they can contain extra air and moisture, which may affect the texture of the cookies.
No matter which brand you choose, using a good-quality vegan butter will help create cookies with tender centers and lightly crisp edges.
Best Vegan Butter Types for Baking
Not all vegan butter products bake the same way.
If you’re shopping for vegan butter, this quick guide can help you choose the best option for soft and chewy cookies.
| Vegan Butter Type | Why It Works |
|---|---|
| Stick Vegan Butter | Produces the best overall texture with soft centers and lightly crisp edges. |
| Block Vegan Butter | Contains less moisture and works well for thicker, bakery-style cookies. |
| Tub Spreads | Not recommended because they often contain extra water, which can affect texture and cause excess spreading. |
For the most consistent results, I recommend using stick or block-style vegan butter whenever possible.
They behave more like traditional butter in baking and help create the chewy texture this recipe is designed to deliver.
Can I Use Coconut Oil?
Yes, coconut oil can be used instead of vegan butter if needed.
Refined coconut oil is a great option if you want a neutral flavor that won’t compete with the chocolate.
Unrefined coconut oil adds a mild coconut taste, which some people enjoy in chocolate chip cookies.
Keep in mind that cookies made with coconut oil may spread a little more and have a slightly different texture than cookies made with vegan butter.
For best results, use solid coconut oil rather than melted oil and measure it carefully before mixing.
If the dough feels too soft after mixing, chilling it for 20 to 30 minutes can help prevent excessive spreading during baking.
Gluten-Free Alternatives
Making these cookies gluten-free is simple with the right flour blend.
A good-quality gluten-free all-purpose flour blend designed for baking is usually the easiest substitute for regular flour.
Choose a blend that already contains ingredients that help with structure and texture, allowing the cookies to hold together well after baking.
Measure the flour carefully and avoid packing it into the measuring cup, as too much flour can make the cookies dry.
The dough may look slightly different from traditional cookie dough, but the baked cookies should still be soft, chewy, and full of chocolate flavor.
Choosing the Best Vegan Chocolate Chips
Chocolate is the star ingredient, so choosing a good one makes a noticeable difference.
Vegan chocolate chips are widely available and come in a variety of sweetness levels, from semi-sweet to dark chocolate.
Semi-sweet chips create a classic chocolate chip cookie flavor, while dark chocolate provides a richer and more intense chocolate taste.
For extra pockets of melted chocolate, try using a mix of chocolate chips and chopped chocolate chunks.
Always check the ingredient label to make sure the chocolate is dairy-free, especially if you’re baking for someone following a vegan diet.
If you’re a chocolate lover, don’t be afraid to add a little extra chocolate to the dough, because a generously filled cookie is rarely a bad thing.
| Ingredient | Best Substitute | Result |
|---|---|---|
| Vegan Butter | Coconut Oil | Slightly more spread |
| Brown Sugar | Coconut Sugar | Less chewy |
| Plant Milk | Almond/Oat/Soy Milk | Similar results |
| Chocolate Chips | Chocolate Chunks | More melted pockets |
Kitchen Equipment Needed
- Mixing bowls – You’ll need separate bowls for combining the wet and dry ingredients.
- Measuring cups and spoons – Accurate measurements help ensure soft, chewy cookies every time.
- Electric mixer (optional) – Makes it easier to cream the vegan butter and sugars, but a sturdy spoon works too.
- Cookie scoop – Helps create evenly sized cookies that bake uniformly.
- Baking sheet – Provides a flat surface for baking the cookies to golden perfection.
- Parchment paper – Prevents sticking and makes cleanup quick and easy.
What These Cookies Should Look Like
If this is your first time making vegan chocolate chip cookies, it helps to know what a successful batch should look like before they come out of the oven.
- Soft centers – The middle of each cookie should be tender and chewy, not dry or crumbly.
- Slightly crisp edges – The edges should have a light crispness that contrasts nicely with the soft center.
- Light golden bottoms – The bottoms should be lightly golden brown, which is a good sign the cookies are baked through without being overdone.
- Thick but not cakey – The cookies should hold their shape and have some height, while still staying chewy rather than fluffy like a cake.
- Melty chocolate pockets – The chocolate chips should be soft and slightly melted, creating a rich chocolate flavor throughout every bite.
Don’t worry if the centers look slightly underdone when the cookies first come out of the oven.
They will continue to set as they cool, which is what creates their signature soft and chewy texture.
How to Make Vegan Chocolate Chip Cookies
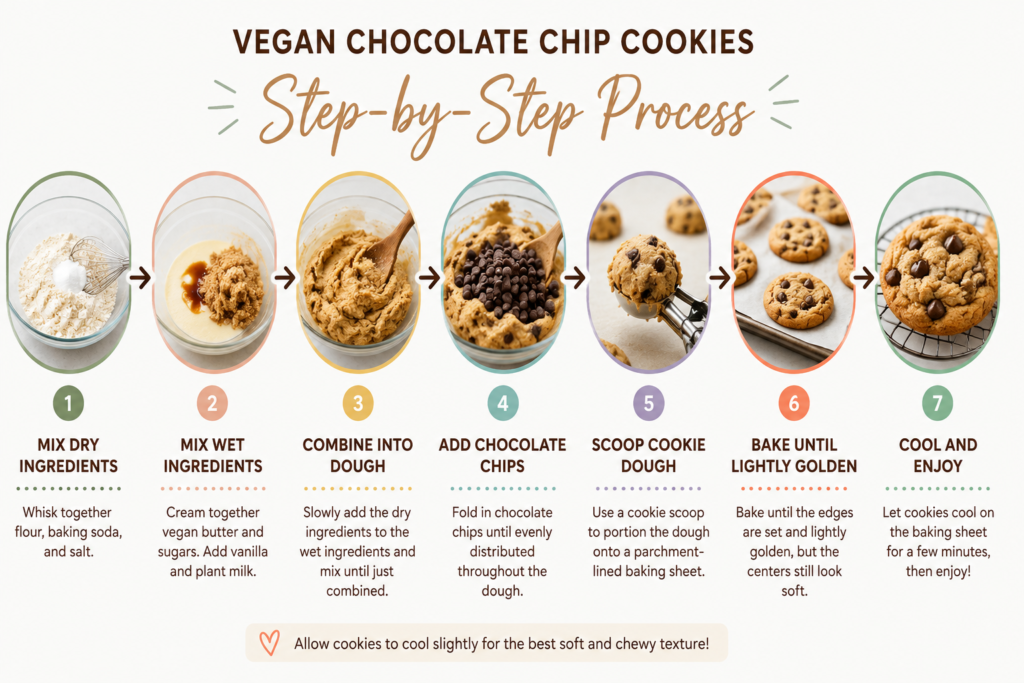
Step 1: Prepare the Oven and Baking Sheet
Preheat your oven to 350°F (175°C) so it reaches the proper temperature before the cookies go in.
Line a baking sheet with parchment paper to prevent sticking and make cleanup much easier.
Taking a minute to prepare your baking sheet now helps the cookies bake evenly later.
Step 2: Mix the Dry Ingredients
In a medium mixing bowl, whisk together the flour, baking soda, and salt until everything is evenly combined.
Mixing the dry ingredients first helps distribute the baking soda throughout the dough, which leads to more consistent cookies.
Set the bowl aside while you prepare the wet ingredients.
Step 3: Cream the Butter and Sugars
In a large mixing bowl, combine the softened vegan butter, brown sugar, and granulated sugar.
Beat the mixture until it looks smooth, creamy, and slightly lighter in color.
This step helps create the soft and chewy texture that makes these cookies so satisfying.
If you’re mixing by hand, don’t worry—just keep stirring until the ingredients are well blended.
Step 4: Add Vanilla and Plant Milk
Pour in the vanilla extract and plant-based milk.
Mix until everything is fully incorporated and the mixture looks smooth.
The vanilla adds warmth and depth of flavor, while the plant milk helps create a soft, easy-to-mix dough.
Step 5: Combine Wet and Dry Ingredients
Gradually add the dry ingredients to the wet ingredients.
Stir gently until no dry streaks of flour remain.
Once the dough comes together, stop mixing.
Overmixing can make cookies less tender, so mix only until everything is combined.
Step 6: Fold in Chocolate Chips
Add the vegan chocolate chips to the bowl.
Use a spoon or spatula to fold them evenly throughout the dough.
Make sure every scoop of dough contains plenty of chocolate for the best flavor in every bite.
What Your Dough Should Look Like
Before you start scooping the dough, take a quick look at its texture.
This can help you catch any issues early and give you confidence that your cookies are on the right track.
- Slightly thick – The dough should be thicker than cake batter and easy to gather with a spoon or cookie scoop.
- Soft but scoopable – It should feel soft and smooth, but firm enough to scoop into rounded portions without running or spreading.
- Holds its shape – When you scoop the dough onto the baking sheet, it should stay in a mound rather than flattening immediately.
- Not sticky like cake batter – The dough may feel slightly tacky, but it should not be wet, runny, or difficult to handle.
- Chocolate chips evenly distributed – The chocolate chips should be spread throughout the dough so every cookie gets plenty of chocolate in each bite.
If your dough seems too soft, chilling it in the refrigerator for 20 to 30 minutes can help firm it up before baking.
If it feels unusually dry or crumbly, a small splash of plant-based milk can help bring it back together.
Step 7: Scoop and Shape the Dough
Use a cookie scoop or spoon to portion the dough into evenly sized balls.
Place them on the prepared baking sheet, leaving about 2 inches of space between each cookie.
For thicker cookies, you can chill the dough for 20 to 30 minutes before baking.
If you love extra chocolate on top, press a few additional chocolate chips into each dough ball before they go into the oven.
Step 8: Bake Until Golden
Bake the cookies for 10 to 12 minutes, or until the edges are lightly golden.
The centers may still look slightly soft when you remove them from the oven, and that’s exactly what you want.
Expert Baking Tip
The cookies may look slightly underdone in the center when you remove them from the oven. This is completely normal and is actually one of the keys to achieving a soft, chewy texture.
The residual heat from the baking sheet will continue cooking the cookies for several minutes after they come out of the oven.
If you wait until the centers look fully baked in the oven, the cookies will often become firmer and drier once cooled.
For the best results, remove the cookies when the edges are lightly golden and the centers still appear slightly soft.
As they cool, they’ll set into perfectly chewy cookies with tender centers and lightly crisp edges.
The cookies will continue to set as they cool, which helps create that classic chewy center.
Resist the urge to overbake, as this is one of the easiest ways to end up with dry cookies.
Step 9: Cool and Serve
Let the cookies rest on the baking sheet for about 5 minutes after baking.
This short cooling time allows them to firm up enough to move without falling apart.
Transfer the cookies to a wire rack to cool completely, or enjoy one while it’s still warm and the chocolate is melty.
Serve immediately, store in an airtight container, or freeze a batch for future cookie cravings.
Tips for the Best Vegan Chocolate Chip Cookies
Don’t Overmix the Dough
Once the dry ingredients are added, mix only until the flour disappears into the dough.
Overmixing can make the cookies denser and less tender than you want.
A few small streaks of flour are fine while mixing because they will disappear as you finish combining the dough.
Gentle mixing helps keep the cookies soft and gives them a better texture after baking.
Measure Flour Correctly
Flour is one of the easiest ingredients to accidentally overmeasure, and even a small amount of extra flour can affect the final result.
Instead of scooping the measuring cup directly into the flour bag, spoon the flour into the cup and level it off with a knife.
This simple step helps prevent dry, heavy cookies.
If you have a kitchen scale, weighing the flour is an even more accurate option and helps create consistent results every time.
Chill the Dough for Thicker Cookies
If you prefer thicker cookies with a softer center, chilling the dough is worth the extra time.
Place the dough in the refrigerator for 20 to 30 minutes before scooping and baking.
Chilled dough spreads more slowly in the oven, which helps the cookies stay thicker and develop a chewier texture.
This step is especially helpful on warm days when the dough feels soft or sticky.
Avoid Overbaking
One of the biggest secrets to soft and chewy cookies is removing them from the oven at the right moment.
The edges should look lightly golden, while the centers may still appear slightly underdone.
This is completely normal and often leads to the best texture.
The cookies continue cooking from the leftover heat on the baking sheet after they come out of the oven.
Leaving them in the oven too long can dry them out and make them firmer than intended.
Let Cookies Cool Before Serving
Freshly baked cookies are delicate and need a few minutes to set properly.
Allow them to rest on the baking sheet for about 5 minutes before moving them.
This short cooling period helps the centers finish setting while keeping the cookies soft and chewy.
If you can wait a little longer, transfer them to a wire rack to cool completely.
The flavors become more balanced as the cookies cool, and the texture develops into that perfect combination of tender center and lightly crisp edge.
Common Mistakes to Avoid
- Cookies Spread Too Much – This usually happens when the dough is too warm, so chilling it before baking can help the cookies hold their shape.
- Cookies Turn Out Dry – Too much flour or overbaking can remove moisture and lead to dry, crumbly cookies.
- Cookies Are Too Dense – Overmixing the dough can create a heavier texture instead of a soft and chewy bite.
- Uneven Baking Results – Using uneven dough portions or overcrowding the baking sheet can cause some cookies to bake faster than others.
| Problem | Likely Cause | Solution |
|---|---|---|
| Cookies spread too much | Warm dough | Chill dough 30 minutes |
| Cookies are dry | Too much flour | Measure flour correctly |
| Cookies are dense | Overmixed dough | Mix until just combined |
| Cookies are hard | Overbaked | Remove earlier |
Delicious Variations
- Double Chocolate Vegan Cookies – Add cocoa powder to the dough for a rich chocolate cookie packed with even more chocolate flavor.
- Peanut Butter Chocolate Chip Cookies – Mix in creamy peanut butter for a soft, nutty twist that pairs perfectly with chocolate chips.
- Oatmeal Chocolate Chip Cookies – Stir in rolled oats to add extra texture and a hearty homemade feel.
- Sea Salt Chocolate Chunk Cookies – Use chocolate chunks instead of chips and finish with flaky sea salt for a sweet-and-salty treat.
- Holiday Spice Chocolate Chip Cookies – Add cinnamon, nutmeg, and a pinch of ginger for warm seasonal flavor in every bite.
How to Store Vegan Chocolate Chip Cookies
Room Temperature Storage
Once the cookies have cooled completely, place them in an airtight container to keep them soft and fresh.
Storing warm cookies can create excess moisture inside the container, so it’s important to let them cool first.
When stored properly at room temperature, these cookies typically stay fresh for up to 5 days.
If you’d like to keep them extra soft, place a small piece of bread in the container.
The cookies will absorb moisture from the bread, helping maintain their chewy texture without affecting their flavor.
Refrigerating Leftovers
Refrigeration is an option if you need to store the cookies for a little longer.
Place the cookies in an airtight container before refrigerating to prevent them from drying out or absorbing odors from other foods.
Keep in mind that refrigeration can make cookies firmer than they are at room temperature.
For the best texture, let a cookie sit at room temperature for a few minutes before eating.
A few seconds in the microwave can also bring back some of that fresh-baked softness.
Freezing Baked Cookies
Baked cookies freeze very well and are a great option for preparing treats ahead of time.
Allow the cookies to cool completely before placing them in a freezer-safe container or storage bag.
For added protection, separate layers of cookies with parchment paper to prevent sticking.
Frozen cookies can maintain their quality for up to 3 months when stored properly.
When you’re ready to enjoy them, let the cookies thaw at room temperature or warm them briefly in the microwave.
Freezing Cookie Dough
Freezing cookie dough is one of the easiest ways to have freshly baked cookies whenever a craving strikes.
Scoop the dough into individual portions and place them on a lined baking sheet.
Freeze the dough balls until firm, then transfer them to a freezer-safe bag or container.
This method allows you to bake only as many cookies as you need at a time.
Cookie dough can be frozen for up to 3 months without losing much of its texture or flavor.
When baking from frozen, simply add an extra minute or two to the baking time and watch for lightly golden edges.
Having cookie dough ready in the freezer means warm, homemade vegan chocolate chip cookies are never far away.
Make-Ahead Instructions
Refrigerating Dough Overnight
If you’d like to prepare the dough in advance, cover it tightly and store it in the refrigerator for up to 24 hours.
The extra resting time allows the flavors to develop and can create an even chewier texture after baking.
When you’re ready to bake, let the dough sit at room temperature for 10 to 15 minutes if it feels too firm to scoop.
Freezing Dough Balls
For longer storage, scoop the dough into individual portions and place them on a parchment-lined baking sheet.
Freeze until the dough balls are firm, then transfer them to a freezer-safe container or storage bag.
This method prevents the dough from sticking together and makes it easy to bake only the number of cookies you need.
Frozen cookie dough can be stored for up to 3 months.
Baking Directly From Frozen
There’s no need to thaw frozen cookie dough before baking.
Simply place the frozen dough balls on a prepared baking sheet and bake as directed.
Add 1 to 3 extra minutes to the baking time, depending on the size of the cookies.
The cookies will bake up soft, chewy, and just as delicious as those made from freshly prepared dough.
What to Serve with Vegan Chocolate Chip Cookies
- Almond milk – Its light, nutty flavor pairs perfectly with the rich chocolate in the cookies.
- Oat milk latte – A creamy latte complements the chewy texture and makes a cozy afternoon treat.
- Hot chocolate – Perfect for chocolate lovers who want an extra indulgent dessert experience.
- Vegan ice cream – Serve cookies alongside a scoop of your favorite vegan ice cream for an easy dessert.
- Coffee and tea pairings – Fresh coffee, black tea, chai, or herbal tea all balance the sweetness of the cookies beautifully.
Final Thoughts
These vegan chocolate chip cookies are everything a great cookie should be—soft, chewy, packed with chocolate, and easy to make with simple ingredients.
Feel free to experiment with different mix-ins and flavors to create a version that becomes your own family favorite.
FAQs
Are Chocolate Chip Cookies Vegan?
Traditional chocolate chip cookies are not usually vegan because they often contain butter, eggs, and dairy-based chocolate chips. This recipe uses plant-based alternatives, making it completely vegan.
Can I Make These Cookies Gluten-Free?
Yes, you can replace the all-purpose flour with a gluten-free all-purpose baking blend designed for 1-to-1 substitution.
Why Are My Vegan Cookies Dry?
Dry cookies are often caused by using too much flour or baking the cookies for too long. Measure carefully and remove them from the oven as soon as the edges are lightly golden.
Can I Freeze the Dough?
Yes, cookie dough freezes very well. Scoop the dough into portions, freeze until firm, and store in a freezer-safe container for up to 3 months.
How Long Do Vegan Cookies Stay Fresh?
When stored in an airtight container at room temperature, vegan chocolate chip cookies typically stay fresh for up to 5 days.
Can I Use Coconut Sugar Instead?
Yes, coconut sugar can be used, but it may slightly change the flavor and texture. The cookies will have a deeper caramel-like taste and may be a bit less chewy.
Vegan Chocolate Chip Cookies (Soft, Chewy & Irresistible)
Course: Vegan DessertsDifficulty: Easy24
Cookies15
minutes10
minutes25
minutesSoft, chewy vegan chocolate chip cookies with crisp edges and gooey chocolate in every bite. Made with simple pantry ingredients and ready in under 30 minutes.
Ingredients
2 ¼ cups all-purpose flour
1 tsp baking soda
½ tsp salt
¾ cup vegan butter, softened
¾ cup brown sugar
¼ cup granulated sugar
2 tbsp plant-based milk
2 tsp vanilla extract
1 ½ cups vegan chocolate chips
Directions
- Preheat oven to 350°F (175°C) and line a baking sheet with parchment paper.
- In a bowl, whisk together the flour, baking soda, and salt.
- In a separate bowl, cream the vegan butter, brown sugar, and granulated sugar until smooth.
- Mix in the plant-based milk and vanilla extract.
- Gradually add the dry ingredients to the wet ingredients and mix until combined.
- Fold in the vegan chocolate chips.
- Scoop dough onto the prepared baking sheet, spacing cookies about 2 inches apart.
- Bake for 10–12 minutes, until the edges are lightly golden and the centers are still slightly soft.
- Let cool on the baking sheet for 5 minutes before transferring to a wire rack.
Notes
- For thicker cookies, chill the dough for 20–30 minutes before baking.
- Do not overbake; the cookies will continue setting as they cool.
- Store in an airtight container for up to 5 days or freeze for up to 3 months.

Hi, I’m Daisy Roots, the home cook and recipe developer behind this kitchen. I create simple, tested vegan recipes using everyday ingredients. Every dish is developed and cooked in my own kitchen, with clear steps to help you get reliable results every time. Thanks for stopping by — let’s cook something great!