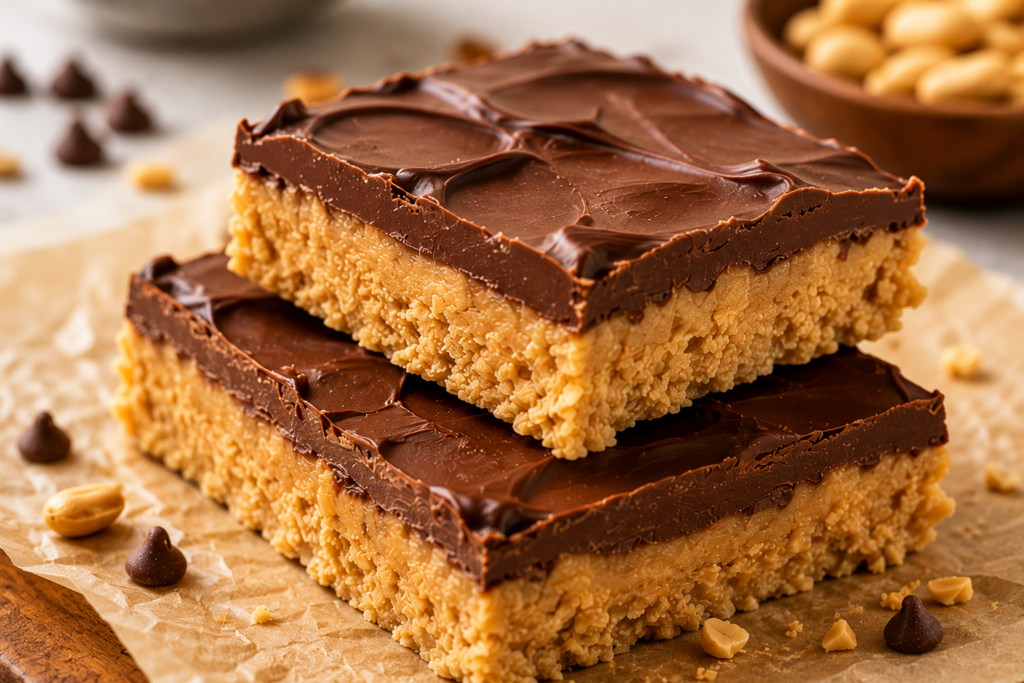
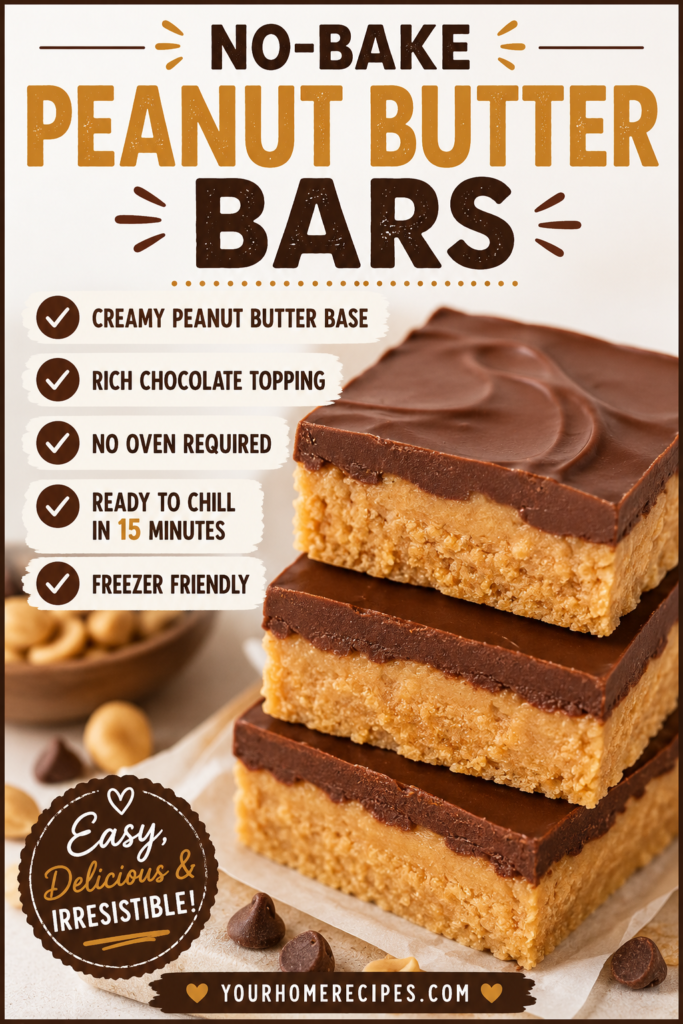
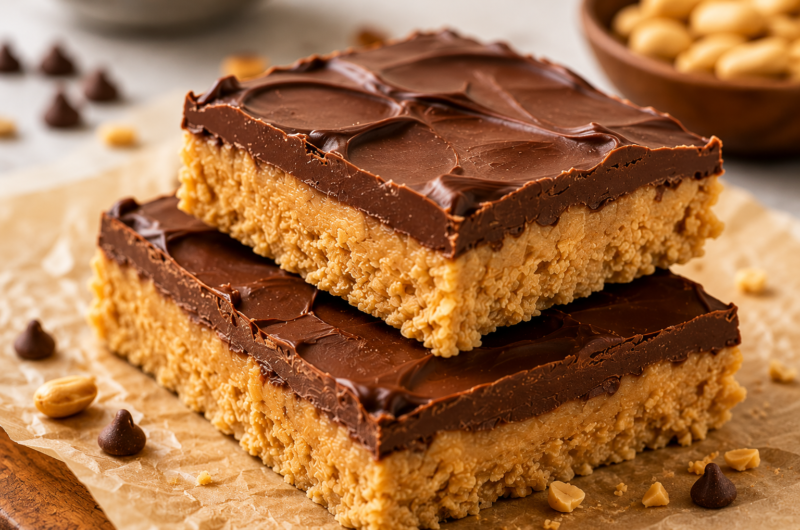
If you love the classic combination of peanut butter and chocolate, these no-bake peanut butter bars are about to become a favorite.
They have a rich, creamy peanut butter base topped with a smooth layer of chocolate, creating a dessert that tastes like a homemade peanut butter cup.
The best part? You don’t need to turn on the oven.
With a handful of simple ingredients and just a few easy steps, these bars come together quickly, making them perfect for busy weekdays, holiday gatherings, parties, or whenever a sweet craving hits.
Even if you’re new to making desserts, this recipe is simple, reliable, and well worth adding to your collection.
Recipe at a Glance
| Detail | Information |
|---|---|
| Prep Time | 15 minutes |
| Chill Time | 1–2 hours |
| Total Time | 1 hour 15 minutes |
| Difficulty | Easy |
| Servings | 16 bars |
| No-Bake | Yes |
| Make Ahead | Yes |
| Freezer Friendly | Yes |
Why You’ll Love This No-Bake Peanut Butter Bars Recipe
- Quick and easy to make – Just mix, layer, chill, and enjoy with no baking required.
- Requires simple pantry ingredients – Everything you need is easy to find and may already be in your kitchen.
- Perfect balance of peanut butter and chocolate – Rich peanut butter and smooth chocolate come together in every bite.
- Great make-ahead dessert – Prepare them in advance and keep them chilled until you’re ready to serve.
- Kid-friendly and crowd-pleasing – Their sweet, creamy flavor makes them a hit with both kids and adults.
What Are No-Bake Peanut Butter Bars?
No-bake peanut butter bars are a simple dessert made with a rich peanut butter base and a smooth chocolate topping, all chilled until firm instead of baked in the oven.
They are known for delivering big flavor with very little effort, making them a favorite choice when you want something homemade without spending a lot of time in the kitchen.
Many people compare them to peanut butter cups because they feature the same classic combination of creamy peanut butter and chocolate, but in an easy-to-slice bar form that is perfect for sharing.
The peanut butter layer is soft, dense, and slightly chewy, while the chocolate topping adds a smooth finish that melts in your mouth with every bite.
Each square offers a satisfying balance of sweet and salty flavors, with the peanut butter taking center stage and the chocolate providing just the right amount of richness.
One of the reasons these bars are so popular is their versatility, as they fit just as well on a holiday dessert table as they do in an everyday snack tray.
They’re a great option for birthday parties, family gatherings, potlucks, bake sales, and holiday celebrations because they can be made ahead of time and served straight from the refrigerator.
They also come in handy when you need a quick dessert for unexpected guests or simply want a sweet treat ready to enjoy whenever a craving strikes.
Since there is no baking involved, they are especially beginner-friendly and a wonderful recipe to make with kids, allowing everyone to enjoy the fun of creating a homemade dessert without any complicated steps.
What Do These Bars Taste Like?
These no-bake peanut butter bars deliver the classic flavor combination of peanut butter and chocolate in every bite, making them an easy favorite for anyone who loves peanut butter cup-style desserts.
The peanut butter layer is rich, creamy, and slightly sweet, with a bold peanut butter flavor that stands out without being overwhelming.
On top, the smooth chocolate layer adds just the right amount of richness and creates a delicious contrast to the peanut butter base.
Together, the two layers taste very similar to a homemade peanut butter cup, but with a thicker, more satisfying texture.
The center is soft and dense, giving the bars a substantial bite while still feeling creamy and easy to eat.
Thanks to the Graham cracker crumbs, the peanut butter layer also has a subtle chewiness that makes the texture even more enjoyable.
After chilling, the bars become firm enough to slice cleanly while remaining tender and melt-in-your-mouth delicious.
If you enjoy desserts that balance sweet peanut butter, rich chocolate, and a smooth, satisfying texture, these bars are likely to become a regular favorite in your recipe collection.
Ingredients You’ll Need
For the Peanut Butter Base
- 1 cup creamy peanut butter – Creates the rich, creamy foundation of the bars.
- ½ cup unsalted butter, melted – Helps bind the ingredients together and adds a smooth texture.
- 2 cups powdered sugar – Sweetens the bars and gives the peanut butter layer its firm consistency.
- 2 cups graham cracker crumbs – Adds structure and a subtle buttery flavor.
For the Chocolate Topping
- 1½ cups semi-sweet chocolate chips – Creates a rich chocolate layer that pairs perfectly with the peanut butter base.
- ¼ cup creamy peanut butter – Mixed with the chocolate for a smoother topping that’s easier to spread and slice.
Ingredient Notes and Substitutions
Best Peanut Butter to Use
Creamy peanut butter is the easiest and most reliable option for this recipe because it blends smoothly with the other ingredients and creates a firm, creamy texture once chilled.
Traditional processed peanut butters such as Jif, Skippy, or similar brands tend to work best because they have a consistent texture that helps the bars hold their shape.
Natural peanut butter can be used, but it often separates in the jar and contains more oil, which can make the peanut butter layer softer and harder to set properly.
If you choose natural peanut butter, stir it very well before measuring to evenly distribute the oils throughout the jar.
Crunchy peanut butter is another option if you’d like a little extra texture and small peanut pieces in every bite.
No matter which variety you use, aim for a peanut butter that is smooth, spreadable, and easy to mix for the best results.
Graham Cracker Alternatives
Graham cracker crumbs provide structure and a lightly sweet flavor, but there are several easy substitutes if you don’t have them on hand.
Crushed digestive biscuits work exceptionally well and create a similar texture with a slightly richer, buttery taste.
Vanilla wafers are another great choice and add a sweeter flavor that pairs beautifully with both the peanut butter and chocolate layers.
If you’re making these bars for someone who avoids gluten, simply use your favorite gluten-free graham-style crackers and crush them into fine crumbs before measuring.
The goal is to use a dry, crumbly cookie or biscuit that can absorb moisture and help the peanut butter base hold together once chilled.
Chocolate Options
Semi-sweet chocolate chips are a popular choice because they provide a balanced chocolate flavor that isn’t overly sweet and complements the peanut butter perfectly.
If you prefer a sweeter dessert, milk chocolate creates a creamier topping with a softer chocolate flavor that many kids especially enjoy.
For a richer and more intense chocolate taste, dark chocolate is an excellent alternative and adds a deeper flavor contrast to the sweet peanut butter layer.
Dairy-free chocolate chips can be used if needed and melt just as easily for a smooth, glossy topping.
Whichever chocolate you choose, melting it together with a little peanut butter helps create a silky layer that spreads easily and slices cleanly after chilling.
Feel free to experiment with different chocolates until you find your favorite combination, since this recipe is flexible and works well with a variety of flavors.
Quick Ingredient Swaps
| If You Don’t Have | Use Instead |
|---|---|
| Graham cracker crumbs | Digestive biscuit crumbs |
| Semi-sweet chocolate chips | Milk chocolate chips |
| Semi-sweet chocolate chips | Dark chocolate chips |
| Creamy peanut butter | Crunchy peanut butter |
| Graham cracker crumbs | Gluten-free cracker crumbs |
Kitchen Tools Needed
- Mixing bowl – Used to combine the peanut butter base ingredients until smooth and evenly mixed.
- Microwave-safe bowl or saucepan – Needed for melting the butter and preparing the chocolate topping.
- 8×8-inch baking dish – Creates thick, perfectly sized bars that are easy to slice.
- Parchment paper – Prevents sticking and makes removing the bars from the pan much easier.
- Spatula – Helps mix ingredients thoroughly and spread each layer evenly.
Best Pan Sizes for This Recipe
| Pan Size | Result |
|---|---|
| 8×8-inch | Thick bars (recommended) |
| 9×9-inch | Slightly thinner bars |
| 9×13-inch | Much thinner bars |
Choosing the right pan size can make a noticeable difference in the thickness and texture of your bars.
For the classic thick, peanut butter cup-style bars featured in this recipe, an 8×8-inch pan delivers the best results.
How to Make No-Bake Peanut Butter Bars
Step 1: Prepare the Pan
Line an 8×8-inch baking dish with parchment paper, leaving a little overhang on the sides to make it easier to lift the bars out later.
Taking a minute to prepare the pan now will save you from struggling with stuck bars when it’s time to slice and serve.
Step 2: Make the Peanut Butter Layer
Place the melted butter, creamy peanut butter, powdered sugar, and graham cracker crumbs in a large mixing bowl.
Stir everything together until the mixture is evenly combined and no dry pockets of powdered sugar or crumbs remain.
The finished mixture should be thick, smooth, and easy to press into the pan.
Transfer the mixture to the prepared baking dish and spread it out evenly.
Use a spatula, the back of a spoon, or clean hands to firmly press the mixture into a flat, compact layer.
Pay extra attention to the corners so every bar has the same thickness and texture.
Step 3: Create the Chocolate Topping
Add the semi-sweet chocolate chips and peanut butter to a microwave-safe bowl or small saucepan.
If using a microwave, heat in short intervals, stirring between each one to prevent the chocolate from overheating.
If using the stovetop, melt the mixture over low heat while stirring frequently.
Continue stirring until the chocolate and peanut butter are fully melted and blended into a smooth, glossy mixture.
A smooth topping will spread more easily and create a beautiful finish once the bars are chilled.
Step 4: Assemble the Bars
Pour the melted chocolate mixture over the peanut butter layer.
Use a spatula to gently spread the chocolate from edge to edge, creating an even layer across the entire surface.
Work slowly and carefully so the peanut butter layer stays smooth underneath.
Once spread, lightly tap the dish on the counter a few times to help level the chocolate.
Step 5: Chill and Set
Place the dish in the refrigerator and chill for about 1 to 2 hours, or until the bars feel firm when gently touched.
Allowing enough chilling time helps the layers set properly and makes slicing much easier.
Once firm, lift the bars from the pan using the parchment paper overhang.
Place them on a cutting board and use a sharp knife to cut them into squares or rectangles.
For the cleanest cuts, wipe the knife between slices or run it under warm water and dry it before cutting.
Serve immediately or store the bars in the refrigerator until you’re ready to enjoy them.
Tips for Perfect Peanut Butter Bars
Use Room-Temperature Ingredients When Possible
Allowing ingredients such as peanut butter to come to room temperature before mixing can make the process much easier and help everything combine more smoothly.
Room-temperature ingredients blend together more evenly, which creates a consistent texture throughout the peanut butter layer.
If you’re short on time, don’t worry, but a few minutes on the counter can make mixing feel much less effort.
Press the Base Firmly for Clean Layers
When spreading the peanut butter mixture into the pan, take an extra moment to press it down firmly and evenly.
A compact base helps the bars hold together better once sliced and prevents the layers from separating.
Using the bottom of a measuring cup or a flat spatula can make it easier to create a smooth, level surface.
Pay close attention to the corners so every bar has the same thickness and texture.
Don’t Overheat the Chocolate
Chocolate melts best when heated gently.
If using a microwave, warm it in short bursts and stir often between each interval.
If using the stovetop, keep the heat low and stir continuously until smooth.
Overheated chocolate can become thick, grainy, or difficult to spread, so patience is well worth it here.
Chill Completely Before Slicing
It can be tempting to cut into the bars right away, but giving them enough time to chill makes a big difference.
Fully chilled bars hold their shape better and produce cleaner, more attractive slices.
A minimum of one to two hours in the refrigerator is usually enough, but a little extra time won’t hurt.
The firmer the bars are, the easier they will be to cut and serve.
Use a Warm Knife for Cleaner Cuts
For neat, bakery-style squares, run a sharp knife under warm water and dry it before slicing.
The gentle warmth helps the knife glide through the chocolate layer without cracking or dragging.
Wipe the blade clean between cuts to keep the edges looking smooth and tidy.
Flavor Variations
Chocolate Peanut Butter Cup Bars
If you’re a true chocolate lover, adding an extra layer of chocolate is an easy way to make these bars even more indulgent.
You can spread a thin layer of melted chocolate over the peanut butter base before adding the final chocolate topping, creating a dessert that tastes even more like a giant peanut butter cup.
The extra chocolate adds richness while giving each bite a more pronounced chocolate flavor.
Crunchy Peanut Butter Bars
For added texture, stir chopped peanuts into the peanut butter mixture before pressing it into the pan.
The peanuts add a satisfying crunch that contrasts beautifully with the creamy peanut butter filling and smooth chocolate topping.
You can use roasted, salted, or unsalted peanuts depending on the flavor you prefer.
If you enjoy a little texture in your desserts, this variation is a simple and delicious upgrade.
Salted Peanut Butter Bars
A light sprinkle of flaky sea salt over the chocolate layer can completely transform the flavor of these bars.
The salt helps balance the sweetness while bringing out the rich peanut butter and chocolate flavors.
A little goes a long way, so a small pinch scattered across the top is usually all you need.
This variation is especially popular with anyone who enjoys sweet-and-salty desserts.
Holiday Peanut Butter Bars
These bars are easy to dress up for special occasions.
Simply add festive sprinkles to the chocolate topping before it sets.
Red and green sprinkles work beautifully for the holidays, while pastel colors are perfect for spring celebrations, and bright rainbow sprinkles make them fun for birthdays.
This simple addition adds color and personality without changing the flavor or texture of the bars.
Protein Peanut Butter Bars
For a heartier version, mix a scoop of your favorite protein powder into the peanut butter layer.
Vanilla and chocolate protein powders both pair nicely with the peanut butter and chocolate flavors.
If the mixture becomes slightly dry after adding the powder, stir in a small amount of peanut butter until the texture is easy to press into the pan.
This variation is a great option when you want the same delicious flavor with a little extra substance in every bite.
Customization Ideas
One of the best things about these no-bake peanut butter bars is how easy they are to customize.
- Mini chocolate chips – Mix them into the peanut butter layer for extra chocolate in every bite.
- Chopped pretzels – Add a crunchy sweet-and-salty twist that pairs perfectly with peanut butter.
- Crushed cookies – Stir in crushed chocolate sandwich cookies or vanilla cookies for added texture and flavor.
- Toasted coconut – Sprinkle toasted coconut on top of the chocolate layer for a nutty, tropical touch.
- Peanut butter chips – Mix them into the base or sprinkle them over the top for even more peanut butter flavor.
How to Store No-Bake Peanut Butter Bars
Refrigerator Storage
No-bake peanut butter bars should be stored in an airtight container in the refrigerator to keep them firm and fresh.
The cool temperature helps maintain the smooth chocolate topping and prevents the peanut butter layer from becoming too soft.
If you’re stacking multiple layers of bars in the container, place a sheet of parchment paper between them to prevent sticking.
When properly stored, these bars will stay fresh and delicious for up to one week.
Many people find that the flavor becomes even better after a day in the refrigerator, as the layers have more time to settle and firm up.
For the best texture, serve them straight from the refrigerator or let them sit at room temperature for a few minutes before enjoying.
Freezer Storage
These bars freeze exceptionally well, making them a great make-ahead dessert for busy weeks, holidays, and special occasions.
To freeze them, first allow the bars to chill completely in the refrigerator until firm.
Once set, cut them into individual squares and arrange them in a single layer on a baking sheet or plate.
Freeze the bars for about an hour, or until they are firm enough to handle without sticking together.
Transfer the frozen bars to a freezer-safe container or zip-top freezer bag.
If you’re stacking them, place parchment paper between the layers to keep the chocolate topping looking its best.
Properly stored, no-bake peanut butter bars can be frozen for up to three months.
Best Thawing Methods
When you’re ready to enjoy the bars, transfer the desired amount from the freezer to the refrigerator.
Allow them to thaw overnight or for several hours until they return to their original texture.
If you’re short on time, you can let them sit at room temperature for about 15 to 20 minutes before serving.
Avoid using a microwave to thaw the bars, as the chocolate can soften too quickly and affect the texture.
Make Ahead Timeline
| Timeline | What to Do |
|---|---|
| Up to 3 days ahead | Prepare the bars and store them covered in the refrigerator. |
| Up to 3 months ahead | Freeze the bars in an airtight container with parchment between layers. |
| Day of serving | Slice and serve chilled for the best texture and cleanest cuts. |
Common Mistakes to Avoid
- Using overly oily natural peanut butter – Excess oil can make the peanut butter layer too soft and difficult to set properly.
- Not chilling long enough – Cutting the bars before they are fully chilled can cause messy slices and layers that don’t hold together.
- Making the base too crumbly – Incorrect ingredient measurements or insufficient mixing can prevent the bars from holding their shape.
- Overheating the chocolate – Chocolate that gets too hot can become thick, grainy, and harder to spread smoothly.
Troubleshooting No-Bake Peanut Butter Bars
| Problem | Solution |
|---|---|
| Bars are too soft | Chill them longer until fully firm. |
| Chocolate cracks when slicing | Let the bars sit at room temperature for 5 minutes before cutting. |
| Base is crumbly | Mix in 1–2 tablespoons of peanut butter until the mixture holds together. |
| Chocolate is difficult to spread | Gently rewarm the chocolate mixture and stir until smooth. |
Serving Suggestions
- With coffee or tea – The rich peanut butter and chocolate flavors pair perfectly with a warm cup of coffee or tea.
- As a holiday dessert tray addition – These bars add a crowd-pleasing peanut butter and chocolate option to any festive dessert spread.
- Packed in lunchboxes – Their firm texture makes them easy to pack as a sweet treat for school, work, or day trips.
- Topped with whipped cream or ice cream – A dollop of whipped cream or a scoop of vanilla ice cream makes them feel even more special.
Author’s Note
I’ve made these no-bake peanut butter bars for holiday dessert trays, family gatherings, potlucks, and make-ahead treats, and they never last long once they’re served.
One thing I’ve learned is that chilling the bars overnight produces the cleanest slices and gives the peanut butter layer the perfect firm-yet-creamy texture.
If you’re making them for a special occasion, preparing them the day before is a simple way to save time while ensuring they taste their absolute best.
Final Thoughts
No-bake peanut butter bars are a favorite for a reason—they’re easy to make, packed with rich peanut butter and chocolate flavor, and perfect for everything from everyday treats to special occasions.
Don’t be afraid to try different variations and add your own twist, whether it’s extra chocolate, crunchy peanuts, or a sprinkle of sea salt.
Happy baking—well, no baking!
FAQs
Can I make these bars ahead of time?
Yes, these bars are perfect for making ahead and can be stored in the refrigerator for up to one week.
Can I freeze peanut butter bars?
Absolutely. Place them in a freezer-safe container and freeze for up to three months.
Do I need graham cracker crumbs?
No. Crushed digestive biscuits, vanilla wafers, or gluten-free crackers can be used instead.
Can I use crunchy peanut butter?
Yes, crunchy peanut butter works well and adds extra texture to the bars.
How long do no-bake peanut butter bars last?
When stored in an airtight container in the refrigerator, they stay fresh for up to one week.
No-Bake Peanut Butter Bars Recipe (Easy, Creamy & Chocolatey)
Course: Vegan DessertsDifficulty: Easy16
Bars15
minutes1
hour15
minutesThese no-bake peanut butter bars feature a creamy peanut butter base topped with a rich chocolate layer. They’re quick to make, require no oven, and taste just like a homemade peanut butter cup.
Ingredients
1 cup creamy peanut butter
½ cup unsalted butter, melted
2 cups powdered sugar
2 cups graham cracker crumbs
1½ cups semi-sweet chocolate chips
¼ cup creamy peanut butter
Directions
- Line an 8×8-inch baking dish with parchment paper.
- In a large bowl, mix the peanut butter, melted butter, powdered sugar, and graham cracker crumbs until combined.
- Press the mixture firmly into the prepared baking dish.
- Melt the chocolate chips and ¼ cup peanut butter together, stirring until smooth.
- Spread the chocolate mixture evenly over the peanut butter layer.
- Refrigerate for 1–2 hours, or until firm.
- Slice into 16 squares and serve.
Notes
- For the cleanest slices, chill overnight and cut with a warm knife.
- Store in an airtight container in the refrigerator for up to 1 week.
- Freeze for up to 3 months.
Hi, I’m Daisy Roots, the home cook and recipe developer behind this kitchen. I create simple, tested vegan recipes using everyday ingredients. Every dish is developed and cooked in my own kitchen, with clear steps to help you get reliable results every time. Thanks for stopping by — let’s cook something great!