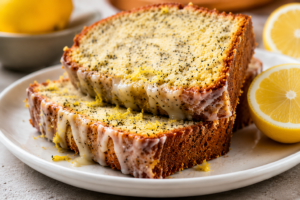
If you have a few ripe bananas on the counter, this vegan banana bread with walnuts is a great way to use them.
It bakes up soft, moist, and full of rich banana flavor, with crunchy walnuts in every bite.
The best part is how simple it is. No eggs, no dairy, and no complicated steps—just a handful of everyday ingredients mixed together in one easy batter.
If you’re new to vegan baking, don’t worry, because this recipe is straightforward, reliable, and easy to follow from start to finish.
Recipe At a Glance
| Detail | Information |
|---|---|
| Prep Time | 10 minutes |
| Bake Time | 50–60 minutes |
| Total Time | 1 hour 10 minutes |
| Difficulty | Easy |
| Servings | 10 slices |
| Vegan | Yes |
| Freezer Friendly | Yes |
This vegan banana bread with walnuts comes together with simple ingredients and minimal prep, making it an easy recipe for both beginner and experienced bakers.
Why You’ll Love This Vegan Banana Bread
- Soft, moist, and flavorful – Every slice is tender, rich in banana flavor, and perfectly satisfying.
- Simple pantry ingredients – Made with everyday staples you likely already have at home.
- Naturally sweetened with ripe bananas – Overripe bananas add plenty of sweetness and delicious flavor.
- Loaded with crunchy walnuts – Walnuts bring a satisfying crunch that pairs perfectly with the soft bread.
- Great for meal prep and freezing – Make a loaf ahead of time and enjoy slices throughout the week.
Ingredients You’ll Need
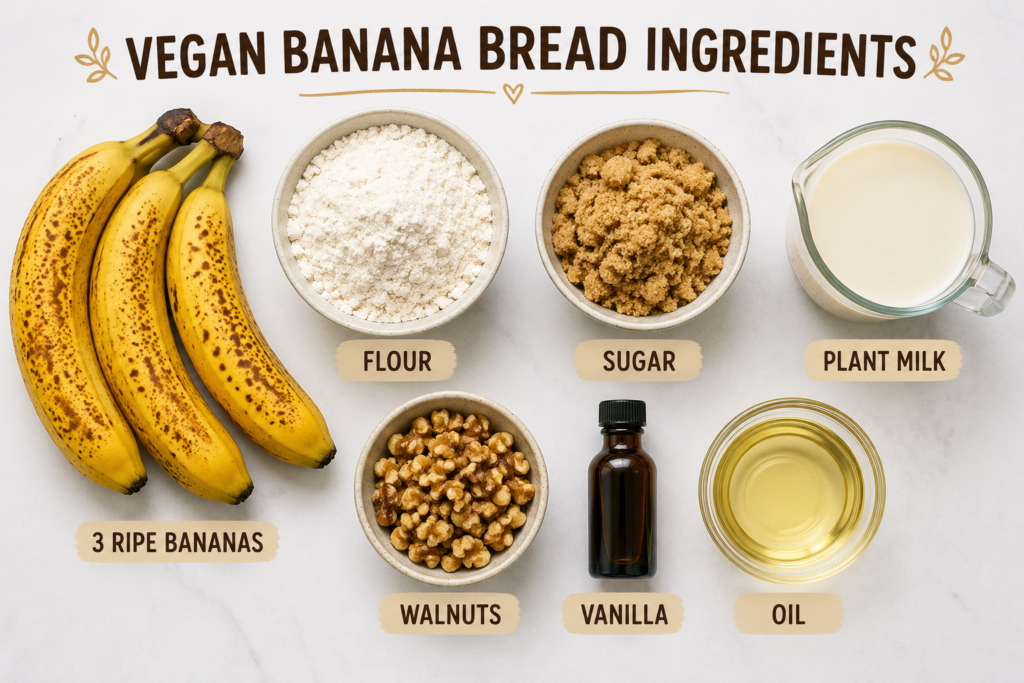
For the Banana Bread
- 3 large ripe bananas, mashed
- 1¾ cups (220g) all-purpose flour
- ½ cup (100g) brown sugar or coconut sugar
- 1 teaspoon baking powder
- 1 teaspoon baking soda
- ½ teaspoon salt
- ¼ cup (60ml) plant-based milk
- ⅓ cup (80ml) vegetable oil or melted coconut oil
- 1 teaspoon vanilla extract
- ¾ cup (90g) chopped walnuts
Optional Add-Ins
- ½ cup (85g) vegan chocolate chips
- 1 teaspoon ground cinnamon
- ¼ teaspoon ground nutmeg
- ½ cup (60g) chopped pecans
- ¼ cup (20g) unsweetened shredded coconut
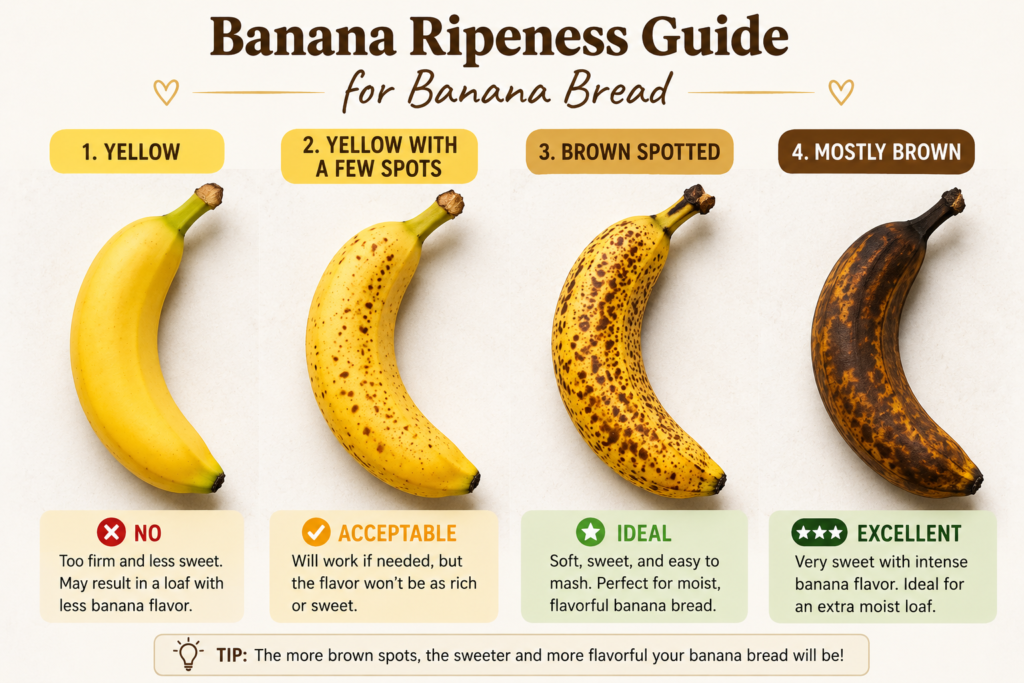
How Ripe Should Bananas Be?
The ripeness of your bananas can have a big impact on the flavor, sweetness, and texture of your banana bread.
For the best results, choose bananas with plenty of brown spots on the peel.
As bananas ripen, they become sweeter and softer, which helps create a moist loaf with rich banana flavor.
If your bananas are still bright yellow, it may be worth waiting another day or two before baking.
Banana Ripeness Guide
| Banana Stage | Best for Banana Bread? |
|---|---|
| Yellow | ❌ No |
| Yellow with a few spots | ✓ Acceptable |
| Brown spotted | ★ Ideal |
| Mostly brown | ★★★★★ Excellent |
What to Look For
Yellow Bananas
These are great for snacking but not ideal for banana bread.
They are firmer and less sweet, which can result in a loaf with less banana flavor.
Yellow Bananas with a Few Spots
These will work if needed, but the flavor won’t be as rich as fully ripe bananas.
You may notice a slightly less sweet finished loaf.
Brown Spotted Bananas
This is the sweet spot for banana bread.
The bananas are soft, naturally sweet, and easy to mash into a smooth batter.
Mostly Brown Bananas
These are excellent for baking.
Their concentrated sweetness and strong banana flavor create an especially moist and flavorful loaf.
Kitchen Equipment
- Mixing bowls – For combining the wet and dry ingredients.
- Measuring cups and spoons – To accurately measure all ingredients.
- 9×5-inch loaf pan – For baking the banana bread.
- Whisk or spatula – To mix the batter until just combined.
- Cooling rack – To help the bread cool evenly after baking.
Recipe Notes
✓ Bananas should be heavily spotted for the best flavor.
✓ Do not overmix once the flour is added.
✓ Every oven bakes differently, so start checking for doneness around the 50-minute mark.
✓ Let the loaf cool completely before slicing for the best texture and cleanest cuts.
How to Make Vegan Banana Bread with Walnuts
Step 1: Prepare the Oven and Pan
Preheat your oven to 350°F (175°C), so it has plenty of time to reach the correct temperature before the batter is ready.
A properly preheated oven helps the banana bread bake evenly from the start.
Grease a 9×5-inch loaf pan lightly with oil, or line it with parchment paper for easy removal later.
If you’re using parchment paper, leave a little overhang on the sides to make lifting the finished loaf out of the pan much easier.
Step 2: Mash the Bananas
Place the ripe bananas in a large mixing bowl.
Use a fork or potato masher to mash them until they are mostly smooth.
A few small lumps are perfectly fine and can add extra banana flavor throughout the loaf.
The riper the bananas, the sweeter and more flavorful your bread will be.
Step 3: Mix the Wet Ingredients
Add the brown sugar, plant-based milk, oil, and vanilla extract to the mashed bananas.
Stir everything together until well combined and smooth.
Make sure the sugar is evenly mixed into the banana mixture.
At this stage, the batter should look thick, creamy, and lightly glossy.
Step 4: Combine the Dry Ingredients
In a separate bowl, whisk together the flour, baking powder, baking soda, and salt.
Whisking helps distribute the leavening agents evenly throughout the flour.
This simple step helps the bread rise consistently and prevents pockets of baking soda or baking powder from ending up in the finished loaf.
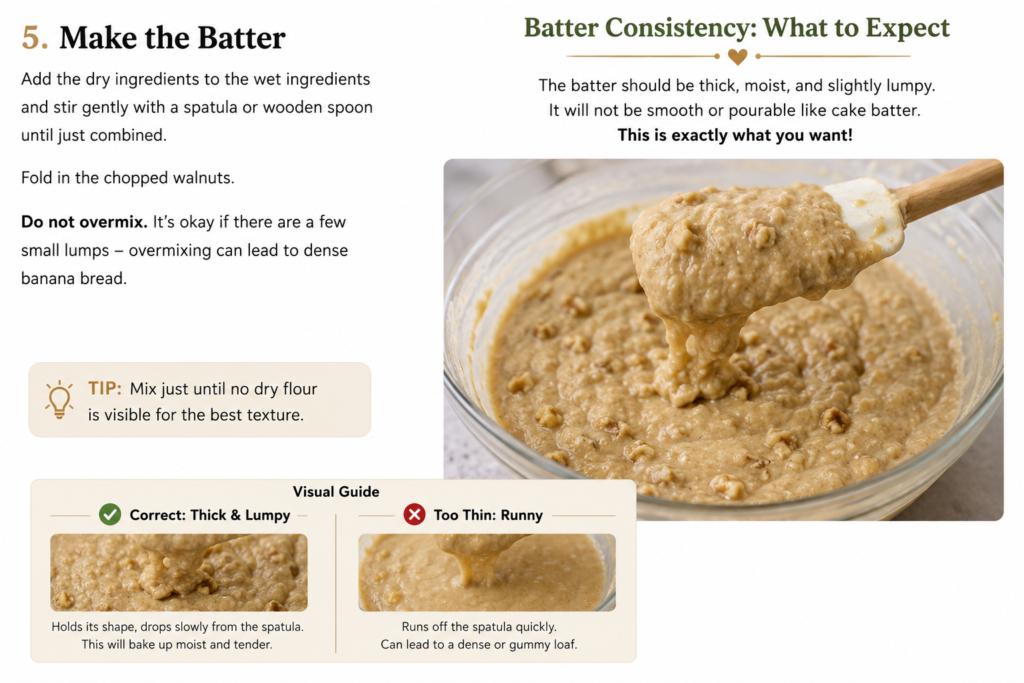
Step 5: Make the Batter
Add the dry ingredients to the bowl of wet ingredients.
Using a spatula or wooden spoon, gently fold everything together until no dry streaks of flour remain.
Try not to overmix the batter.
A few small lumps are completely normal and help keep the bread soft and tender.
Once the batter is combined, fold in the chopped walnuts until they are evenly distributed.
The walnuts add a delicious crunch that contrasts beautifully with the soft banana bread.
Step 6: Bake
Pour the batter into the prepared loaf pan and spread the top into an even layer.
If you like, sprinkle a handful of extra chopped walnuts over the surface for added texture and a bakery-style look.
Place the pan in the preheated oven and bake for 50 to 60 minutes.
The loaf is ready when the top is golden brown, and a toothpick inserted into the center comes out clean or with just a few moist crumbs attached.
If the top starts browning too quickly near the end of baking, loosely cover it with foil and continue baking until done.
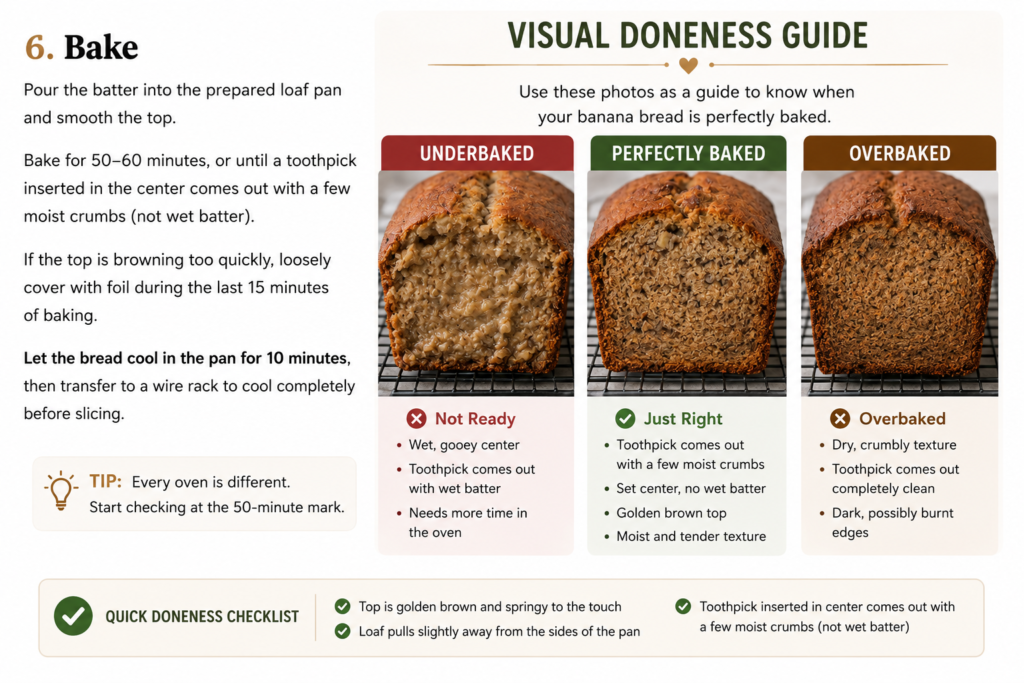
Step 7: Cool and Serve
Remove the loaf from the oven and place the pan on a cooling rack.
Allow the banana bread to cool in the pan for about 10 to 15 minutes.
This short resting time helps the loaf set and makes it easier to remove from the pan without breaking.
Carefully lift the bread out and transfer it directly to the cooling rack.
Let it cool completely before slicing for the cleanest cuts and best texture.
Serve as is, spread with vegan butter, or enjoy alongside your favorite cup of coffee or tea.
Baker’s Tip
If you’re using frozen bananas, thaw them completely before adding them to the batter.
Don’t pour away the liquid that collects during thawing.
That liquid is packed with concentrated banana flavor and helps create an extra moist loaf.
Simply add both the bananas and the liquid to the mixing bowl and continue with the recipe as written.
This is one of my favorite tricks for getting the most flavor possible from banana bread while reducing food waste at the same time.
Tips for the Best Vegan Banana Bread
Use Very Ripe Bananas with Brown Spots
The bananas you use can make a big difference in the final flavor of your bread.
Look for bananas with plenty of brown spots on the peel, as these are naturally sweeter and softer than yellow bananas.
Ripe bananas mash more easily and blend smoothly into the batter.
If your bananas are not quite ripe enough, let them sit on the counter for another day or two before baking.
Avoid Overmixing the Batter
Once the dry ingredients are added, mix only until everything is combined.
Overmixing can make banana bread dense and less tender.
A few small lumps in the batter are completely normal and nothing to worry about.
Gentle mixing helps create a softer loaf with a better texture.
Measure Flour Correctly
Too much flour is one of the most common reasons banana bread turns out dry.
Instead of scooping directly into the flour bag, spoon the flour into your measuring cup and level it off with a knife.
This simple step helps prevent packing too much flour into the cup.
Accurate measuring gives you a moist loaf that stays soft for days.
Toast Walnuts for Extra Flavor
For even more flavor, toast the walnuts before adding them to the batter.
Spread them on a baking sheet and bake for a few minutes until they smell warm and nutty.
Toasting brings out their natural richness and adds extra depth to every bite.
Be sure to let them cool slightly before stirring them into the batter.
Let the Bread Cool Completely Before Slicing
It can be tempting to cut into the loaf right away, especially when your kitchen smells amazing.
Giving the bread time to cool allows the inside to finish setting properly.
Slicing too soon can make the loaf crumbly and harder to cut neatly.
A little patience rewards you with cleaner slices and the best possible texture.
If you want to serve it warm, wait until it has cooled completely, then gently reheat individual slices before serving.
Variations and Substitutions
One of the best things about this vegan banana bread is how easy it is to adapt to different preferences and ingredients you already have at home.
Gluten-Free Version
If you need a gluten-free option, replace the all-purpose flour with a 1:1 gluten-free baking flour blend.
These blends are designed to work as a direct substitute, making the change simple and beginner-friendly.
For the best texture, choose a blend that contains xanthan gum or a similar binding ingredient.
The finished loaf will still be soft, moist, and packed with banana flavor.
Oil-Free Version
If you’d prefer to skip the oil, replace it with an equal amount of unsweetened applesauce.
Applesauce helps keep the bread moist while adding a subtle sweetness that works well with the bananas.
The texture may be slightly softer than the original version, but it will still bake into a tender and flavorful loaf.
Be sure to use unsweetened applesauce so the overall sweetness stays balanced.
Lower-Sugar Option
When your bananas are very ripe, they provide plenty of natural sweetness on their own.
In that case, you can reduce the sugar by a few tablespoons without sacrificing flavor.
This is an easy adjustment if you prefer a less sweet banana bread.
Taste the mashed bananas before mixing the batter and adjust the sugar to suit your preference.
Nut-Free Option
If you need a nut-free version, simply leave out the walnuts.
For a little crunch, replace them with sunflower seeds or pumpkin seeds.
These alternatives add texture without changing the overall flavor of the bread too much.
You can also skip any mix-ins entirely and enjoy a classic, soft banana bread that lets the banana flavor shine.
More Ways to Make It Your Own
Feel free to experiment with other mix-ins based on what you enjoy most.
Vegan chocolate chips add pockets of melted chocolate throughout the loaf.
A teaspoon of cinnamon brings extra warmth and pairs beautifully with the bananas.
Shredded coconut adds a subtle sweetness and a little texture in every bite.
| Flavor Combination | Add-Ins |
|---|---|
| Chocolate Lover | Chocolate chips + walnuts |
| Cozy Spice | Cinnamon + nutmeg |
| Tropical | Coconut + walnuts |
| Nutty Crunch | Pecans + walnuts |
Storage Instructions
Proper storage helps keep your vegan banana bread soft, moist, and delicious for as long as possible.
Make sure the loaf has cooled completely before storing it.
Storing warm banana bread can trap steam inside the container, which may affect the texture.
Room Temperature
If you plan to enjoy the bread within a few days, room temperature storage works perfectly.
Place the loaf or individual slices in an airtight container.
You can also wrap the bread tightly in plastic wrap or foil before placing it in the container.
Store it in a cool, dry spot away from direct sunlight.
When stored properly, the bread will stay fresh for up to 3 days.
Refrigerator
For longer storage, keep the banana bread in the refrigerator.
Place it in an airtight container or wrap it well to prevent it from drying out.
The refrigerator can help extend freshness, especially in warmer kitchens.
The bread will keep well for up to 1 week.
If you’d like a softer texture before serving, let a slice sit at room temperature for a few minutes or warm it briefly in the microwave.
Freezer
Banana bread freezes exceptionally well, making it a great make-ahead treat.
For the easiest serving option, slice the loaf before freezing.
Wrap each slice individually in plastic wrap or parchment paper.
Place the wrapped slices in a freezer-safe container or freezer bag.
This method allows you to remove only the amount you need without thawing the entire loaf.
The bread can be frozen for up to 3 months.
When you’re ready to enjoy a slice, let it thaw at room temperature or warm it gently in the microwave for a freshly baked taste and texture.
Quick Storage Tip
If you’re baking an extra loaf for later, freezing it on the day it’s made helps lock in its moisture and flavor.
A few minutes of wrapping now can reward you with homemade banana bread whenever the craving strikes.
Serving Suggestions
- Enjoy warm with vegan butter – A simple spread of vegan butter melts beautifully into each slice.
- Pair with coffee or tea – The rich banana flavor goes perfectly with your favorite hot drink.
- Serve with nut butter spread – Almond butter or peanut butter adds extra richness and flavor.
- Add fresh fruit on the side – Fresh berries, sliced bananas, or apple slices make a delicious pairing.
Common Mistakes to Avoid
- Using under-ripe bananas – Less ripe bananas won’t provide the same sweetness, moisture, or rich banana flavor.
- Overbaking the loaf – Baking too long can dry out the bread and make it less tender.
- Overmixing the batter – Mixing too much can create a dense loaf instead of a soft, fluffy texture.
- Skipping the cooling time – Allowing the bread to cool helps it set properly and makes slicing much easier.
| Problem | Likely Cause | Solution |
|---|---|---|
| Dense loaf | Overmixed batter | Stir only until combined |
| Dry bread | Too much flour | Spoon and level flour |
| Soggy center | Underbaked | Bake longer and test with toothpick |
| Bread sank in middle | Oven opened too early | Keep oven closed for first 40 minutes |
| Crumbly slices | Cut while warm | Cool completely first |
Final Thoughts
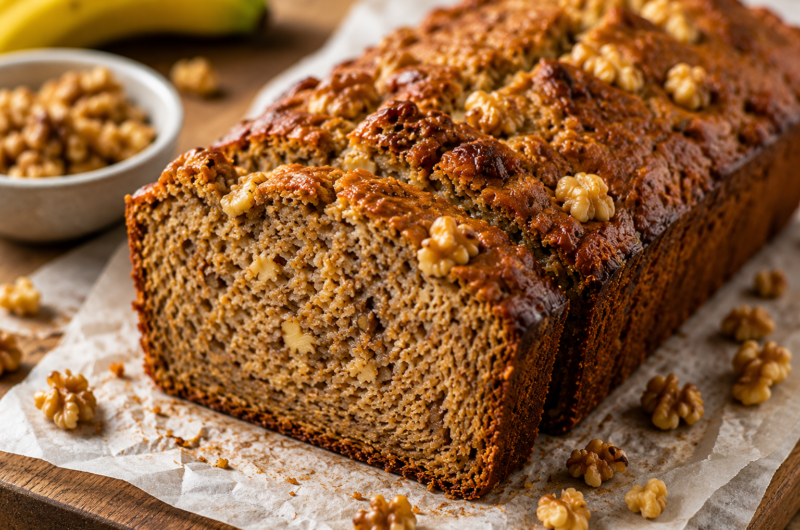
This vegan banana bread with walnuts is simple to make, full of rich banana flavor, and has the perfect balance of soft texture and crunchy walnuts.
It’s the kind of recipe you can turn to again and again, whether you’re baking for breakfast, a snack, or a cozy dessert.
Feel free to make it your own with chocolate chips, cinnamon, coconut, or any of your favorite add-ins.
If you give this recipe a try, share it with family and friends, and let them enjoy a slice too.
FAQs
Can I make vegan banana bread without walnuts?
Yes, simply omit the walnuts or replace them with another mix-in.
How ripe should bananas be?
The riper the bananas, the sweeter and more flavorful the bread.
Can I freeze banana bread?
Yes, wrap slices individually and freeze for easy grab-and-go servings.
Why is my banana bread dense?
Overmixing the batter or adding too much flour can create a dense loaf.
Vegan Banana Bread with Walnuts – Moist, Easy, and Irresistible
Course: Vegan DessertsDifficulty: Easy10
Slices10
minutes1
hour1
hour10
minutesThis vegan banana bread with walnuts is soft, moist, and packed with rich banana flavor. Made with simple pantry ingredients, it’s an easy dairy-free and egg-free loaf that’s perfect for breakfast, snacks, or dessert.
Ingredients
3 large ripe bananas, mashed
1¾ cups (220g) all-purpose flour
½ cup (100g) brown sugar or coconut sugar
1 teaspoon baking powder
1 teaspoon baking soda
½ teaspoon salt
¼ cup (60ml) plant-based milk
⅓ cup (80ml) vegetable oil or melted coconut oil
1 teaspoon vanilla extract
¾ cup (90g) chopped walnuts
Directions
- Preheat the oven to 350°F (175°C) and grease or line a 9×5-inch loaf pan.
- In a large bowl, mash the bananas until mostly smooth.
- Stir in the sugar, plant-based milk, oil, and vanilla extract.
- In a separate bowl, whisk together the flour, baking powder, baking soda, and salt.
- Add the dry ingredients to the wet ingredients and gently mix until just combined.
- Fold in the chopped walnuts.
- Transfer the batter to the prepared loaf pan and spread evenly.
- Bake for 50–60 minutes, or until a toothpick inserted into the center comes out clean.
- Let the loaf cool in the pan for 10–15 minutes before transferring it to a wire rack to cool completely.
Notes
- Use heavily spotted bananas for the sweetest flavor.
- Do not overmix the batter once the flour is added.
- Start checking for doneness around the 50-minute mark.
- Allow the bread to cool completely before slicing for the best texture.

Hi, I’m Daisy Roots, the home cook and recipe developer behind this kitchen. I create simple, tested vegan recipes using everyday ingredients. Every dish is developed and cooked in my own kitchen, with clear steps to help you get reliable results every time. Thanks for stopping by — let’s cook something great!