Quinoa is one of those pantry staples that can be simple and delicious when cooked the right way.
It has a light, fluffy texture and a mild flavor that works well in everything from salads and grain bowls to soups and side dishes.
The challenge is that quinoa can easily turn out mushy, watery, bitter, or undercooked if a few key steps are missed.
The good news? Perfect quinoa is much easier to make than you might think.
In this guide, I’ll walk you through the simple method I use every time.
You’ll learn how to rinse, measure, cook, and fluff quinoa so it comes out tender, fluffy, and ready for any meal.
Quick Answer: How Do You Cook Quinoa Perfectly?
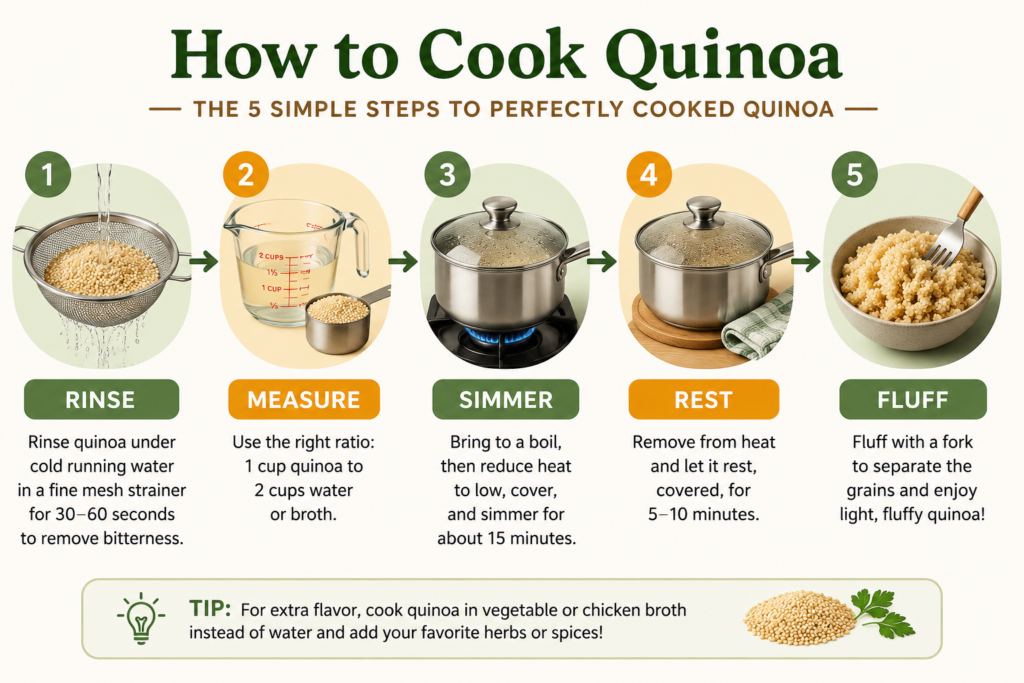
Rinse 1 cup of quinoa under cool water, then combine it with 2 cups of water or broth in a saucepan. Bring to a boil, reduce the heat to low, cover, and simmer for about 15 minutes. Remove from the heat and let it rest, covered, for 5–10 minutes. Finally, fluff the quinoa with a fork before serving.
What Is Quinoa?
Quinoa is a small seed that is cooked and enjoyed like a grain.
It has been grown for thousands of years in the Andes Mountains of South America, where it was a staple food for ancient civilizations.
Today, quinoa is popular around the world because it is easy to cook, versatile, and works well in a wide variety of dishes.
Many people consider quinoa a superfood because it is packed with nutrients while still being light and satisfying.
It is especially valued for its protein content and balanced nutritional profile.
Types of Quinoa
You may come across several varieties of quinoa at the grocery store:
- White Quinoa: The most common type, with a mild flavor and soft, fluffy texture.
- Red Quinoa: Slightly firmer than white quinoa and holds its shape well in salads.
- Black Quinoa: Has a richer, earthier flavor and a slightly crunchier texture.
- Tricolor Quinoa: A blend of white, red, and black quinoa that offers a mix of textures and visual appeal.
Can You Cook Different Types of Quinoa the Same Way?
Yes, all types of quinoa can be cooked using the same basic method, but there are a few differences in texture and cooking time worth knowing.
White quinoa tends to cook the fastest and produces the softest, fluffiest texture.
Red and black quinoa are slightly firmer and may need a few extra minutes to become fully tender.
Tricolor quinoa is simply a blend of different varieties, so the final texture is usually a mix of soft and slightly chewy grains.
| Type | Texture | Cooking Time |
|---|---|---|
| White Quinoa | Soft and fluffy | About 15 minutes |
| Red Quinoa | Slightly firm | 15–18 minutes |
| Black Quinoa | Firm and chewy | 18–20 minutes |
| Tricolor Quinoa | Mixed texture | 15–20 minutes |
If you’re cooking red, black, or tricolor quinoa and the grains still seem a little firm after the recommended cooking time, simply add a splash of water and continue cooking for another minute or two.
No matter which variety you choose, the same key principles apply: rinse well, use the correct liquid ratio, cook gently, let it rest, and fluff before serving.
Nutritional Benefits
Quinoa is loaded with nutrients that make it a great addition to many meals.
Some of its key benefits include:
- High in protein, making it more filling than many other grains.
- Rich in fiber, which helps create a satisfying texture and keeps meals balanced.
- Naturally gluten-free, making it a suitable option for those avoiding gluten.
- Packed with vitamins and minerals, including magnesium, iron, potassium, and B vitamins.
Essential Ingredients and Equipment
Before you begin, gather a few simple ingredients and basic kitchen tools.
Having everything ready makes the cooking process smooth and helps ensure consistently fluffy quinoa.
Ingredients You’ll Need
- Quinoa: Any variety of quinoa will work, including white, red, black, or tricolor.
- Water or Broth: Water produces a clean, neutral flavor, while broth adds extra depth and richness.
- Optional Seasonings: A pinch of salt, herbs, spices, garlic powder, or a squeeze of lemon juice can enhance the flavor.
Kitchen Tools
- Fine-Mesh Strainer: Essential for rinsing quinoa and removing its natural coating, which can cause bitterness.
- Medium Saucepan with Lid: Allows the quinoa to cook evenly and absorb liquid properly.
- Measuring Cups: Helps ensure the correct quinoa-to-liquid ratio for the best texture.
- Fork for Fluffing: Separates the grains after cooking and creates a light, fluffy finish.
Step 1: Rinse Quinoa Properly
Why Rinsing Matters
If there is one step you should never skip when cooking quinoa, it’s rinsing.
Quinoa naturally has a coating called saponin on the outside of each seed.
This coating helps protect the plant as it grows, but it can leave a bitter or soapy taste behind when cooked.
Even if the package says the quinoa has been pre-rinsed, giving it a quick rinse at home is still a good idea.
It only takes a minute and can make a noticeable difference in flavor.
Rinsing also helps wash away any dust or small particles that may be present from packaging and handling.
Starting with clean quinoa gives you the best chance of ending up with a fresh, mild flavor that works well in any recipe.
Best Rinsing Method
Place the dry quinoa into a fine-mesh strainer.
A fine-mesh strainer is important because quinoa seeds are very small and can slip through larger holes.
Hold the strainer under cool running water.
Use your hand or a spoon to gently stir the quinoa while the water runs over it.
Moving the grains around helps ensure every seed gets rinsed evenly.
Continue rinsing for about 30 to 60 seconds.
You’ll often notice the water looks slightly cloudy at first.
Keep rinsing until the water runs clear and the quinoa looks clean.
Once rinsed, give the strainer a few gentle shakes to remove excess water.
The quinoa does not need to be completely dry before cooking.
At this point, it’s ready for the pot and the next step in the cooking process.
Taking a minute to rinse may seem small, but it’s one of the easiest ways to improve both the flavor and texture of your finished quinoa.
Step 2: Use the Correct Quinoa-to-Water Ratio
The Ideal Ratio
Getting the quinoa-to-water ratio right is one of the biggest secrets to perfectly cooked quinoa.
Too much liquid can leave the quinoa soft and watery.
Too little liquid can result in grains that are dry or undercooked.
For most varieties of quinoa, the sweet spot is 1 cup of quinoa to 2 cups of water or broth.
This ratio gives the quinoa enough liquid to cook through while still staying light and fluffy.
If you’re cooking a larger batch, simply keep the same ratio.
For example, use 2 cups of quinoa with 4 cups of liquid, or 3 cups of quinoa with 6 cups of liquid.
If you prefer quinoa with a slightly firmer bite, you can reduce the liquid a little.
Using just under 2 cups of liquid per cup of quinoa often creates a texture that is a bit more defined and less soft.
If you like quinoa to be extra tender for soups, grain bowls, or warm side dishes, adding a small splash more liquid can help.
The key is to avoid making large changes.
Small adjustments go a long way when cooking quinoa.
Measuring carefully may seem simple, but it can make the difference between fluffy grains and a pot of mushy quinoa.
Water vs. Broth
Once you’ve measured the correct amount of liquid, the next choice is deciding whether to use water or broth.
Both work well, but they create different results.
Water allows the natural flavor of the quinoa to shine through.
It produces a clean, neutral taste that pairs easily with almost any ingredient.
This is a great option when the quinoa will be mixed into strongly flavored dishes, salads, or recipes with plenty of seasonings.
Broth adds flavor right from the start.
As the quinoa absorbs the liquid, it also absorbs the savory taste of the broth.
Vegetable broth works beautifully in plant-based meals.
Chicken broth adds a rich, comforting flavor that pairs well with roasted vegetables, grilled meats, and hearty grain bowls.
If you’re serving quinoa as a simple side dish, broth can make it taste more flavorful without any extra effort.
No matter which liquid you choose, make sure it tastes good on its own.
The flavor you start with is the flavor the quinoa will absorb as it cooks.
When you’re unsure, water is always a safe choice.
When you want a little extra flavor built into every bite, reach for broth.
Either option can produce delicious quinoa as long as the ratio is correct.
| Quinoa Amount | Liquid Amount | Yield (Approx.) |
|---|---|---|
| 1/2 cup | 1 cup | 1 1/2 cups cooked |
| 1 cup | 2 cups | 3 cups cooked |
| 2 cups | 4 cups | 6 cups cooked |
| 3 cups | 6 cups | 9 cups cooked |
Step 3: Cook Quinoa Perfectly
Stovetop Method
The stovetop method is one of the easiest and most reliable ways to cook quinoa.
Once your quinoa is rinsed and your liquid is measured, you’re ready to start cooking.
A steady simmer and a little patience are all you need to achieve fluffy, tender grains.
Bring to a Boil
Add the rinsed quinoa and your measured water or broth to a medium saucepan.
If you’d like a little extra flavor, this is a good time to add a pinch of salt.
Place the saucepan over medium-high heat.
Leave the pot uncovered and allow the liquid to heat up gradually.
After a few minutes, you’ll see small bubbles begin to form.
Continue heating until the liquid reaches a gentle boil.
A boil means the liquid is actively bubbling across the surface.
Once you reach this stage, it’s time to lower the heat.
There’s no need to keep the quinoa boiling aggressively.
Doing so can cause the liquid to evaporate too quickly and affect the final texture.
Simmer Gently
Reduce the heat to low as soon as the liquid comes to a boil.
Cover the saucepan with a tight-fitting lid.
This traps the steam inside the pot and helps the quinoa cook evenly.
Try not to lift the lid while the quinoa is cooking.
Every time the lid is removed, heat and steam escape.
That steam is important because it helps soften the grains and cook them through.
A gentle simmer is all you need.
The quinoa should cook quietly without vigorous bubbling.
Keeping the heat low helps prevent scorching on the bottom of the pan.
It also allows the grains to absorb the liquid at a steady pace.
Allow the Quinoa to Absorb Liquid
Let the quinoa cook undisturbed for about 15 minutes.
Different brands and varieties may vary slightly, so a few extra minutes is normal.
As the quinoa cooks, it will gradually absorb the liquid.
Near the end of the cooking time, most of the liquid should no longer be visible on the surface.
If you notice a small amount remaining, don’t worry.
The resting step that comes later will help finish the process.
Avoid stirring the quinoa while it cooks.
Stirring can break up the grains and create a softer, less fluffy texture.
Allowing the quinoa to cook undisturbed produces the best results.
How to Tell When Quinoa Is Done
One of the easiest ways to tell when quinoa is fully cooked is by looking for the germ ring.
The germ is the tiny inner part of the seed.
As the quinoa cooks, it separates slightly and forms a small white ring around each grain.
This ring becomes clearly visible when the quinoa is ready.
The grains should also look larger than they did before cooking.
Texture is another reliable indicator.
Properly cooked quinoa should feel tender when you bite into it.
It should not be hard or crunchy in the center.
At the same time, it shouldn’t be mushy or overly soft.
The grains should hold their shape while still being light and delicate.
If the quinoa is still firm, cover the pot and cook for another minute or two.
If it’s tender and the liquid has been absorbed, you’ve successfully completed the most important part of the process.
The next step is simple, but it plays a big role in creating that fluffy texture everyone wants.
Quick Checklist: Is Your Quinoa Done?
Before turning off the heat, use this simple checklist to confirm your quinoa is perfectly cooked:
✓ Germ ring visible around the grains
✓ Most or all of the liquid absorbed
✓ Grains appear larger than when they started
✓ Tender when tasted with no hard center
✓ No standing water remaining in the pot
If you can check off all five signs, your quinoa is ready to rest and fluff before serving.
Step 4: Let It Rest
Why Resting Improves Texture
Once the quinoa has finished cooking, it can be tempting to remove the lid and serve it right away.
A short resting period, however, makes a noticeable difference in the final texture.
After the heat is turned off, the quinoa continues to cook gently from the trapped steam inside the pot.
This extra steaming time helps any remaining moisture distribute evenly throughout the grains.
As a result, the quinoa finishes cooking without becoming overdone.
Resting also helps prevent sogginess.
If there is a small amount of moisture left at the bottom of the pot, the resting period gives the quinoa time to absorb it.
This creates a lighter texture and helps keep the grains separate.
Skipping this step can leave the quinoa slightly wet or unevenly cooked.
Think of resting as the final stage of the cooking process rather than an optional extra step.
It’s a simple habit that helps turn good quinoa into great quinoa.
Recommended Resting Time
As soon as the quinoa is done cooking, remove the saucepan from the heat.
Keep the lid firmly in place.
Leave the quinoa covered for about 5 to 10 minutes.
During this time, avoid lifting the lid.
Keeping the pot closed allows the steam to do its job.
Even a quick peek releases heat and moisture that the quinoa needs for the best texture.
If you’re busy preparing the rest of your meal, this is the perfect time to do it.
The quinoa can rest quietly while you finish other tasks in the kitchen.
After 5 to 10 minutes, remove the lid.
You’ll notice the grains look fluffier and more distinct than they did immediately after cooking.
The quinoa is now ready for the final step before serving.
A quick fluff with a fork is all that’s left between you and a bowl of perfectly cooked quinoa.
Step 5: Fluff Before Serving
The final step is simple, but it has a big impact on the texture of your quinoa.
Once the quinoa has finished resting, remove the lid and take a look at the grains.
You’ll notice that they have absorbed the remaining moisture and appear light and tender.
Instead of stirring with a spoon, use a fork to gently fluff the quinoa.
A fork works best because its tines can lift and separate the grains without crushing them.
A spoon tends to press the quinoa together, which can make it feel heavier and less fluffy.
Starting at the edges of the pot, gently lift and turn the quinoa toward the center.
Continue working your way around the pot until all of the grains have been loosened.
There’s no need to rush this step.
A few gentle passes with the fork are usually all it takes.
As you fluff, the grains separate from one another, and any remaining steam can escape.
This helps create the light, airy texture that makes perfectly cooked quinoa so enjoyable to eat.
If you’re adding herbs, lemon juice, butter, olive oil, or seasonings, now is a great time to mix them in.
The warm grains will absorb those flavors beautifully.
Once the quinoa is fluffed, it’s ready to serve as a side dish, add to salads, spoon into grain bowls, or use in your favorite recipes.
With the rinsing, proper ratio, gentle cooking, resting period, and final fluffing complete, you now have all the steps needed to make fluffy, flavorful quinoa every time.
Common Quinoa Cooking Mistakes to Avoid
Even a few small mistakes can affect the texture and flavor of your quinoa.
Here are the most common ones to watch out for:
- Skipping the Rinse: Failing to rinse quinoa can leave behind its natural coating, called saponin, which may cause a bitter or soapy taste.
- Using Too Much Water: Excess liquid can make quinoa mushy and prevent the grains from staying light and fluffy.
- Removing the Lid Too Often: Lifting the lid releases steam that the quinoa needs to cook evenly and absorb moisture properly.
- Overcooking the Quinoa: Cooking quinoa for too long can make it soft, soggy, and less pleasant to eat.
- Forgetting the Resting Step: Skipping the resting period can leave the quinoa wetter than it should be and prevent the grains from fully fluffing up.
Quinoa Troubleshooting Guide
If your quinoa doesn’t turn out exactly as expected, don’t worry.
Most quinoa cooking problems are easy to fix once you know what caused them.
| Problem | Likely Cause | Solution |
|---|---|---|
| Mushy quinoa | Too much water | Reduce the amount of liquid slightly next time. |
| Bitter taste | Quinoa wasn’t rinsed | Rinse thoroughly under cool running water before cooking. |
| Crunchy center | Quinoa is undercooked | Add a splash of water and cook for a few more minutes. |
| Watery quinoa | Excess liquid remains in the pot | Let the quinoa rest covered for a few extra minutes. |
| Burned bottom | Heat was too high | Simmer gently over low heat and use a tight-fitting lid. |
Alternative Ways to Cook Quinoa
While the stovetop method is the most common approach, it’s not the only way to make perfectly cooked quinoa.
If you prefer a hands-off cooking method or need something quick and convenient, several other options work well.
Instant Pot Method
The Instant Pot is a great choice when you want reliable results with very little attention.
Start by rinsing the quinoa thoroughly under cool water.
Add the rinsed quinoa and liquid to the Instant Pot.
A ratio of 1 cup quinoa to 1¼ cups water or broth works well in most models.
Secure the lid and set the valve to the sealing position.
Cook on High Pressure for 1 minute.
Once the cooking time is complete, allow the pressure to release naturally for about 10 minutes.
After 10 minutes, carefully release any remaining pressure.
Open the lid and fluff the quinoa gently with a fork.
The result is tender, fluffy quinoa with very little effort.
This method is especially helpful when you’re already using the Instant Pot for other parts of your meal.
Rice Cooker Method
A rice cooker offers one of the easiest ways to prepare quinoa.
Simply rinse the quinoa and add it to the rice cooker bowl.
Pour in the appropriate amount of water or broth.
Most rice cookers work well with the standard 1-to-2 ratio of quinoa to liquid.
Close the lid and start the regular rice cooking cycle.
From there, the rice cooker does all the work.
There’s no need to monitor the pot or adjust the heat.
Once the cycle finishes, let the quinoa sit with the lid closed for about 5 minutes.
This brief resting period helps finish the steaming process.
Fluff the quinoa with a fork before serving.
If you enjoy batch cooking or meal prepping, this set-and-forget method is hard to beat.
Microwave Method
The microwave can be a surprisingly useful option when time is limited.
Begin by rinsing the quinoa well.
Combine 1 cup of quinoa and 2 cups of water or broth in a large microwave-safe bowl.
Make sure the bowl is large enough because the liquid will bubble as it cooks.
Cover the bowl loosely with a microwave-safe lid or plate.
Microwave on high for about 5 minutes.
Carefully stir the quinoa.
Continue microwaving for another 8 to 10 minutes, or until most of the liquid has been absorbed.
The exact time may vary depending on your microwave.
Once cooked, leave the bowl covered for about 5 minutes.
This allows the remaining steam to finish the cooking process.
Remove the cover carefully and fluff the quinoa with a fork.
While the microwave method may not be the first choice for large batches, it’s a convenient solution for busy days when you need quinoa on the table quickly.
Tips for Adding More Flavor
Perfectly cooked quinoa has a mild, pleasant flavor that makes it a great base for countless dishes.
The best part is that a few simple additions can transform it from a basic side dish into something truly memorable.
Cook with Broth
One of the easiest ways to add flavor is to replace water with broth.
As the quinoa cooks, it absorbs the liquid around it.
Using vegetable broth or chicken broth allows every grain to soak up extra savory flavor.
This small change can make a noticeable difference without adding any extra work.
If you’re serving quinoa as a side dish, broth is often the quickest way to give it more depth and richness.
Add Herbs and Spices
Seasoning the cooking liquid is another simple way to build flavor from the beginning.
A pinch of salt can help bring out the natural taste of the quinoa.
Dried herbs such as parsley, oregano, thyme, or basil add subtle layers of flavor as the quinoa cooks.
Spices like paprika, cumin, turmeric, or chili powder can completely change the character of the dish.
The beauty of quinoa is that it pairs well with a wide variety of seasonings.
You can easily match the flavors to the rest of your meal.
Stir in Aromatics
Aromatics are ingredients that add fragrance and depth to a dish.
They create a flavorful foundation and make quinoa taste more interesting.
Garlic
Fresh garlic adds a warm, savory flavor that works with almost any quinoa recipe.
For the best results, sauté minced garlic in a little olive oil before adding the quinoa and cooking liquid.
Even one or two cloves can make a simple pot of quinoa taste much more flavorful.
Onion
Onion brings a gentle sweetness and savory depth to quinoa.
Finely diced onion can be cooked until softened before adding the quinoa.
As it cooks, the onion blends into the dish and adds flavor to every bite.
Shallots
Shallots have a milder and slightly sweeter flavor than onions.
They add a delicate richness without overpowering the quinoa.
If you want a more refined flavor profile, shallots are an excellent choice.
Finish with Fresh Ingredients
Adding fresh ingredients after cooking is one of the easiest ways to brighten the flavor of quinoa.
These finishing touches add contrast, freshness, and texture.
Lemon Juice
A squeeze of fresh lemon juice can instantly wake up the flavors in a bowl of quinoa.
The light acidity balances the savory notes and makes the dish taste fresher.
A little goes a long way, so start with a small amount and adjust to taste.
Fresh Herbs
Fresh herbs add color, aroma, and freshness.
Parsley, cilantro, dill, basil, and chives all pair beautifully with quinoa.
Sprinkling herbs over warm quinoa just before serving helps preserve their bright flavor.
Toasted Nuts
Toasted nuts add both flavor and texture.
Almonds, walnuts, pecans, and pine nuts are all great options.
The crunchy texture contrasts nicely with the soft quinoa and makes each bite more satisfying.
Combining even two or three of these flavor-boosting ideas can turn a simple bowl of quinoa into a dish that feels special enough to serve with any meal.
Pro Tip: My Favorite Quinoa Flavor Boost
For everyday meals, I almost always cook quinoa in vegetable broth instead of water.
Once it’s finished cooking, I add a squeeze of fresh lemon juice, a handful of chopped parsley, and a light drizzle of olive oil.
The lemon brightens the flavor, the parsley adds freshness, and the olive oil gives the quinoa a richer finish.
It’s a simple combination that takes only a minute to add, yet it makes quinoa taste much more flavorful.
I use this method regularly because it pairs well with everything from roasted vegetables and salads to grilled chicken and fish.
How to Store and Reheat Quinoa
One of the best things about quinoa is that it stores well and reheats beautifully.
Making a larger batch can save time throughout the week and give you a ready-to-use ingredient for quick meals.
Refrigerating Cooked Quinoa
Before storing quinoa, allow it to cool to room temperature.
Storing hot quinoa can create excess moisture inside the container, which may affect its texture.
Transfer the cooled quinoa to an airtight storage container.
A container with a secure lid helps keep the quinoa fresh and prevents it from absorbing odors from other foods in the refrigerator.
Glass and BPA-free plastic containers both work well.
Once stored properly, cooked quinoa will typically stay fresh in the refrigerator for up to 5 days.
If you plan to use it in salads, grain bowls, or meal prep recipes, keeping a container of cooked quinoa in the fridge can be a real time-saver.
For the best flavor and texture, use refrigerated quinoa within a few days whenever possible.
Freezing Quinoa
If you have more quinoa than you can use within a few days, freezing is a great option.
Allow the quinoa to cool completely before freezing.
Portioning the quinoa into individual servings makes it easier to thaw only what you need later.
Place the portions in freezer-safe containers or resealable freezer bags.
If using bags, gently press out as much air as possible before sealing.
Removing excess air helps reduce freezer burn and keeps the quinoa tasting fresher.
Label the containers with the date so you can keep track of how long they’ve been stored.
Cooked quinoa can be frozen for up to 3 months.
When you’re ready to use it, thaw it overnight in the refrigerator or reheat it directly from frozen.
Reheating Methods
Quinoa reheats quickly and can be brought back to a soft, fluffy texture with just a little moisture.
Microwave
Place the quinoa in a microwave-safe bowl.
Add a small splash of water or broth.
This extra moisture helps prevent the quinoa from drying out as it reheats.
Cover the bowl loosely with a microwave-safe lid or plate.
Heat in 30-second intervals, stirring between each interval until warmed through.
Once heated, fluff the quinoa with a fork before serving.
Stovetop
For larger portions, the stovetop is an excellent reheating option.
Add the quinoa to a saucepan with a small splash of water or broth.
Place the pan over low heat.
Stir occasionally as the quinoa warms.
The added liquid creates gentle steam that helps restore moisture and keeps the grains tender.
Once heated through, remove the pan from the heat and fluff the quinoa with a fork.
Easy Ways to Use Cooked Quinoa
Cooked quinoa is incredibly versatile and can be used in a variety of meals throughout the day.
- Breakfast Bowls: Top warm quinoa with fruit, nuts, and a drizzle of honey for a simple and satisfying breakfast.
- Salads: Add quinoa to fresh salads for extra texture and a more filling meal.
- Grain Bowls: Use quinoa as the base for bowls loaded with vegetables, proteins, and your favorite sauces.
- Soups and Stews: Stir cooked quinoa into soups and stews to add heartiness and absorb delicious flavors.
- Stuffed Vegetables: Mix quinoa with seasonings and fillings, then use it to stuff peppers, zucchini, or tomatoes.
- Side Dishes: Serve quinoa alongside grilled meats, roasted vegetables, or seafood as an easy alternative to rice or pasta.
Best Recipes That Use Quinoa
Once you’ve mastered cooking quinoa, there are plenty of delicious ways to put it to use.
These recipes are great options for meal prep, quick lunches, easy dinners, and satisfying side dishes.
Mediterranean Quinoa Salad
A fresh and colorful salad made with quinoa, cucumbers, tomatoes, red onion, olives, and a simple lemon dressing.
Southwest Quinoa Bowl
A hearty bowl featuring quinoa, black beans, corn, avocado, fresh vegetables, and your favorite southwest-inspired toppings.
Lemon Herb Quinoa
A simple side dish flavored with fresh lemon juice, parsley, and olive oil that pairs well with almost any meal.
Quinoa Stuffed Peppers
Bell peppers filled with seasoned quinoa, vegetables, and cheese, then baked until tender and flavorful.
Vegetable Quinoa Soup
A comforting soup loaded with vegetables and quinoa for a satisfying meal that’s perfect for cooler days.
Breakfast Quinoa Bowl
Warm quinoa topped with fruit, nuts, seeds, and a drizzle of honey for an easy breakfast option.
Key Takeaways
- Always rinse quinoa before cooking.
- Use a 1:2 quinoa-to-liquid ratio.
- Simmer gently instead of boiling aggressively.
- Rest for 5–10 minutes after cooking.
- Fluff with a fork before serving.
Final Thoughts
Perfect quinoa comes down to a few simple steps that make a big difference.
Rinse the quinoa well, use the correct liquid ratio, cook it gently, let it rest, and fluff it with a fork before serving.
Once you’ve mastered the basics, don’t be afraid to experiment with different broths, herbs, spices, and toppings to make it your own.
With these easy techniques, you’ll be able to cook light, fluffy, flavorful quinoa with confidence every time.
FAQs
Do I need to rinse quinoa every time?
Yes. Rinsing helps remove the natural coating on quinoa that can cause a bitter or soapy taste.
Why does my quinoa taste bitter?
Bitterness is usually caused by skipping the rinsing step and leaving the natural saponin coating on the quinoa.
Can I cook quinoa in broth instead of water?
Absolutely. Broth adds extra flavor and is a simple way to make quinoa more delicious.
How long does cooked quinoa last in the fridge?
Stored in an airtight container, cooked quinoa will stay fresh in the refrigerator for up to 5 days.
Can quinoa be frozen?
Yes. Cooked quinoa freezes well for up to 3 months when stored in freezer-safe containers or bags.
Is quinoa healthier than rice?
Quinoa generally contains more protein and fiber than white rice, but both can be part of a balanced diet depending on your needs and preferences.
Hi, I’m Daisy Roots, the home cook and recipe developer behind this kitchen. I create simple, tested vegan recipes using everyday ingredients. Every dish is developed and cooked in my own kitchen, with clear steps to help you get reliable results every time. Thanks for stopping by — let’s cook something great!