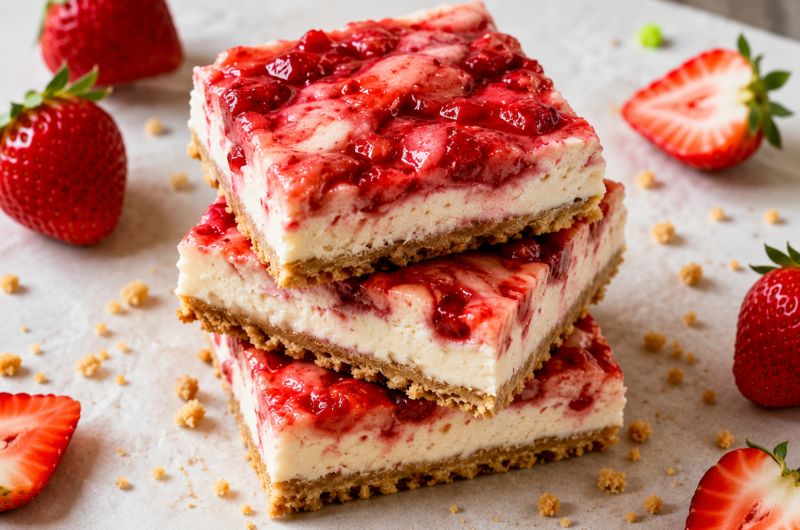
If you love creamy cheesecake and fresh strawberries, these vegan strawberry cheesecake bars are about to become a favorite.
They’re rich, smooth, and packed with sweet strawberry flavor, all without dairy or eggs.
This recipe is simple to follow and perfect for everything from family gatherings to meal prep.
I’ll walk you through each step, share helpful tips along the way, and show you how to make cheesecake bars that look impressive and taste even better.
Recipe at a Glance
| Detail | Information |
|---|---|
| Prep Time | 25 minutes |
| Chill Time | 6 hours (or overnight) |
| Total Time | 6 hours 25 minutes |
| Servings | 12 bars |
| Difficulty Level | Easy |
| Dietary Information | Vegan, Dairy-Free, Egg-Free |
| Equipment Needed | Food processor or high-speed blender, mixing bowls, 8×8-inch baking pan, parchment paper, spatula |
This recipe combines a buttery crust, creamy dairy-free cheesecake filling, and fresh strawberry flavor in every bite.
It’s simple enough for beginners, easy to make ahead, and perfect for everything from casual family desserts to special occasions.
What Are Vegan Strawberry Cheesecake Bars?
Vegan strawberry cheesecake bars are a creamy, sliceable dessert made with a buttery crust, a smooth cheesecake-style filling, and a layer or swirl of fresh strawberry flavor, all cut into easy-to-serve squares.
They deliver the same rich, satisfying experience you expect from classic cheesecake, but without using dairy products or eggs.
Instead of traditional cream cheese, heavy cream, or eggs, vegan versions often rely on ingredients such as plant-based cream cheese, soaked cashews, coconut cream, or a combination of these to create a filling that is silky, thick, and full of flavor.
The result is a dessert that still has that signature cheesecake texture—smooth, creamy, and slightly tangy—while allowing the bright sweetness of strawberries to shine through.
One of the biggest differences between traditional cheesecake bars and vegan cheesecake bars is the way the filling is made, but you may be surprised by how similar the final texture and taste can be.
A well-made vegan filling is rich enough to satisfy cheesecake lovers while feeling light and fresh when paired with juicy strawberries.
Another advantage is that many vegan cheesecake bars are simple to prepare and often require less hands-on work than a traditional baked cheesecake.
You also don’t have to worry as much about common cheesecake challenges like overbaking, cracking, or achieving the perfect water bath.
Plant-based ingredients bring their own benefits to the recipe beyond simply replacing dairy and eggs.
Cashews and coconut cream create a naturally creamy texture, while strawberries add fresh fruit flavor and a beautiful color that makes the bars look as good as they taste.
These ingredients work together to create a dessert that feels indulgent, balanced, and perfect for sharing.
| Traditional Cheesecake | Vegan Cheesecake Bars |
|---|---|
| Cream cheese | Cashews or vegan cream cheese |
| Eggs | No eggs |
| Heavy cream | Coconut cream |
| Springform pan | Square baking pan |
Why You’ll Love This Recipe
Creamy and Indulgent
These vegan strawberry cheesecake bars have all the rich, creamy qualities that make cheesecake such a popular dessert.
The filling is smooth, luscious, and satisfying, creating a texture that feels special with every bite.
Whether you use cashews, vegan cream cheese, or a combination of both, the filling blends into a silky mixture that sets beautifully once chilled.
Cashews add richness and body, while vegan cream cheese brings the familiar tangy flavor many people love in traditional cheesecake.
The best part is that you can achieve that classic cheesecake experience without using any dairy at all.
Each layer works together to create a dessert that feels indulgent without being complicated to make.
Naturally Fruity
Fresh strawberries give these cheesecake bars their bright, sweet flavor and make every bite taste fresh and vibrant.
Instead of overwhelming the dessert, the strawberries balance the richness of the filling and add a natural burst of flavor throughout.
Their sweetness pairs perfectly with the creamy cheesecake layer, creating a combination that feels light, refreshing, and satisfying at the same time.
The strawberries also give the bars a beautiful pink color that makes them stand out on any dessert table.
Easy to Make Ahead
One of the most convenient things about this recipe is that it can be prepared in advance.
In fact, the bars often taste even better after they have had plenty of time to chill and fully set in the refrigerator.
That means you can make them the day before a gathering and have one less thing to worry about when guests arrive.
Once chilled, the bars slice neatly and hold their shape well, making serving simple and stress-free.
They also store beautifully in the refrigerator, so you can enjoy leftovers over the next few days without sacrificing texture or flavor.
Having a ready-to-serve dessert waiting in the fridge is always a welcome bonus.
Perfect for Any Occasion
These bars fit comfortably into almost any celebration or casual get-together.
Their fresh strawberry flavor makes them especially popular during spring and summer when fruit-based desserts are often in high demand.
They’re easy to transport, easy to serve, and easy for guests to enjoy without needing plates piled high with dessert.
For birthday parties, they offer a fun alternative to traditional cake while still feeling festive and special.
They also look right at home on holiday dessert tables alongside cookies, pies, and other seasonal treats.
Why This Recipe Works
Cashews Create a Creamy Cheesecake Texture
Soaked cashews are one of the secrets behind a great vegan cheesecake filling.
When blended, they become incredibly smooth and create a rich texture that closely resembles traditional cheesecake.
Their mild flavor allows the strawberries, vanilla, and lemon to shine while providing the body needed for a thick and satisfying filling.
The result is a creamy dessert that feels indulgent without relying on dairy products.
Coconut Cream Helps the Filling Set
Full-fat coconut cream adds richness while helping the filling become firm once chilled.
Its natural fat content works with the blended cashews to create a stable texture that holds its shape when sliced.
Without enough fat, the filling can become too soft or lose its classic cheesecake consistency.
Using full-fat coconut cream helps ensure each bar is smooth, creamy, and sturdy enough to serve neatly.
Lemon Juice Adds Classic Cheesecake Tang
A small amount of lemon juice makes a big difference in the final flavor.
Traditional cheesecake has a slight tang that balances its richness, and lemon juice helps recreate that signature taste.
It brightens the filling, enhances the sweetness of the strawberries, and prevents the dessert from tasting overly heavy.
Even though it is a simple ingredient, it plays an important role in creating an authentic cheesecake flavor.
Chilling Time Creates Clean, Beautiful Slices
Patience is one of the most important ingredients in this recipe.
As the cheesecake bars chill, the filling gradually firms up and develops its ideal texture.
This resting period allows the layers to settle and makes slicing much easier.
Bars that have chilled overnight typically hold their shape better, produce cleaner cuts, and deliver the smooth, creamy texture that makes cheesecake so enjoyable.
Giving the dessert enough time to set is one of the easiest ways to ensure professional-looking results at home.
Ingredients You’ll Need
Before you begin, gather all of your ingredients and measure them out.
Having everything ready makes the process smoother and helps the recipe come together with ease.
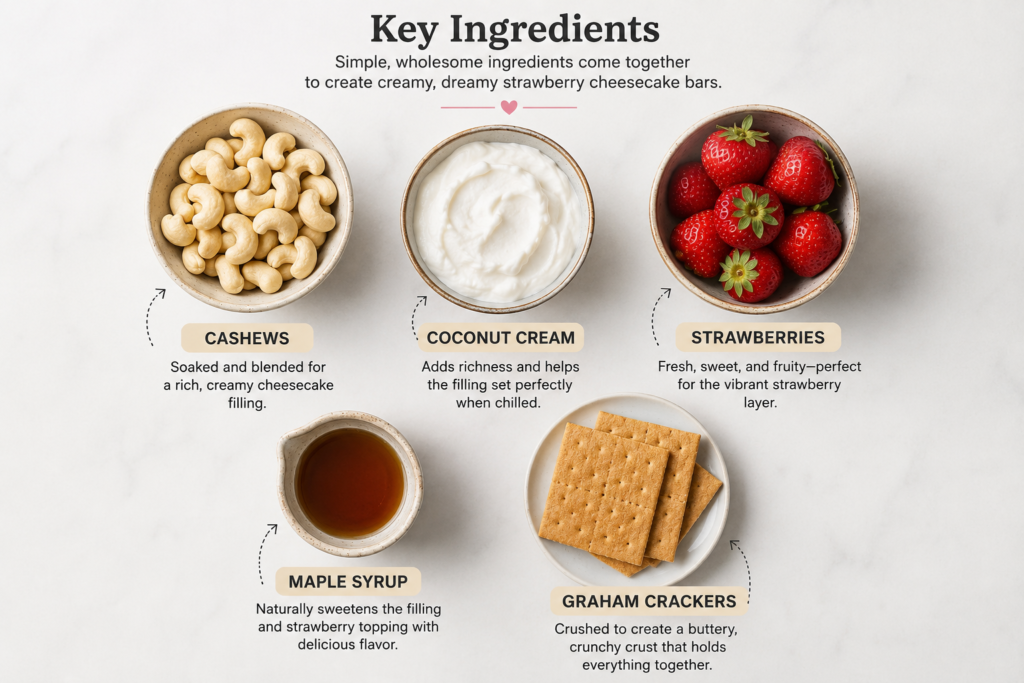
For the Crust
- 1½ cups (150g) crushed graham crackers or vegan cookies
- 6 tablespoons (85g) melted coconut oil or vegan butter
- 1 tablespoon maple syrup or granulated sugar (optional, for extra sweetness)
For the Cheesecake Filling
- 1½ cups (225g) raw cashews, soaked for at least 4 hours and drained
or 12 ounces (340g) vegan cream cheese, softened - 1 cup (240ml) full-fat coconut cream
- ½ cup (120ml) pure maple syrup
- 2 tablespoons fresh lemon juice
- 1 teaspoon pure vanilla extract
For the Strawberry Layer
- 2 cups (300g) fresh strawberries, hulled and chopped
- 2 tablespoons maple syrup, agave syrup, or granulated sugar
- 1 tablespoon cornstarch (optional, for a thicker strawberry layer)
- 1 tablespoon water (if using cornstarch)
Optional Garnishes
- Fresh sliced strawberries
- Coconut whipped cream
- Crushed vegan cookies or graham crackers
- Lemon zest for a bright finishing touch
Ingredient Substitutions
Don’t have a particular ingredient on hand? The substitutions below can help you adapt the recipe while still achieving delicious results.
| Ingredient | Substitute | Notes |
|---|---|---|
| Raw Cashews | Vegan cream cheese | The easiest swap for a smooth, creamy filling with a classic cheesecake flavor. |
| Coconut Cream | Dairy-free heavy cream | Creates a slightly softer texture but still provides richness and creaminess. |
| Maple Syrup | Agave syrup | Offers a similar level of sweetness and blends easily into the filling. |
| Fresh Strawberries | Mixed berries | Raspberries, blueberries, or blackberries work well and create a different berry flavor profile. |
| Graham Crackers | Gluten-free cookies | A simple option for making the crust gluten-free without sacrificing texture. |
While these substitutions work well, the original ingredients provide the best balance of flavor and texture.
If you decide to make a swap, keep in mind that the final taste and consistency may vary slightly.
Best Strawberries to Use
The quality of your strawberries can have a big impact on the flavor of the finished cheesecake bars, so it’s worth choosing them carefully.
Fresh vs Frozen Strawberries
Fresh strawberries are the best option when they’re in season and at their peak ripeness.
They provide the brightest flavor, the most vibrant color, and the freshest taste in the finished dessert.
Fresh berries also contain less excess moisture, making it easier to create a thick strawberry layer.
Frozen strawberries are a great alternative when fresh strawberries aren’t available or aren’t tasting their best.
They work especially well in the cooked strawberry topping because the berries will be softened and blended anyway.
If using frozen strawberries, thaw them first and drain any excess liquid before cooking to prevent the topping from becoming too thin.
How to Choose Ripe Strawberries
Look for strawberries that are bright red from top to bottom with no large white or green areas.
Ripe strawberries should have a sweet, fruity aroma that you can smell as soon as you open the container.
Avoid berries that appear dull, mushy, or have signs of mold.
Smaller strawberries are often packed with flavor, while larger berries can sometimes be less sweet.
If possible, give the strawberries a quick taste before making the recipe.
Naturally sweet berries will produce the best flavor and may even reduce the need for extra sweetener.
When Frozen Strawberries Work Best
Frozen strawberries are especially useful during the off-season when fresh berries can be expensive or lacking flavor.
They’re also a convenient option if you like keeping ingredients on hand for last-minute desserts.
Because frozen strawberries are picked and frozen at peak ripeness, they often deliver consistent flavor throughout the year.
They are ideal for the strawberry swirl, sauce, or layered topping where texture is less important than flavor.
For garnishing and decorating the finished cheesecake bars, fresh strawberries remain the better choice because of their appearance and firmer texture.
Equipment Needed
- Food Processor or High-Speed Blender
This is the most important tool for the recipe. It helps create a smooth, creamy cheesecake filling by blending the cashews, coconut cream, and other ingredients into a silky mixture. If you’re using vegan cream cheese instead of cashews, a blender still helps ensure everything combines evenly. - Mixing Bowls
You’ll need a few mixing bowls for preparing the crust, cheesecake filling, and strawberry layer. Having separate bowls keeps the process organized and makes assembly easier. - 8×8-Inch Baking Pan
An 8×8-inch square pan is ideal for creating thick, neatly sliced cheesecake bars. It provides the perfect balance between crust and filling while ensuring the bars set properly. - Parchment Paper
Lining the pan with parchment paper makes removing the cheesecake bars simple once they have chilled. Leave a little extra paper hanging over the sides to create handles that allow you to lift the entire dessert out of the pan with ease. - Spatula
A silicone spatula is perfect for scraping every bit of filling from the blender and spreading the layers evenly in the pan. It also helps create smooth surfaces and clean edges for a polished final result.
Reader Success Tips
For the creamiest texture, soak your cashews overnight whenever possible.
Use full-fat coconut cream rather than light coconut products to help the filling set properly.
Let the cheesecake bars chill overnight before slicing for the cleanest cuts and best texture.
If your strawberry mixture seems thin, simmer it for a few extra minutes before assembling the bars.
Wipe your knife clean between slices to create neat, bakery-style squares.
How to Make Vegan Strawberry Cheesecake Bars
Step 1: Prepare the Crust
Add the crushed graham crackers or vegan cookies, melted coconut oil or vegan butter, and optional sweetener to a food processor or mixing bowl.
Blend or mix until the crumbs are evenly coated and resemble wet sand when pressed between your fingers.
Transfer the mixture to your parchment-lined 8×8-inch baking pan.
Use the bottom of a measuring cup or glass to firmly press the crumbs into an even layer across the bottom of the pan.
Take a moment to smooth out any uneven spots, as a level crust creates cleaner, more professional-looking bars.
Place the pan in the refrigerator while you prepare the filling.
Chilling the crust helps it firm up and makes it easier to layer the cheesecake mixture on top later.
Step 2: Make the Cheesecake Filling
Add the soaked and drained cashews, coconut cream, maple syrup, lemon juice, and vanilla extract to a high-speed blender.
If you’re using vegan cream cheese instead of cashews, add it along with the remaining filling ingredients.
Blend until the mixture becomes completely smooth and creamy.
Stop occasionally to scrape down the sides of the blender if needed.
A silky filling is one of the keys to great cheesecake bars, so don’t rush this step.
If the mixture looks grainy, continue blending for another minute or two.
The finished filling should be thick, glossy, and smooth with no visible bits remaining.
Give it a quick taste and adjust the sweetness if desired before moving on.
Step 3: Prepare the Strawberry Mixture
Add the chopped strawberries and sweetener to a small saucepan over medium heat.
Cook for about 5 to 7 minutes, stirring occasionally, until the berries soften and release their juices.
For a thicker strawberry layer, stir together the cornstarch and water, then add it to the strawberries and cook for another minute until slightly thickened.
Remove the mixture from the heat and allow it to cool for a few minutes.
If you prefer a smoother texture, blend the strawberry mixture until silky.
For a more rustic look and texture, leave a few small strawberry pieces intact.
Step 4: Assemble the Bars
Remove the chilled crust from the refrigerator.
Pour the cheesecake filling over the crust and spread it into an even layer using a spatula.
Spoon the strawberry mixture across the top of the filling.
For distinct layers, gently spread the strawberry mixture across the surface.
For a marbled effect, drag a knife or skewer through the strawberry mixture using gentle swirling motions.
There is no right or wrong pattern here, so have fun creating a design you like.
A few simple swirls can make the finished bars look especially beautiful once sliced.
Step 5: Chill and Set
Place the assembled cheesecake bars in the refrigerator.
Allow them to chill for at least 6 hours, although overnight is even better.
This resting time gives the filling a chance to fully firm up and develop its best texture.
Avoid cutting into the bars too early, even if they look set on top.
The bars are ready when the center feels firm and no longer jiggles when the pan is gently moved.
A properly chilled cheesecake bar should hold its shape cleanly when sliced.
Step 6: Slice and Serve
Once fully chilled, use the parchment paper handles to carefully lift the cheesecake slab out of the pan.
Place it on a cutting board for easier slicing.
For the cleanest cuts, use a sharp knife and wipe the blade clean between each slice.
You can also run the knife under warm water and dry it before cutting to create smooth edges.
Cut into squares or rectangles, depending on your preferred serving size.
Finish the bars with fresh strawberry slices, a dollop of coconut whipped cream, a sprinkle of crushed cookies, or a little lemon zest for extra color and flavor.
Serve immediately or return any leftovers to the refrigerator until you’re ready to enjoy them.
Expert Tips for Success
Soak Cashews Properly
If you’re using cashews for the filling, giving them enough soaking time is one of the most important steps in the recipe.
Soak the cashews in water for at least 4 hours, or overnight if possible, to help them soften completely.
Soft cashews blend much more easily and create the smooth, creamy texture that makes these cheesecake bars so satisfying.
If you’re short on time, you can cover the cashews with boiling water and let them soak for about 30 minutes.
Be sure to drain and rinse them before blending to keep the filling fresh and clean-tasting.
A few extra minutes spent preparing the cashews can make a noticeable difference in the final texture.
Use Full-Fat Coconut Cream
For the richest and creamiest filling, always choose full-fat coconut cream rather than lighter coconut products.
The higher fat content helps the cheesecake set properly while creating a smooth, luxurious texture.
Using lighter alternatives can result in a filling that feels thinner and less rich.
If your coconut cream has separated in the can, give it a good stir before measuring.
A creamy, well-mixed coconut base helps every ingredient blend together evenly.
This simple choice goes a long way toward creating bars that taste like a true cheesecake.
Line the Pan with Parchment Paper
Taking a minute to line the pan with parchment paper will save you time and frustration later.
Allow the paper to hang slightly over two sides of the pan to create easy lifting handles.
Once the cheesecake has chilled, you can lift the entire dessert out in one piece instead of trying to remove individual bars from the pan.
This makes slicing cleaner and helps keep the edges looking neat.
It also reduces the risk of the crust sticking to the bottom of the pan.
A little preparation at the beginning makes serving much easier at the end.
Chill Overnight for Best Texture
While the bars can be ready after several hours in the refrigerator, an overnight chill often produces the best results.
The extra time allows the filling to firm up completely and develop a smoother texture.
The flavors also have more time to come together, creating a more balanced and delicious dessert.
If you’re making these for a gathering, preparing them the day before is a great option.
You’ll have a fully set dessert waiting for you when it’s time to serve.
Patience pays off here, and the finished bars are well worth the wait.
Use Ripe Strawberries for Maximum Flavor
The strawberries play a major role in this recipe, so choosing ripe, flavorful berries makes a big difference.
Look for strawberries that are bright red, fragrant, and naturally sweet.
Ripe berries provide a stronger strawberry flavor and a more vibrant color in the finished bars.
If your strawberries taste slightly tart, you can add a little extra sweetener to balance them out.
Giving the berries a quick taste before cooking is an easy way to adjust the flavor as needed.
When the strawberries are at their best, the entire dessert tastes fresher, sweeter, and more memorable.
Troubleshooting Common Issues
Even simple recipes can occasionally need a small adjustment.
If something doesn’t turn out exactly as expected, these quick fixes can help you get your cheesecake bars back on track.
| Problem | Possible Cause | Solution |
|---|---|---|
| Filling is grainy | Cashews were not blended long enough or were not fully softened before blending. | Continue blending until completely smooth and make sure the cashews are properly soaked before use. |
| Filling won’t set | The bars haven’t chilled long enough for the filling to firm up. | Refrigerate for at least 6 hours, preferably overnight, before slicing. |
| Crust falls apart | There isn’t enough melted coconut oil or vegan butter holding the crumbs together. | Mix in a little more melted coconut oil or vegan butter until the crust resembles wet sand. |
| Strawberry layer is runny | The strawberries released too much liquid during cooking. | Simmer the mixture for a few extra minutes or add a small amount of cornstarch to thicken it. |
Most cheesecake bar issues are easy to fix with a little patience and a few simple adjustments.
Taking the time to properly soak the cashews, use full-fat coconut cream, and chill the bars thoroughly will help ensure the best possible results every time.
Recipe Variations
No-Bake Version
One of the easiest ways to customize this recipe is to turn it into a completely no-bake dessert.
Simply prepare the crust, filling, and strawberry layer as directed, then let the refrigerator do all the work.
The chilled filling becomes firm and creamy without needing any oven time.
This option is especially useful during warmer months when you want to keep the kitchen cool.
It’s also a great choice for beginner bakers since there is no need to monitor baking times or worry about overcooking.
Just assemble the layers, refrigerate until set, and enjoy a refreshing dessert with minimal effort.
Gluten-Free Option
Making these cheesecake bars gluten-free is simple and doesn’t require major changes to the recipe.
Replace the graham crackers or vegan cookies with your favorite gluten-free cookies or gluten-free graham-style crackers.
Many stores now carry excellent gluten-free options that create a crust with the same buttery texture and satisfying crunch.
You can also make a homemade crust using gluten-free oats, almond flour, or a combination of both.
Be sure to check labels on all packaged ingredients to confirm they are certified gluten-free if needed.
The result is a crust that pairs beautifully with the creamy filling while keeping the dessert just as delicious.
Mixed Berry Cheesecake Bars
Strawberries are wonderful on their own, but mixing in other berries can create a whole new flavor experience.
Try replacing part of the strawberries with raspberries, blueberries, blackberries, or a combination of all three.
Each berry brings its own unique sweetness and tartness to the dessert.
Raspberries add a bright, tangy flavor that balances the rich filling.
Blueberries contribute a mellow sweetness and a deep purple color.
Blackberries bring a slightly bold berry flavor that pairs especially well with the creamy cheesecake layer.
This variation is perfect when you have a variety of fresh berries on hand or want to make use of seasonal fruit.
Chocolate Strawberry Cheesecake Bars
Chocolate and strawberries are a classic pairing, and this variation brings those flavors together beautifully.
For a richer base, swap the regular crust for a chocolate cookie crust.
The deep cocoa flavor creates a delicious contrast to the sweet strawberries and creamy filling.
You can also drizzle melted dairy-free chocolate over the chilled bars before serving.
A light chocolate drizzle adds flavor, texture, and an elegant finishing touch without adding much extra work.
For an even more indulgent version, fold a few tablespoons of melted chocolate into part of the cheesecake filling and create a chocolate-strawberry swirl effect.
The combination of creamy cheesecake, juicy strawberries, and rich chocolate makes these bars feel extra special while still being easy to prepare.
Storage and Make-Ahead Tips
Refrigerator Storage
These vegan strawberry cheesecake bars store exceptionally well, which makes them a great dessert to prepare in advance.
Once the bars have fully set and been sliced, place them in an airtight container or cover the pan tightly with plastic wrap or a fitted lid.
Keeping them covered helps prevent the bars from absorbing odors from other foods in the refrigerator.
For the best flavor and texture, store the bars in the refrigerator at all times when they are not being served.
They will stay fresh for up to 5 days when properly stored.
In fact, many people find that the bars taste even better on the second day because the flavors have had more time to blend together.
If you’re serving them for a gathering, making them the night before can save time and reduce stress on the day of the event.
Having a ready-made dessert waiting in the refrigerator is always a welcome convenience.
Freezing Instructions
If you’d like to keep the bars for longer, freezing is an excellent option.
Allow the cheesecake bars to chill completely before freezing to ensure they hold their shape and texture.
You can freeze the entire slab or freeze individual slices for easy grab-and-go portions.
For individual servings, place the sliced bars on a baking sheet and freeze them until firm.
Once frozen, transfer them to a freezer-safe container or resealable freezer bag.
If stacking the bars, place a small piece of parchment paper between each layer to prevent sticking.
Properly stored, the bars can be frozen for up to 2 months.
When you’re ready to enjoy them, transfer the bars to the refrigerator and allow them to thaw overnight.
For a quicker option, let a slice sit at room temperature for about 20 to 30 minutes before serving.
Avoid using a microwave to thaw the bars, as it can soften the filling unevenly and affect the texture.
Once thawed, the bars should be creamy, smooth, and just as enjoyable as when they were first made.
Serving Suggestions
- With Fresh Strawberries – Add sliced fresh strawberries on top or alongside each bar for extra sweetness, color, and a burst of fresh berry flavor.
- Topped with Coconut Whipped Cream – A light dollop of coconut whipped cream adds a creamy finishing touch that pairs perfectly with the strawberry cheesecake filling.
- Paired with Coffee or Tea – Serve these bars with a hot cup of coffee or your favorite tea for a simple and satisfying dessert experience.
- As Part of a Dessert Platter – Arrange the bars alongside cookies, brownies, and fresh fruit to create an attractive dessert spread for parties and gatherings.
Make These Cheesecake Bars for Any Occasion
These vegan strawberry cheesecake bars are easy to customize for different events and celebrations.
A few simple presentation changes can help them feel right at home, no matter the occasion.
| Occasion | Suggested Presentation |
|---|---|
| Birthday Party | Top each bar with fresh strawberry slices and serve on a decorative dessert platter. |
| Summer Picnic | Keep the bars chilled in a cooler and serve directly from a cold tray for the best texture. |
| Holiday Dessert Table | Add a dollop of coconut whipped cream and a light sprinkle of lemon zest for an elegant finish. |
| Baby Shower | Cut the bars into bite-sized squares and arrange them on a tiered serving tray for easy sharing. |
Small presentation touches can make these cheesecake bars feel special while keeping the recipe just as simple and delicious.
Final Thoughts
These vegan strawberry cheesecake bars are creamy, fruity, easy to make, and perfect for sharing with family and friends.
With their smooth cheesecake filling, fresh strawberry flavor, and simple preparation, they’re a dessert you’ll want to make again and again.
Give this recipe a try and don’t be afraid to make it your own with different toppings or variations.
FAQs
Can I use frozen strawberries?
Yes, frozen strawberries work well in this recipe. Thaw and drain any excess liquid before using them to prevent the strawberry layer from becoming too watery.
Can I make these nut-free?
Yes. Use vegan cream cheese instead of cashews in the filling to create a nut-free version with a similarly creamy texture.
What can I substitute for coconut cream?
You can use a thick vegan cream cheese or a dairy-free heavy cream alternative, though the texture may vary slightly from the original recipe.
How do I prevent a grainy texture?
Soak the cashews properly and blend the filling until completely smooth. A high-speed blender will give the creamiest results.
Can I make this recipe ahead of time?
Absolutely. These cheesecake bars are perfect for making a day in advance, and they often taste even better after chilling overnight.
Vegan Strawberry Cheesecake Bars (Creamy, Easy & Dairy-Free)
Course: Vegan DessertsDifficulty: Easy12
Bars25
minutes10
minutes6
hours35
minutesThese vegan strawberry cheesecake bars feature a buttery cookie crust, a rich and creamy dairy-free cheesecake filling, and a fresh strawberry swirl for the perfect sweet treat.
Ingredients
- For the Crust
1½ cups crushed graham crackers or vegan cookies
6 tablespoons melted coconut oil or vegan butter
1 tablespoon maple syrup (optional)
- For the Filling
1½ cups raw cashews, soaked and drained
1 cup full-fat coconut cream
½ cup maple syrup
2 tablespoons lemon juice
1 teaspoon vanilla extract
- For the Strawberry Layer
2 cups fresh strawberries, chopped
2 tablespoons maple syrup
1 tablespoon cornstarch (optional)
1 tablespoon water (if using cornstarch)
Directions
- Mix the crust ingredients and firmly press into a parchment-lined 8×8-inch pan. Refrigerate while preparing the filling.
- Blend the filling ingredients until completely smooth and creamy.
- Cook the strawberries and maple syrup for 5–7 minutes. Stir in the cornstarch mixture if a thicker topping is desired.
- Pour the cheesecake filling over the crust and spread evenly.
- Spoon the strawberry mixture over the filling and gently swirl with a knife.
- Refrigerate for at least 6 hours or overnight until fully set.
- Slice into bars and serve with fresh strawberries or coconut whipped cream if desired.
Notes
- Soak cashews overnight for the smoothest filling.
- Use full-fat coconut cream for the best texture.
- Chill overnight for cleaner slices and a firmer cheesecake.
- Frozen strawberries can be used if thawed and drained first.
- Store leftovers in the refrigerator for up to 5 days or freeze for up to 2 months.

Hi, I’m Daisy Roots, the home cook and recipe developer behind this kitchen. I create simple, tested vegan recipes using everyday ingredients. Every dish is developed and cooked in my own kitchen, with clear steps to help you get reliable results every time. Thanks for stopping by — let’s cook something great!